CALIFORNIA
Proposition 65 Warning
 |
Safety decals and instructions are easily visible to the operator and are located near any area of potential danger. Replace any decal that is damaged or missing. |
Park the machine on a level surface.
Engage the parking brake.
Shut off the engine and remove the key from the key switch.

Parts needed for this procedure:
| Rear support tube | 1 |
| Left, rear support bracket | 1 |
| Right, rear support bracket | 1 |
| Bolt (5/16 x 2-3/4 inches) | 8 |
| Bolt (5/16 x 2 inches) | 2 |
| Bolt (5/16 x 1-3/4 inches) | 4 |
| Flat washer (5/16 inch) | 10 |
| Flange nut (5/16 inch) | 25 |
| Bolt (5/16 x 1 inch) | 10 |
| Right dash-support bracket | 1 |
| Carriage bolt (5/16 x 3/4 inch) | 2 |
| Flat washer (3/8 inch) | 2 |
| Bolt (3/8 x 1 inch)—machines with ROPS only | 2 |
| Clinch nuts—machines with ROPS only | 2 |
| Hex-socket button head screw (5/16 x 2 inches)—2016 and after models only | 1 |
| Spacer—2016 and after models only | 1 |
| Flat washer (11/32 inch)—2016 and after models only | 1 |
| Locknut (5/16 inch)—2016 and after models only | 1 |
If your machine is equipped with a rollover prtection system (ROPS), you do not need to install a rear support tube; proceed to step 4. If your machine is not equipped with a ROPS, proceed as follows to install the rear support tube:
Note: Machines with a ROPS does not use the parts described in the following sub-steps.
Loosely install the support brackets to the rear support tube using 4 bolts (5/16 x 2-3/4 inches), 4 bolts (5/16 x 1-3/4 inches), 4 flat washers (5/16 inch), and 8 flange nuts (5/16 inch) as shown in Figure 2.
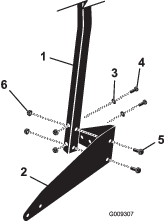
Loosely install the rear tube and support-bracket assemblies to the machine using 8 bolts (5/16 x 1 inch) and 8 flange nuts (5/16 inch) as shown in Figure 3.
Install the left, front support tube to the machine as shown in Figure 3.
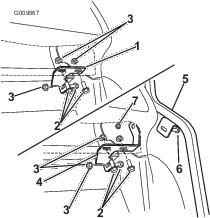
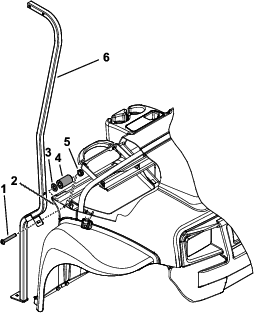
Locate the existing bracket mounted to the cross tube and under the right side of the dash, and remove the bracket under the dash (Figure 4).
Note: Retain the hardware.
For 2015 and Before Models only, assemble the new dash support bracket to the machine by performing the following procedure:
Install the dash bolt (5/16 x 1 inch) through the right, front support tube, dash, and dash bracket (Figure 4).
Loosely install the flange nut (5/16 inch) to secure the dash bracket and support tube to the machine (Figure 4).
Loosely install the remaining previously-removed hardware to secure the dash bracket to the cross tube and frame (Figure 4).
For 2016 and After Models only, secure the canopy support to the dash support as follows:
Install the spacer and flat washer (11/32 inch) between the dash and dash support (Figure 5).
Install the hex-socket button head screw (5/16 x 2 inches) through the canopy support, dash, and dash support (Figure 5).
Install the flange nut (5/16 inch) to secure the dash support to the canopy support (Figure 5).
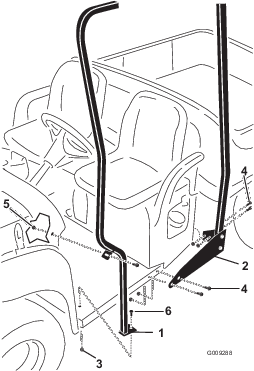
Remove the rear bolt and nut that secure the dash to the front frame support on the left side of the machine (Figure 3).
Note: Retain the rear bolt and nut.
Loosely install the front supports to the floor of the machine (Figure 3).
Important: On the left side, use the existing nut just removed and bolt (5/16 x 1 inch).On the right side, use a bolt (5/16 x 1 inch) and flange nut (5/16 inch) from loose parts. Secure the bottom of both tubes to the machine floor using the carriage bolts (5/16 x 3/4 inch) and flange nuts (5/16 inch).
Locate the canopy top in loose part. Locate and remove the assembled clinch nut, washer, and bolt securing the rear cross bar of the internal canopy frame to the canopy. Retain these parts for installing the canopy top to the rear support frames.
If your machine has a ROPS, mount the clinch nuts into the holes in the ROPS (Figure 8).
Lift the canopy onto the support frame, and loosely install the canopy to the front supports using 4 screws (5/16 x 2-3/4 inches), 4 flat washers (5/16 inch), and 4 flange nuts (5/16 inch) as shown in Figure 6.
Note: The canopy support is already loosely installed to the canopy (Figure 6).

Secure the canopy to the rear support frame as follows:
If your machine does not have a ROPS, secure the canopy to the rear support tube using 2 screws (5/16 x 2 inches), 2 washers (5/16 inch), and 2 flange nuts (5/16 inch) as shown in Figure 7.

If your machine does have a ROPS, secure the canopy to the ROPS frame using 2 bolts (3/8 x 1 inch) and 2 flat washers (3/8 inch) in the clinch nuts installed previously (Figure 8).

Starting at the bottom of the machine and working your way to the top, tighten all the fasteners.