CALIFORNIA
Proposition 65 Warning
Note: Determine the left and right sides of the machine from the normal operating position.
Park the machine on a level surface, engage the parking brake, and lower the hopper.
Shut off the engine and remove the key.
Disconnect the negative (-) cable from the battery.
Remove the fuel tank; refer to the Operator’s Manual for the machine.
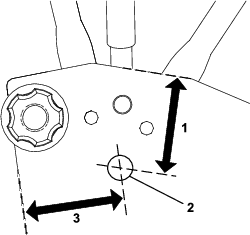
On both sides of the machine, drill a hole into the frame (0.828 inch diameter) in the location shown in Figure 1.
Parts needed for this procedure:
| Bracket | 2 |
| Carriage bolt (5/16 x 1 inch) | 4 |
| Nut (5/16 inch) | 4 |
| Switch | 1 |
| Wire harness | 1 |
| Light assembly | 2 |
| Friction washer | 2 |
| Grommet | 2 |
| Cable tie | 2 |
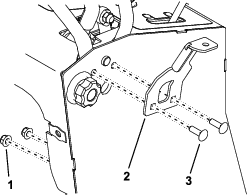
On both sides of the machine, install a bracket using 2 carriage bolts (5/16 x 1 inch) and 2 nuts (5/16 inch) as shown in Figure 2.
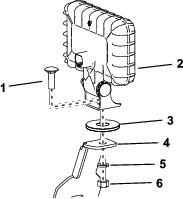
Remove the bolt, lock washer, and nut from a light assembly. Use the hardware and a friction washer to secure the light to a bracket (Figure 3). Do not overtighten the fasteners. Repeat for the other side of the machine.
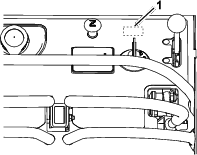
Remove and discard the knockout from the tower panel (Figure 4).
Note: The knockout is covered by the console decal.
From inside the machine, push the switch connector of the wire harness through the knockout hole and connect it to the switch (Figure 5).
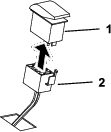
Install the switch in the knockout hole (Figure 5).
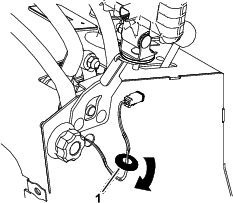
Push the right light connector through the hole you drilled on the right side of the machine. Slide a grommet over the connector, down the wire harness, and secure it in the hole (Figure 6). Repeat for the left wire harness connector on the left side of the machine.
Connect the light connectors to the lights.
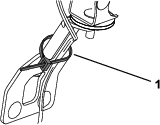
Secure the wire harness to each light bracket using a cable tie (Figure 7).
Connect the uncapped auxiliary power connector to the auxiliary power connector on the main wire harness of the machine.
Note: If you install another powered accessory to the machine, plug it into the capped auxiliary power connector.
Install the fuel tank and fuel-tank bracket; refer to the Operator’s Manual for the machine.
Raise the cushion.
Connect the negative (-) cable to the battery.
Start the engine.
Press the light switch and verify that the lights function.