


Maintenance
Note: Determine the left and right sides of the machine from the normal operating position.
Recommended Maintenance Schedule(s)
| Maintenance Service Interval | Maintenance Procedure |
|---|---|
| After the first 5 operating hours |
|
| Before each use or daily |
|
| Every 100 hours |
|
| Before storage |
|
| Yearly |
|
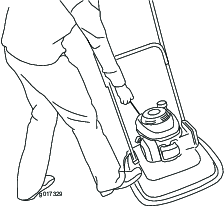
Preparing for Maintenance
Warning
Tipping the machine may cause the fuel to leak. Fuel is flammable, explosive and can cause personal injury.
Run the engine dry or remove the fuel with a hand pump; never siphon.
-
Shut off the engine and wait for all moving parts to stop.
-
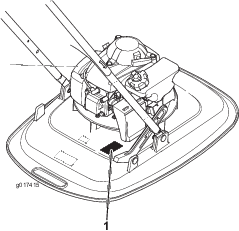
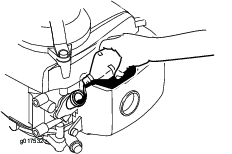
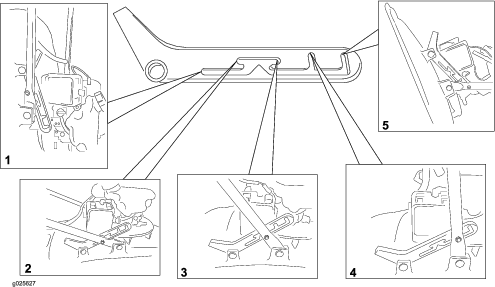
Disconnect the spark-plug wire from the spark plug (Figure 17) before performing any maintenance procedure.
-
After performing the maintenance procedure(s), connect the spark-plug wire to the spark plug.
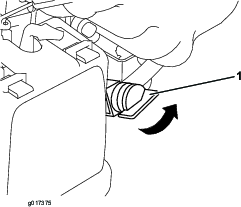
Important: Always tip the machine onto its side, with the dipstick down. If the machine is tipped in another direction, oil may fill the valve train, requiring at least 30 minutes to drain.
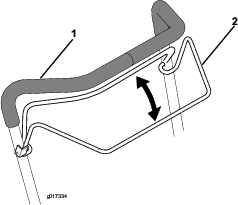
Replacing the Air Cleaner
-
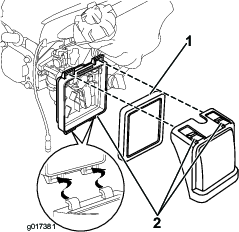
Press down on the latch tabs on top of the air-cleaner cover (Figure 18).
-
Open the cover (Figure 18).
-
Remove the filter (Figure 18).
-
Inspect the air filter.
-
If the filter is damaged or is wet with oil or fuel, replace it.
-
If the filter is dirty, tap it on a hard surface several times or blow compressed air less than 207 kPa (30 psi) through the side of the filter that faces the engine.
Note: Do not brush the dirt off the filter; brushing forces dirt into the fibers.
-
-
Remove dirt from the air cleaner body and cover using a moist rag. Do not wipe dirt into the air duct.
-
Insert the filter into the air cleaner (Figure 18).
-
Install the cover (Figure 18).
Changing the Engine Oil
-
Run the engine a few minutes before changing the oil to warm it.
Note: Warm oil flows better and carries more contaminants.
-
Ensure that the fuel tank contains little or no fuel so that the fuel does not leak when you tip the machine onto its side.
-
Disconnect the wire from the spark plug. Refer to Preparing for Maintenance.
-
Remove the dipstick.
-
Tip the machine onto its side, with the dipstick down, to drain the used oil out through the oil-fill hole.
-
Return the machine to the operating position.
-
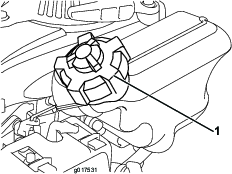
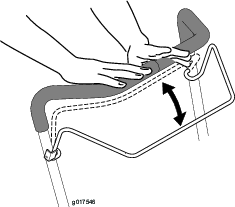
Slowly pour oil into the oil-fill hole, wait 3 minutes, and check the oil level on the dipstick by wiping the dipstick clean and then inserting, but not screwing in, the oil-fill cap into the hole.
Note: Max. fill: 0.59 L (20 fl oz), type: Multigrade Mineral 10W-30 oil with an API service classification of SF, SG, SH, SJ, SL, or higher.
Note: Fill the engine crankcase with oil until the dipstick indicates that the engine oil level is correct as shown in (Figure 19). If you overfill the engine with oil, remove the excess oil as directed in 5.
-
Install the dipstick and hand tighten it securely.
-
Dispose of the used oil properly at a local recycling center.
Servicing the Spark Plug
Use a Champion RN9YC spark plug or equivalent.
-
Shut off the engine and wait for all moving parts to stop.
-
Disconnect the wire from the spark plug.
-
Clean around the spark plug.
-
Remove the spark plug from the cylinder head.
Important: Replace a cracked, fouled, or dirty spark plug. Do not clean the electrodes because grit entering the cylinder can damage the engine.
-
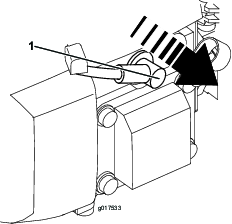
Set the gap on the plug to 0.76 mm (0.030 inch) as shown in Figure 20.

-
Install the spark plug and the gasket seal.
-
Torque the plug to 20 N-m (15 ft-lb).
-
Connect the wire to the spark plug.
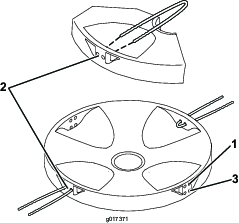
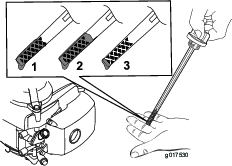
Replacing the Nylon Cutting String
-
Turn the fuel valve to the OFF position and close the vent knob.
-
Disconnect the wire from the spark plug.
-
Turn the machine on its side, with the dipstick facing down.
-
Wearing protective gloves, remove the nylon cutting line.
-
Place one length of nylon cutting line into the desired cutting height setting. Ensure that a second line of the same length is placed in the corresponding cutting height on the opposite side of the cutting disc.
Note: If using a spare reel, cut the line to a length of 200 mm (7-7/8 inches).
Close sectionCleaning the Machine
Warning
The machine may dislodge material from under the machine housing.
-
Wear eye protection.
-
Stay in the operating position (behind the handle).
-
Do not allow bystanders in the area.
-
Tip the machine on its side, with the dipstick down.
-
Use a brush or compressed air to remove grass and debris from the exhaust guard, the top cowl, and the surrounding deck areas.