 |
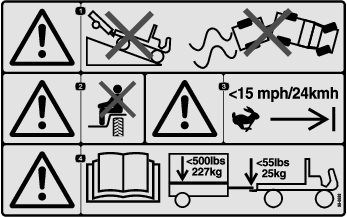
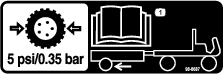
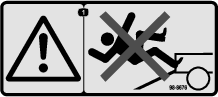
Safety decals and instructions are easily visible to the operator and are located near any area of potential danger. Replace any decal that is damaged or missing. |
Parts needed for this procedure:
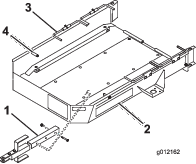
| Trailer bed | 1 |
| Tongue assembly | 1 |
| Axle hub | 2 |
| Wheel assembly | 2 |
| Trailer ramp | 1 |
| Bolt (3/8 x 2-3/4 inches) | 2 |
| Spacer | 2 |
| Nylon Locknuts (3/8 inch) | 2 |
| Carriage bolts (3/8 x 1 inches) | 8 |
| Locknuts (3/8 inch) | 8 |
| Lug nuts | 8 |
| Hinge rod | 1 |
| Cotter pins | 2 |
Mount the tongue assembly to the mounting bracket on the underside of the trailer bed with 2 bolts (3/8 x 2-3/4 inches), 2 spacers and 2 locknuts. For most applications, use the front set of mounting holes in the tongue and bracket (Figure 1).
Using the 4 carriage bolts and 4 locknuts, mount an axle to the bottom side of the mounting brackets on each side of the trailer bed. Position the axle, carriage bolts, and nuts as shown in Figure 2.
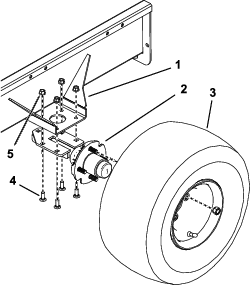
Mount a wheel assembly to each axle hub with 4 lug nuts (Figure 2). Tighten the nuts to 80 ft-lb (108.47 Nm). Inflate the tires to 5 psi (34 kPa).
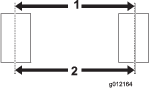
Note: To prevent premature wear of the tires, the wheels should have 0 to 3 (0 to 1/8 inch) toe-in when they are pointed straight ahead. To check the toe-in, scribe a line around the center of each tire. Measure the center-to-center distance (Figure 3), at the wheel hub height, in front and back of the tires. Adjust the axle mounting brackets so that the measurement at the front of the tire is within 3 mm (1/8 inch) less than the measurement at the back of the tire.
Important: Higher tire pressure may damage the machine.
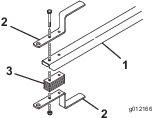
Mount the trailer ramp to the rear of the trailer bed with the hinge rod and 2 cotter pins (Figure 4).
Note: Apply a light coating of grease to the hinge rod prior to assembly.

Pivot the trailer ramp upward and hook the ramp latch into the hole in the top of the wheel guide (Figure 4).
Adjust the trailer tongue height until the trailer is parallel to the ground or until it fits the tow vehicle hitch. Move the spacers to the top or bottom of the tongue until you attain the desired location (Figure 5).
Unhook the ramp latch from the wheel guide and lower the ramp to ground.
Pivot the first set of wheel rods upward.
Remove the baskets from the machine, disengage the reel drive, and move the throttle to the slowest position. Slowly drive the machine onto the trailer until the transport wheels contact the trailer stops (Figure 1).
Shut off the engine and engage the parking brake.
Pivot the first set of wheel rods downward behind the transport wheels (Figure 1).
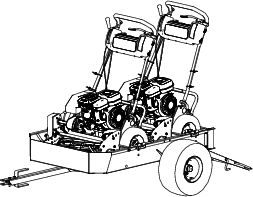
Repeat this procedure if you are hauling 2 machines.
Note: Use the first set of wheel rods as the stop for the second machine (Figure 6).
Pivot the trailer ramp upward and hook the ramp latch into the hole in the top of the wheel guide (Figure 4).
Store the baskets in the tow vehicle.
You can use the trailer for the Greensmaster 1000, 1010, 2000, Flex 21, 2100 and eFlex 2100 machines. You can also use it with the Greensmaster 800, Flex 18, 1800 and eFlex 1800 machines if they are equipped with the Transport Wheel Kit, (Model 04123). A Greensmaster 1600, 1610, or 2600 machine fits if you remove the transport axles from the machine and you remove the rails from the trailer bed. Towing other products may damage the axles and transmissions that continue to rotate when towed.
Use only a vehicle with the proper tow rating. The trailer and 2 greens mowing machines weigh approximately 800 lb. Ensure that the tow vehicle has adequate braking and handling capacity by checking the recommendations of the vehicle manufacturer.
Ensure that the trailer is properly connected to the tow vehicle before loading or unloading the machines to prevent the tongue from suddenly moving or flipping up.
The trailer adds extra towing weight to the vehicle. Drive the vehicle safely.
Do not drive the machine on highways or public roads.
Always slow the tow vehicle when approaching and while making a turn.
Always slow the tow vehicle when driving in unfamiliar areas or over rough terrain.
Always slow the tow vehicle when changing the direction of travel or preparing to stop.
Always slow the tow vehicle when turning or driving on slopes.
Do not make sudden or sharp turns. Do not suddenly change direction of travel on an incline, ramp, grade, slope, or similar surface.
Always adjust the tow vehicle speed to allow for existing ground conditions, such as wet slick surfaces, loose sand or gravel, and/or low-visibility conditions, such as dim or bright lighting, fog, mist, or rain.
Be especially careful when driving a heavily loaded vehicle down an incline or slope. Drive the vehicle up and down the face of the slopes, inclines, or grades whenever possible. Do not drive across the face of a slope if at all possible. There is a risk of upsetting the vehicle, which can result in serious injury or death.
Before backing up, look behind you and ensure that it is clear of people and objects. Back up slowly and watch the trailer movement closely.
Use extreme caution and slow speed when backing up the trailer and tow vehicle.
Watch out for traffic when near or crossing roads. Always yield the right of way to pedestrians and other vehicles.
If the trailer begins to vibrate abnormally, stop immediately. Shut off the tow vehicle engine. Repair all damage before towing.
Before servicing or making any adjustments to the trailer, do the following:
Stop the tow vehicle and engage the parking brake.
Shut off the tow vehicle engine and remove the key.
Keep all nuts, bolts, and other fasteners tightened securely. Replace any parts removed during servicing or when making adjustments.