


Maintenance
Recommended Maintenance Schedule(s)
| Maintenance Service Interval | Maintenance Procedure |
|---|---|
| After the first 25 operating hours |
|
| Before each use or daily |
|
| Every 50 hours |
|
| Every 100 hours |
|
| Every 200 hours |
|
| Every 300 hours |
|
| Yearly or before storage |
|
Pre-Maintenance Procedures
Disconnecting the Spark-Plug Wire
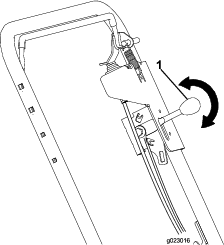
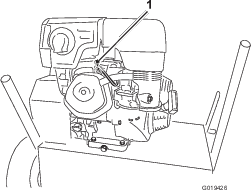
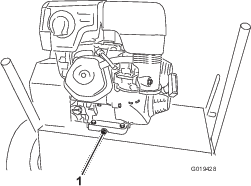
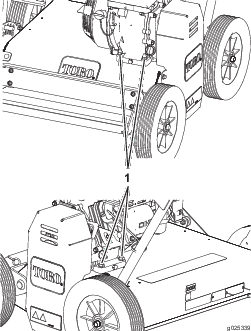
Before performing any maintenance on the engine, belts, or cutting blades, disconnect the spark-plug wire from the spark plug (Figure 12).
Engine Maintenance
Servicing the Air Cleaner
Important: Do not operate the engine without the air-filter assembly; extreme engine damage will occur.
-
Shut off the engine and wait for all moving parts to stop.
-
Disconnect the wire from the spark plug.
-
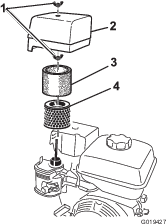
Remove the nut that secures the cover ().
-
Remove the cover.
Note: Be careful to prevent dirt and debris from falling into the base.
-
Remove the nut-restraining air-filter assembly.
-
Remove the foam and paper elements from the base ().
-
Remove the foam element from the paper element ().
-
Inspect the foam and paper elements, and replace them if they are damaged or excessively dirty.
-
If the paper element is excessively dirty, replace it.
Note: Never try to brush dirt off the paper element; brushing forces the dirt into the fibers.
-
Clean the foam element in warm, soapy water or in a nonflammable solvent.
-
Rinse and dry the foam element thoroughly.
-
Dip the foam element in clean engine oil, then squeeze out the excess oil.
Note: Excess oil in the foam element restricts the air flow through the element and may reach the paper filter and clog it.
-
Wipe dirt from the base and the cover with a moist rag.
Note: Be careful to prevent dirt and debris from entering the air duct leading to the carburetor.
-
Install the air-cleaner elements and ensure that they are properly positioned.
-
Securely install the cover with the nut.
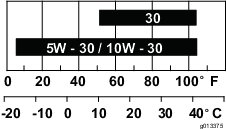
Servicing the Engine Oil
Oil Type: Detergent oil (API service SJ or higher)
Crankcase Capacity: 1.1 L (37 oz)
Viscosity: See the table below (Figure 14).
Changing the Engine Oil
Warning
Oil may be hot after the engine has been run, and contact with hot oil can cause severe personal injury.
Avoid contacting the hot engine oil when you drain it.
-
Shut off the engine by releasing the operator-presence bail, disengage the flail blades, and wait for all moving parts to stop.
-
Disconnect the wire from the spark plug.
-
Raise the front wheels a few inches off the ground and place a pan under the drain plug to catch the oil.
-
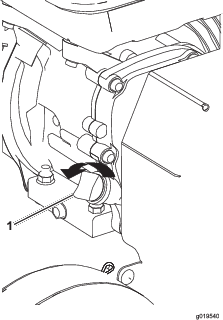
Remove the drain plug (Figure 15).
-
When the oil has drained completely, lower the front wheels to the ground, replace the drain plug, and torque to 18 N∙m (13 ft-lb).
Note: Dispose of the used oil at a certified recycling center.
-
Remove the dipstick and slowly pour oil into the filler hole until the oil level reaches the middle of the dipstick (Figure 10).
-
Replace and secure the dipstick.
-
Wipe up any spilled oil.
-
Connect the wire to the spark plug.
Cleaning the Sediment Cup
Danger
In certain conditions, fuel is extremely flammable and highly explosive. A fire or explosion from fuel can burn you and others and can damage property.
-
Shut off the engine and keep heat, sparks, and flame away.
-
Handle fuel only outdoors.
-
Wipe up spills immediately.
-
Do not smoke while handling fuel.
-
Shut off the engine and wait for all moving parts to stop.
-
Disconnect the wire from the spark plug.
-
Move the fuel-shutoff valve to the OFF position.
-
Remove the sediment cup and O-ring (Figure 16).
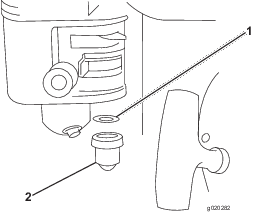
-
Wash the sediment cup in a non-flammable solvent and dry it thoroughly.
-
Place the O-ring in the fuel valve and install the sediment cup, tightening it securely.
-
Move the fuel-shutoff lever to the ON position.
Note: If any fuel leaks, repeat this procedure and replace the O-ring.
Servicing the Spark Plug
Use an NGK BPR6ES spark plug or equivalent.
-
Shut off the engine and wait for all moving parts to stop.
-
Disconnect the wire from the spark plug.
-
Clean around the spark plug.
-
Remove the spark plug from the cylinder head.
Important: Replace a cracked, fouled, or dirty spark plug. Do not clean the electrodes because grit entering the cylinder can damage the engine.
-
Set the gap on the plug to 0.76 mm (0.03 inch) as shown in .

-
Carefully install the spark plug by hand (to avoid cross threading) until it is hand tight.
-
Tighten the spark plug an additional 1/2 turn if it is new; otherwise, tighten it an additional 1/8 to 1/4 turn.
Important: A loose spark plug can become very hot and can damage the engine; overtightening a spark plug may damage the threads in the cylinder head.
-
Connect the wire to the spark plug.
Belt Maintenance
Checking the Belt Tension
-
Stop the machine on a level surface, shut off the engine, disconnect the spark-plug wire, and raise the flail blades to the highest position.
-
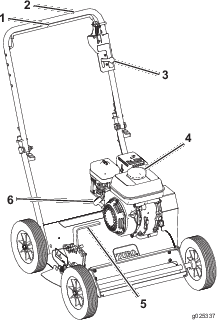
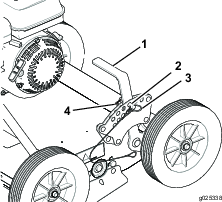
Remove the belt cover from the left side of the machine (Figure 18).
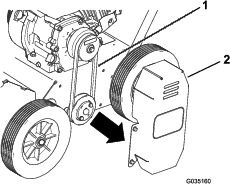
-
Check the tension of the belt (Figure 18).
Note: The belt should not flex more than a 12 mm (1/2 inch) with moderate finger pressure applied to the span just above the machine frame.
-
If the belt tension is loose, refer to Adjusting the Belt Tension.
-
Install the belt cover before operating the machine.
Adjusting the Belt Tension
-
Stop the machine on a level surface and shut off the engine by releasing the operator-presence bail.
-
To tighten the belt, loosen the 4 mounting nuts securing the engine to the frame.
-
Move the engine to tighten the belt to the proper tension.
-
Secure the 4 mounting nuts and bolts.
Note: Torque the bolts that secure the engine to the frame to 271 N∙m (200 in-lb).
Inspecting the Flail Blades
When the flail blades are worn down and are no longer functioning properly, refer to Replacing the Flail Blades.
Important: Perform this procedure when the fuel tank is empty or nearly empty. Tip the machine forward to keep air filter up.
Close sectionReplacing the Flail Blades
When the flail blades are worn down and no longer functioning properly, replace them as follows:
Important: Preform this procedure when the fuel tank is empty or nearly empty.
-
Stop the machine on a level surface and shut off the engine by releasing the operator-presence bail.
-
Lower the flail blades to the lowest position.
-
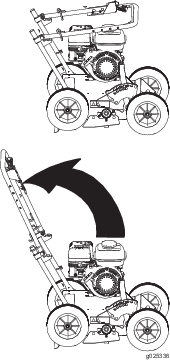
Tilt the machine forward onto its nose, and rest it on a block of wood.
Note: It will take 2 people to tip the machine forward safely.
-
Spin the flail-blade assembly.
Note: It should spin freely. If it makes a grinding noise and is halting, the bearings are worn; replace them when you replace the blades.
-
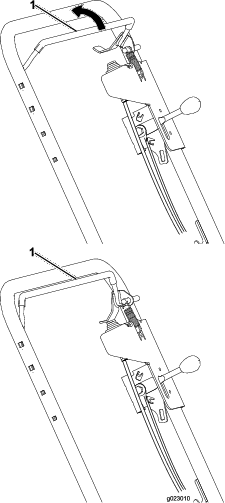
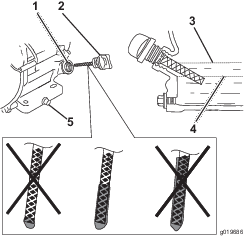
Remove the cotter pin from the rod with the worn down flail (Figure 20).
-
Carefully pull out the rod to release the flails and spacers (Figure 20).
-
Replace worn down flails with new ones and discard the old flails.
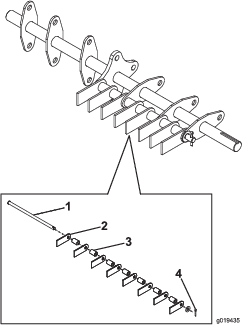
-
Carefully add flails and spacers to rod in the same order as they were removed.
Important: Align the rod with the formed head toward the center of the machine.
-
Add the cotter pin to lock the rod, flails, and spacers into place.