CALIFORNIA
Proposition 65 Warning
Park the machine on a level surface.
Disengage the PTO, engage the parking brake, and move the motion-control levers outward to the NEUTRAL-LOCK position.
Shut off the engine and remove the key.
Parts needed for this procedure:
| Filler plate (Timecutters with 60-inch decks only) | 1 |
Remove the mower deck from the machine; refer to the Operator’s Manual for the machine.
Turn the mower deck upside-down.
Remove the existing mower blades; refer to the Operator’s Manual for the machine.
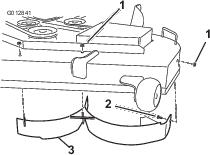
Remove the 2 bolts and 2 nuts securing the cutoff baffle to the deck and remove the cutoff baffle (Figure 1).
Note: Retain the baffle for converting back to side discharge.
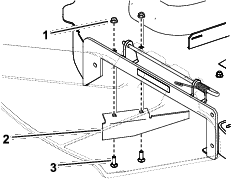
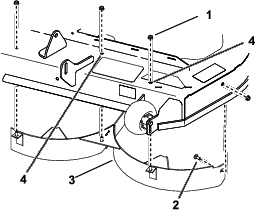
For standard Timecutters (non-HD) with 60-inch decks, use the fasteners to install the filler plate (Figure 2).
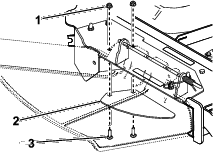
For all other machines, install the fasteners in the same holes from which they were originally removed (Figure 1).
Open holes in the mower deck expose you and others to thrown debris. Debris thrown out of holes in the mower deck can cause injury.
Never operate the machine without hardware mounted in all holes in the mower deck.
Install hardware in mounting holes when the baffle is removed.
Parts needed for this procedure:
| Right baffle | 1 |
| Baffle guard | 1 |
| Carriage bolt (5/16 x 3/4 inch)—48-inch and 60-inch decks only | 2 |
| Carriage bolt (5/16 x 3/4 inch)—54-inch decks only | 4 |
| Nut (5/16 inch)—48-inch decks only | 5 |
| Nut (5/16 inch)—54-inch and 60-inch decks only | 6 |
| Bolt (5/16 x 3/4 inch)—48-inch decks only | 1 |
| Bolt (5/16 x 1-1/4 inches)—60-inch decks only | 1 |
| Spacer (60-inch decks only) | 1 |
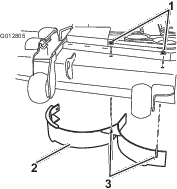
Install the right baffle using 2 nuts (5/16 inch) as shown in Figure 3. Tighten the fasteners by hand.
Install the baffle guard using 1 bolt (5/16 x 3/4 inch), 1 carriage bolt (5/16 x 3/4 inch), and 2 nuts (5/16 inch) as shown in Figure 4. Tighten the fasteners by hand.
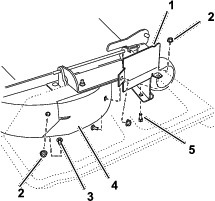
Secure the rear wall of the right baffle to the mower deck using 1 carriage bolt (5/16 x 3/4 inch) and nut (5/16 inch) as shown in Figure 4.
Tighten all fasteners.
Remove the nuts and bolts from the location shown in Figure 5.
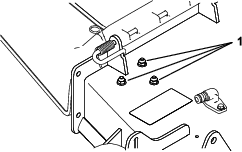
Install the right baffle using 1 carriage bolt (5/16 x 3/4 inch) and 3 nuts (5/16 inch) as shown in Figure 6. Tighten the fasteners by hand.
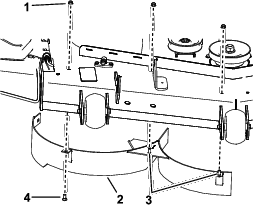
Install the baffle guard using 2 carriage bolts (5/16 x 3/4 inch) and 2 nuts (5/16 inch) as shown in Figure 7. Tighten the fasteners by hand.
Secure the rear wall of the right baffle to the mower deck using 1 carriage bolt (5/16 x 3/4 inch) and nut (5/16 inch) as shown in Figure 7.
Tighten all fasteners.
Remove the nut and bolt from the location shown in Figure 8 or Figure 9.
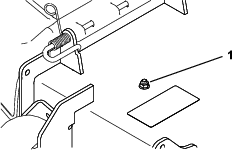
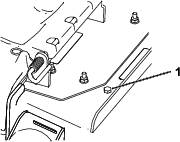
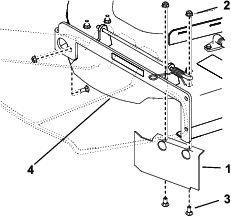
Install the right baffle using 3 nuts (5/16 inch) as shown in Figure 10. Tighten the fasteners by hand.
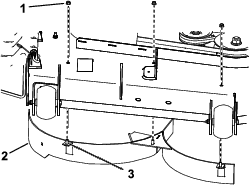
For TimeCutter HD machines, install the baffle guard using 1 carriage bolt (5/16 x 3/4 inch), 1 spacer, and 2 nuts (5/16 inch) as shown in Figure 11.
For standard TimeCutter (non-HD) machines, install the baffle guard using 1 carriage bolt (5/16 x 1-1/4 inch) and 2 nuts (5/16 inch).
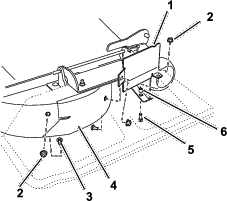
Secure the rear wall of the right baffle to the mower deck using 1 carriage bolt (5/16 x 3/4 inch) and nut (5/16 inch) as shown in Figure 11.
Tighten the fasteners by hand.
Parts needed for this procedure:
| Kicker baffle | 2 |
| Hex-washer-head bolt (5/16 x 3/4 inch) | 4 |
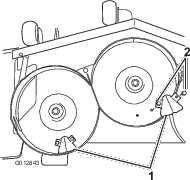
Install the kicker baffles to the underside of the deck using 4 hex-washer-head bolts (5/16 x 3/4 inch) at the locations shown in Figure 12.
Parts needed for this procedure:
| Left baffle | 1 |
| Carriage bolt (5/16 x 3/4 inch)—48-inch decks only | 1 |
| Nut (5/16 inch)—48-inch decks only | 3 |
| Carriage bolt (5/16 x 3/4 inch)—54-inch and 60-inch decks only | 1 |
| Nut (5/16 inch)—54-inch and 60-inch decks only | 4 |
Install the left baffle as follows:
For 48-inch decks, install the left baffle using 3 nuts (5/16 inch) and 1 carriage bolt (5/16 x 3/4 inch) as shown in Figure 13.
For 54-inch and 60-inch decks, remove the existing hardware from the holes shown in Figure 14, and install the left baffle using 4 nuts (5/16 inch) and 1 carriage bolt (5/16 x 3/4 inch).
Tighten all fasteners.
Parts needed for this procedure:
| Decal | 1 |
| Mulching blade | 3 |
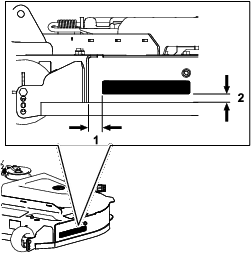
Install the decal to the mower deck in the location shown in Figure 15.
Install the mulching blades; refer to the Operator’s Manual for the machine.
Install the mower deck on the machine; refer to the Operator’s Manual for the machine.
For best mowing and maximum air circulation, operate the engine at the FAST position. Air is required to thoroughly cut grass clippings, so do not set the height of cut so low as to totally surround the mower in uncut grass. Always try to have 1 side of the mower free from uncut grass, which allows air to be drawn into the mower.
Close sectionCut grass slightly longer than normal to ensure that the cutting height of the mower does not scalp any uneven ground. However, the cutting height used in the past is generally the best one to use. When cutting grass longer than 15 cm (6 inches) tall, cut the lawn twice to ensure an acceptable quality of cut.
Close sectionCut only about a third of the grass blade. Cutting more than that is not recommended unless grass is sparse, or it is late fall when grass grows more slowly.
Close sectionAlternate the mowing direction to keep the grass standing straight. This also helps disperse clippings which enhances decomposition and fertilization.
Close sectionGrass grows at different rates at different times of the year. To maintain the same cutting height, mow more often in early spring. As the grass growth rate slows in mid summer, mow less frequently. If you cannot mow for an extended period, first mow at a high cutting height, then mow again 2 days later at a lower height setting.
Close sectionTo improve cut quality, use a slower ground speed in certain conditions.
Close sectionWhen mowing uneven turf, raise the cutting height to avoid scalping the turf.
Close sectionIf you must stop the forward motion of the machine while mowing, a clump of grass clippings may drop onto your lawn. To avoid this, move onto a previously cut area with the blades engaged or you can disengage the mower deck while moving forward.
Close sectionClean clippings and dirt from the underside of the mower after each use. If grass and dirt build up inside the mower, cutting quality will eventually become unsatisfactory.
Close sectionMaintain a sharp blade throughout the cutting season because a sharp blade cuts cleanly without tearing or shredding the grass blades. Tearing and shredding turns grass brown at the edges, which slows growth and increases the chance of disease. Check the mower blades after each use for sharpness, and for any wear or damage. File down any nicks and sharpen the blades as necessary. If a blade is damaged or worn, replace it immediately with a genuine Toro replacement blade.
Close section