CALIFORNIA
Proposition 65 Warning
Park the machine on a level surface.
Engage the parking brake.
Shut off the engine and remove the key.
Disconnect the battery; refer to your machine Operator’s Manual.
Hydraulic fluid escaping under pressure can penetrate skin and cause injury.
Make sure that all hydraulic fluid hoses and lines are in good condition and all hydraulic connections and fittings are tight before applying pressure to the hydraulic system.
Keep your body and hands away from pinhole leaks or nozzles that eject high-pressure hydraulic fluid.
Use cardboard or paper to find hydraulic leaks.
Safely relieve all pressure in the hydraulic system before performing any work on the hydraulic system.
Seek immediate medical attention if fluid is injected into skin.
Important: Plug any hydraulic lines that are disconnected in this procedure to avoid hydraulic fluid contamination.
Note: Keep any removed parts for later installation.
Refer to Figure 3 for this procedure.
Place a clean container large enough to collect at least 2 gallons (7.6 L) under the pump assembly to collect drained hydraulic fluid.
Clamp the pump inlet hose and remove the hose clamp securing it to the pump assembly (Figure 1).
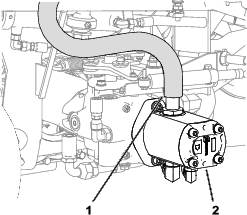
Remove the clamped hose from the pump assembly, and remove the clamp to drain about 2 gallons (7.6 L) into the container placed in step 1.
Clamp the pump inlet hose to prevent additional drainage.
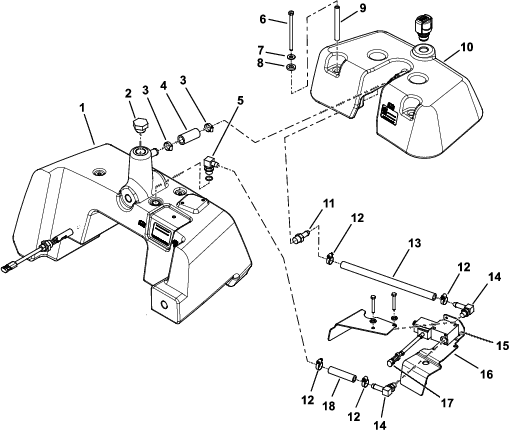
Remove the 4 cap screws, flat washers, neoprene washers, and spacers that secure the leak detector tank to the hydraulic tank.
Thoroughly clean the overflow-hose junction and the hydraulic-leak-detector tank barb. Loosen the hose clamp and disconnect the overflow hose from the leak detector tank barb.
Lift the leak detector tank slightly and remove the hose clamp securing the valve hose to the straight barb fitting on the underside of the existing leak detector tank.
Unthread the straight barb fitting from the underside of the existing leak detector tank.
For machines with a carbon canister attached to the leak detector tank:
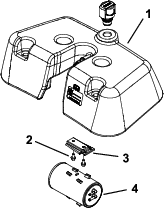
Slide the carbon canister out of the canister bracket beneath the leak detector tank.
Remove the 2 mounting screws from the canister bracket (Figure 2) and remove the canister bracket from the tank.
Remove the leak-detector-tank assembly from the machine.
For machines with a carbon canister attached to the leak detector tank:
Install the canister bracket (Figure 2) to the tank with the 2 mounting screws.
Slide the carbon canister into the canister bracket beneath the leak detector tank.
Lubricate and place a new O-ring on the straight barb fitting removed in step 8.
Install the straight barb fitting into the underside of the kit leak detector tank; tighten it to 23 to 28 Nm (17 to 21 ft-lb).
Connect the valve hose to the straight barb fitting and secure it with a hose clamp.
Connect the overflow hose to the leak-detector-tank barb and secure it with a hose clamp.
Apply anti-seize lubricant to the end threads of the 4 cap screws that are used to secure the leak detector tank to the hydraulic tank.
Important: Do not overtighten the cap screws when you secure the leak detector tank to the hydraulic tank. The threads in the tank may become damaged.
Secure the leak detector tank to the hydraulic tank with 4 cap screws, spacers, neoprene washers, and flat washers.
Torque the cap screws to 3 to 6 N∙m (30 to 50 in-lb).
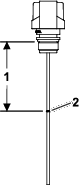
Trim the dipstick to the marked trim line at 9.5 cm (3-3/4 inches) as shown in Figure 4, then install the dipstick into the leak-detector-tank opening.
Fill the hydraulic tank with the drained hydraulic fluid; refer to your machine Operator’s Manual.
Ensure that the leak detector system is operating; refer to your machine Operator’s Manual
Connect the battery; refer to your machine Operator’s Manual.