Introduction

This rotary-blade, walk-behind lawn mower is intended to be used by residential homeowners. It is designed primarily for cutting grass on well-maintained lawns on residential properties. It is not designed for cutting brush or for agricultural uses.

Read this information carefully to learn how to operate and maintain your product properly and to avoid injury and product damage. You are responsible for operating the product properly and safely.

You may contact Toro directly at www.Toro.com for product and accessory information, help finding a dealer, or to register your product.

Whenever you need service, genuine Toro parts, or additional information, contact an Authorized Service Dealer or Toro Customer Service and have the model and serial numbers of your product ready. Figure 1 identifies the location of the model and serial numbers on the product. Write the product model and serial numbers in the space provided.

g017490

This manual identifies potential hazards and has safety messages identified by the safety-alert symbol (Figure 2), which signals a hazard that may cause serious injury or death if you do not follow the recommended precautions.

g000502

This manual uses 2 words to highlight information. Important calls attention to special mechanical information and Note emphasizes general information worthy of special attention.

Warning

CALIFORNIA

Proposition 65 Warning

This product contains a chemical or chemicals known to the State of California to cause cancer, birth defects, or reproductive harm.

The engine exhaust from this product contains chemicals known to the State of California to cause cancer, birth defects, or other reproductive harm.

Important: This engine is not equipped with a spark arrester muffler. It is a violation of California Public Resource Code Section 4442 to use or operate the engine on any forest-covered, brush-covered, or grass-covered land. Other states or federal areas may have similar laws.

This spark ignition system complies with Canadian ICES-002.

The enclosed Engine Owner's Manual is supplied for information regarding the US Environmental Protection Agency (EPA) and the California Emission Control Regulation of emission systems, maintenance, and warranty. Replacements may be ordered through the engine manufacturer.

Net Torque: The gross or net torque of this engine was laboratory rated by the engine manufacturer in accordance with the Society of Automotive Engineers (SAE) J1940. As configured to meet safety, emission, and operating requirements, the actual engine torque on this class of mower will be significantly lower. Go to www.Toro.com to view specifications on your mower model.

Close section

Safety

This lawn mower meets or exceeds the CPSC blade safety requirements for walk-behind rotary lawn mowers at the time of production.

Read and understand the contents of this manual before you start the engine.

The safety alert symbol (Figure 2) is used to alert you to potential personal injury hazards. Obey all safety messages that follow this symbol to avoid possible injury or death. Improperly using or maintaining this mower could result in injury or death. To reduce this potential, comply with the following safety instructions.

The following instructions have been adapted from the ANSI/OPEI standard B71.1-2012.

This cutting machine can amputate hands and feet and throw objects. Failure to observe the following safety instructions could result in serious injury or death.

General Operation

  • Read, understand, and follow all instructions on the machine and in the manual(s) before starting the engine.

  • Do not put hands or feet near or under the machine. Keep clear of the discharge opening at all times.

  • Only allow responsible adults who are familiar with the instructions to operate this machine.

  • Clear the area of objects such as rocks, wire, toys, etc., which could be thrown by the blade. Stay behind the handle when the engine is running.

  • Be sure the area is clear of bystanders before operating. Stop machine if anyone enters the area.

  • Do not operate the machine barefooted or while wearing sandals. Always wear substantial footwear.

  • Do not pull the machine backward unless it is absolutely necessary. Always look down and behind before and while moving backward with the machine.

  • Never direct discharged material toward anyone. Avoid discharging material against a wall or obstruction. Material may ricochet back toward you or bystanders. Stop the blade when crossing gravel surfaces.

  • Do not operate the machine without the entire grass catcher, discharge guard, rear guard, or other safety protective devices in place and working.

  • Never leave a running machine unattended.

  • Stop the engine and wait until the blade comes to a complete stop before cleaning the machine, removing grass catcher, or unclogging the discharge guard.

  • Operate the machine only in daylight or good artificial light.

  • Do not operate the machine while under the influence of alcohol or drugs.

  • Never operate the machine in wet grass. Always be sure of your footing; walk; never run.

  • Disengage the drive system, if so equipped, before starting the engine.

  • If the machine should start to vibrate abnormally, stop the engine and check for the cause immediately. Vibration is generally a warning of trouble.

  • Always wear eye protection when operating the machine.

  • See the manufacturer's instructions for proper operation and installation of accessories. Use only accessories approved by the manufacturer.

Close section

Slope Operation

Slopes are a major factor related to slip and fall accidents, which can result in severe injury. Operation on all slopes requires extra caution. If you feel uneasy on a slope, do not mow it.

  • Mow across the face of slopes; never up and down. Exercise extreme caution when changing direction on slopes.

  • Watch for holes, ruts, bumps, rocks, or other hidden objects. Uneven terrain could cause a slip-and-fall accident. Tall grass can hide obstacles.

  • Do not mow on wet grass or excessively steep slopes. Poor footing could cause a slip-and-fall accident.

  • Do not mow near drop-offs, ditches, or embankments. You could lose your footing or balance.

Close section

Children

Tragic accidents can occur if the operator is not alert to the presence of children. Children are often attracted to the machine and the mowing activity. Never assume that children will remain where you last saw them.

  • Keep children out of the mowing area and under the watchful care of a responsible adult other than the operator.

  • Be alert and turn the machine off if a child enters the area.

  • Never allow children to operate the machine.

  • Use extra care when approaching blind corners, shrubs, trees, or other objects that may block your view of a child.

Close section

Service

Safe Handling of Gasoline

To avoid personal injury or property damage, use extreme care in handling gasoline. Gasoline is extremely flammable and the vapors are explosive.

  • Extinguish all cigarettes, cigars, pipes, and other sources of ignition.

  • Use only an approved gasoline container.

  • Never remove the fuel cap or add fuel with the engine running. Allow the engine to cool before refueling.

  • Never refuel the machine indoors.

  • Never store the machine or fuel container where there is an open flame, spark, or pilot light, such as on a water heater or on other appliances.

  • Never fill containers inside a vehicle or on a truck or trailer bed with a plastic liner. Always place containers on the ground, away from your vehicle before filling.

  • Remove gas-powered equipment from the truck or trailer and refuel it on the ground. If this is not possible, then refuel such equipment with a portable container rather than from a gasoline dispenser nozzle.

  • Keep the nozzle in contact with the rim of the fuel tank or container opening at all times until fueling is complete. Do not use a nozzle lock-open device.

  • If fuel is spilled on clothing, change clothing immediately.

  • Never overfill the fuel tank. Replace the fuel cap and tighten it securely.

Warning

Exhaust contains carbon monoxide, an odorless, deadly poison that can kill you.

Do not run the engine indoors or in an enclosed area.

Close section

General Service

  • Never operate the machine in a closed area.

  • Keep all nuts and bolts tight to be sure that the equipment is in safe working condition.

  • Never tamper with safety devices. Check their proper operation regularly.

  • Keep machine free of grass, leaves, or other debris build-up. Clean up oil or fuel spillage and remove any fuel-soaked debris. Allow the machine to cool before storing it.

  • If you strike a foreign object, stop and inspect the machine. Repair the machine, if necessary, before starting it.

  • Never make any adjustments or repairs with the engine running. Disconnect the spark-plug wire and ground against the engine to prevent it from unintentionally starting.

  • Check the grass catcher components and the discharge guard frequently and replace them with the manufacturer's recommended parts when necessary.

  • Mower blades are sharp. Wrap the blade or wear gloves, and use extra caution when servicing them.

  • Do not change the engine governor setting or overspeed the engine.

  • Maintain or replace safety and instruction labels as necessary.

  • To best protect your investment and maintain optimal performance of your Toro equipment, count on Toro genuine parts. When it comes to reliability, Toro delivers replacement parts designed to the exact engineering specifications of our equipment. For peace of mind, insist on Toro genuine parts.

Close section
Close section

Safety and Instructional Decals

Important: Safety and instruction decals are located near areas of potential danger. Replace damaged decals.

decaloemmarkt
decal94-8072
decal112-8867
decal115-8411
decal131-0894
decal131-4514b
Close section
Close section

Setup

Assembling and Unfolding the Handle

Warning

Assembling and unfolding the handle improperly can damage the cables, causing an unsafe operating condition.

  • Do not damage the cables when assembling and unfolding the handle.

  • Ensure that the cables are routed to the outside of the handle.

  • If a cable is damaged, contact an Authorized Service Dealer.

  1. Raise the rear of the machine housing to its highest cutting-height setting by moving the 2 rear cutting-height levers all the way forward. Refer to Adjusting the Cutting Height.

  2. Attach the handle ends to the machine housing with 2 washers and 2 handle bolts (Figure 3), but do not tighten the handle bolts.

    g017457

    Important: Route the cables to the outside of the handle (Figure 3).

  3. Rotate the handle rearward (Figure 4).

    g017479
  4. Lock the handle at your desired height. Refer to Adjusting the Handle Height.

  5. Torque the handle bolts to 14 to 17 N-m (120 to 160 in-lb).

  6. Adjust the cutting height. Refer to Adjusting the Cutting Height.

Close section

Installing the Recoil-Starter Rope

Important: To start the engine safely and easily whenever you use the machine, install the recoil-starter rope in the rope guide.

Hold the blade-control bar to the upper handle and pull the recoil-starter rope through the rope guide on the handle (Figure 5).

g003251
Close section

Filling the Engine with Oil

Important: Your machine does not come with oil in the engine. Before starting the engine, fill the engine with oil.

  1. Move the machine to a level surface.

  2. Remove the dipstick (Figure 6) and pour about 3/4 of the crankcase capacity of oil into the oil-fill tube.

    Note: Max. fill: 0.55 L (18.6 oz), type: SAE 30 detergent oil with an API service classification of SF, SG, SH, SJ, SL, or higher.

    g017491
  3. Wipe off the dipstick end with a clean cloth.

  4. Insert the dipstick into the oil-fill tube.

  5. Remove the dipstick and read the oil level on the dipstick (Figure 6).

    • If the oil level is too low, add a small amount of oil slowly to the oil-fill tube, and then repeat steps 3 through 5 until the oil level on the dipstick is correct.

    • If the oil level is too high, drain the excess oil until the oil level on the dipstick is correct. To drain the excess oil, refer to Changing the Engine Oil.

      Important: If the oil level in the crankcase is too low or too high and you run the engine, you may damage the engine.

  6. Install the dipstick securely.

    Important: Change the engine oil after the first 5 operating hours; change it yearly thereafter. Refer to Changing the Engine Oil.

Close section

Assembling the Grass Bag

  1. Slip the grass bag over the frame as shown in Figure 7.

    g027257

    Note: Do not slip the bag over the handle (Figure 7).

  2. Hook the bottom channel of the bag onto the bottom of the frame (Figure 8).

    g027258
  3. Hook the top and side channels of the bag onto the top and sides of the frame, respectively (Figure 8).

Close section
Close section

Product Overview

g027628
g007407
Close section

Operation

Filling the Fuel Tank

Danger

Gasoline is extremely flammable and explosive. A fire or explosion from gasoline can burn you and others.

  • To prevent a static charge from igniting the gasoline, place the container and/or machine directly on the ground before filling, not in a vehicle or on an object.

  • Fill the tank outdoors when the engine is cold. Wipe up spills.

  • Do not handle gasoline when smoking or around an open flame or sparks.

  • Store gasoline in an approved fuel container, out of the reach of children.

  • For best results, use only clean, fresh (less than 30 days old), unleaded gasoline with an octane rating of 87 or higher ((R+M)/2 rating method).

  • Oxygenated fuel with up to 10% ethanol or 15% MTBE by volume is acceptable.

  • Ethanol: Gasoline with up to 10% ethanol (gasohol) or 15% MTBE (methyl tertiary butyl ether) by volume is acceptable. Ethanol and MTBE are not the same. Gasoline with 15% ethanol (E15) by volume is not approved for use. Never use gasoline that contains more than 10% ethanol by volume, such as E15 (contains 15% ethanol), E20 (contains 20% ethanol), or E85 (contains up to 85% ethanol). Using unapproved gasoline may cause performance problems and/or engine damage which may not be covered under warranty.

  • Do not use gasoline containing methanol.

  • Do not store fuel either in the fuel tank or in fuel containers over the winter unless a fuel stabilizer is used.

  • Do not add oil to gasoline.

Fill the fuel tank with fresh unleaded regular gasoline from a major name-brand service station (Figure 11).

Important: To reduce starting problems, add fuel stabilizer to the fuel all season, mixing it with gasoline less than 30 days old.

g027629
Close section

Checking the Engine-Oil Level

Max. fill: 0.55 L (18.6 oz), type: SAE 30 or SAE 10W-30 detergent oil with an API service classification of SF, SG, SH, SJ, SL, or higher.

  1. Move the machine to a level surface.

  2. Remove the dipstick (Figure 12).

    g017491
  3. Wipe off the dipstick end with a clean cloth.

  4. Insert the dipstick into the oil-fill tube, but do not screw it in.

  5. Remove the dipstick and read the oil level; refer to Figure 12.

    • If the oil level is too low, add a small amount of oil slowly to the oil-fill tube, and then repeat steps 3 through 5 until the oil level on the dipstick is correct.

    • If the oil level is too high, drain the excess oil until the oil level on the dipstick is correct. To drain the excess oil, refer to Changing the Engine Oil.

      Important: If the oil level in the crankcase is too low or too high and you run the engine, you may damage the engine.

  6. Install the dipstick securely.

Close section

Adjusting the Cutting Height

Warning

Adjusting the cutting height may bring you into contact with the moving blade, causing serious injury.

  • Stop the engine and wait for all moving parts to stop.

  • Do not put your fingers under the housing when adjusting the cutting height.

Caution

If the engine has been running, the muffler will be hot and can severely burn you. Keep away from the hot muffler.

Adjust the cutting height as desired. Set all 4 wheels to the same height.

Note: To raise the machine, move all 4 cutting height levers forward; to lower the machine, move them all rearward (Figure 13).

g189041
Close section

Adjusting the Handle Height

You may raise or lower the handle to a position comfortable for you.

Rotate the handle lock, move the handle to 1 of 3 positions, and lock the handle into position (Figure 14).

g007284
Close section

Starting the Engine

  1. Pull the blade-control bar to the handle (Figure 15).

    g003124
  2. Pull the recoil-start handle (Figure 16).

    g003274

    Note: If the machine does not start, contact an Authorized Service Dealer.

Close section

Using the Self-Propel Drive

To operate the self-propel drive, simply walk with your hands on the upper handle and your elbows at your sides, and the machine will automatically keep pace with you (Figure 17).

g003221
Close section

Stopping the Engine

Release the blade-control bar (Figure 18).

Important: When you release the blade-control bar, the blade should stop within 3 seconds. If it does not stop properly, stop using your machine immediately and contact an Authorized Service Dealer.

g003126
Close section

Recycling the Clippings

Your machine comes from the factory ready to recycle the grass and leaf clippings back into the lawn.

If the grass bag is on the machine, remove it; refer to Removing the Grass Bag before recycling the clippings. If the side-discharge chute is on the machine, remove it and lock the side-discharge door; refer to Removing the Side-Discharge Chute before recycling the clippings.

Important: Ensure that the rear-discharge plug is locked in place. To lock the plug: Raise the discharge deflector (Figure 19), firmly push the plug in until it snaps into place behind the tabs, and rotate the lever on the plug to the left (Figure 20).

g017463
g010084

Note: To unlock the plug, rotate the lever on the plug to the right (Figure 20).

Close section

Bagging the Clippings

Use the grass bag when you want to collect grass and leaf clippings from the lawn.

Note: Ensure the bag is seated in the correct position.

Warning

A worn grass bag could allow small stones and other similar debris to be thrown toward you or bystanders, resulting in serious personal injury or death.

Check the grass bag frequently. If it is damaged, install a new Toro replacement bag.

If the side-discharge chute is on the machine, remove it and lock the side-discharge door; refer to Removing the Side-Discharge Chute before bagging the clippings.

Warning

The blade is sharp; contacting the blade can result in serious personal injury.

Stop the engine and wait for all moving parts to stop before leaving the operating position.

Installing the Grass Bag

  1. Route the starter rope around the lower-rope guide (Figure 21).

    g017483

    Note: The lower-rope guide releases the starter rope when you pull the recoil-start handle.

  2. Raise and hold up the discharge deflector (Figure 22).

    g017464
  3. Pull out the rear-discharge plug (Figure 22).

  4. Hang the upper front edge of the bag on the notches (Figure 23).

    g017484

    Note: Ensure that the grass bag is securely installed onto the machine.

  5. Lower the discharge deflector.

Close section

Removing the Grass Bag

  1. Route the starter rope around the lower- rope guide (Figure 24).

    g017483

    Note: The lower-rope guide releases the starter rope when you pull the recoil-start handle.

  2. Raise and hold up the discharge deflector.

  3. Remove the grass bag.

  4. Install the rear-discharge plug (Figure 25).

    g017463

    Important: Ensure that the rear-discharge plug is locked in place. To lock the plug, firmly push the plug in until it snaps into place behind the tabs, and rotate the lever on the plug to the left (Figure 26).

    g010084

    Note: To unlock the plug, rotate the lever on the plug to the right (Figure 26).

  5. Lower the discharge deflector.

Close section
Close section

Side-Discharging the Clippings

Use the side-discharge feature for cutting very tall grass.

If the bag is on the machine, remove it and insert the rear-discharge plug; refer to Removing the Grass Bag before side-discharging the clippings.

Important: Ensure that the rear-discharge plug is locked in place. To lock the plug: Raise the discharge deflector (Figure 27), firmly push the plug in until it snaps into place behind the tabs, and rotate the lever on the plug to the left (Figure 26).

g017463

Note: To unlock the plug, rotate the lever on the plug to the right (Figure 26).

Warning

The blade is sharp; contacting the blade can result in serious personal injury.

Stop the engine and wait for all moving parts to stop before leaving the operating position.

Installing the Side-Discharge Chute

  1. Unlock the side-discharge door (Figure 28).

    g002590
  2. Lift open the side-discharge door (Figure 29).

    g002591
  3. Install the side-discharge chute and close the door onto the chute (Figure 30).

    g002592
Close section

Removing the Side-Discharge Chute

To remove the side-discharge chute, reverse the steps above.

Important: Lock the side-discharge door after you close it (Figure 31).

g002593
Close section
Close section

Operating Tips

General Mowing Tips

  • Clear the area of sticks, stones, wire, branches, and other debris that the blade could hit.

  • Avoid striking solid objects with the blade. Never deliberately mow over any object.

  • If the machine strikes an object or starts to vibrate, immediately stop the engine, disconnect the wire from the spark plug, and examine the machine for damage.

  • For best performance, install a new blade before the cutting season begins.

  • Replace the blade when necessary with a Toro replacement blade.

Close section

Cutting Grass

  • Cut only about a third of the grass blade at a time. Do not cut below the 51 mm (2 inch) setting unless the grass is sparse or it is late fall when grass growth begins to slow down. Refer to Adjusting the Cutting Height.

  • When cutting grass over 15 cm (6 inches) tall, mow at the highest cutting-height setting and walk slower; then mow again at a lower setting for the best lawn appearance. If the grass is too long, the machine may plug and cause the engine to stall.

  • Mow only dry grass or leaves. Wet grass and leaves tend to clump on the yard and can cause the machine to plug or the engine to stall.

    Warning

    Wet grass or leaves can cause serious injury if you slip and contact the blade. Mow only in dry conditions.

  • Alternate the mowing direction. This helps disperse the clippings over the lawn for even fertilization.

  • If the finished lawn appearance is unsatisfactory, try 1 or more of the following:

    • Replace the blade or have it sharpened.

    • Walk at a slower pace while mowing.

    • Raise the cutting height on your machine.

    • Cut the grass more frequently.

    • Overlap cutting swaths instead of cutting a full swath with each pass.

    • Set the cutting height on the front wheels a notch lower than the rear wheels. For example, set the front wheels at 60 mm (2-1/4 inches) and the rear wheels at 70 mm (2-3/4 inches).

Close section

Cutting Leaves

  • After cutting the lawn, ensure that half of the lawn shows through the cut leaf cover. You may need to make more than a single pass over the leaves.

  • If there are more than 13 cm (5 inches) of leaves on the lawn, set the front cutting height 1 or 2 notches higher than the rear cutting height.

  • Slow down your mowing speed if the machine does not cut the leaves finely enough.

Close section
Close section
Close section

Maintenance

Note: Determine the left and right sides of the machine from the normal operating position.

Recommended Maintenance Schedule(s)

Maintenance Service IntervalMaintenance Procedure
After the first 5 operating hours
  • Change the engine oil.
  • Before each use or daily
  • Check the engine oil level.
  • Service the air cleaner.
  • Ensure that the engine stops within 3 seconds after releasing the blade-control bar.
  • Clean grass clippings and dirt from under the machine.
  • Every 25 hours
  • Lubricate the rear wheel gears.
  • Replace the blade or have it sharpened (more frequently if the edge dulls quickly).
  • Before storage
  • Empty the fuel tank before repairs as directed and before annual storage.
  • Yearly
  • Service the air cleaner.
  • Change the engine oil.
  • Important: Refer to your engine owner's manual for additional maintenance procedures.

    Preparing for Maintenance

    1. Stop the engine and wait for all moving parts to stop.

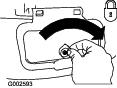
    2. Disconnect the spark-plug wire from the spark plug (Figure 32) before performing any maintenance procedure.

      g002901
    3. After performing the maintenance procedure(s), connect the spark-plug wire to the spark plug.

      Important: Before tipping the machine to change the oil or replace the blade, allow the fuel tank to run dry through normal usage. If you must tip the machine prior to running out of fuel, use a hand fuel pump to remove the fuel. Always tip the machine onto its side with the dipstick down.

      Warning

      Tipping the machine may cause the fuel to leak. Gasoline is flammable and explosive and can cause personal injury.

      Run the engine dry or remove the gasoline with a hand pump; never siphon.

    Close section

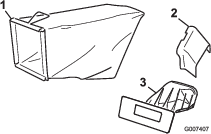
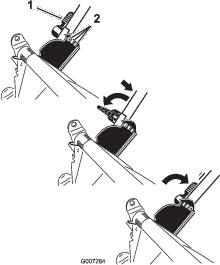
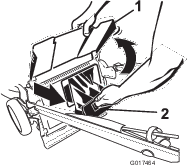
    Servicing the Air Cleaner

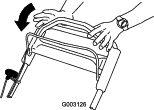
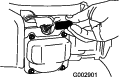
    1. Press down on the latch tabs on top of the air cleaner cover (Figure 33).

      g002902
    2. Open the cover.

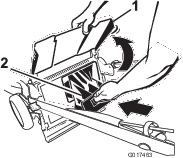
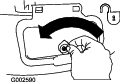
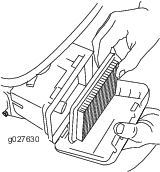
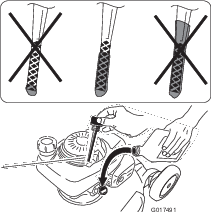
    3. Remove the paper air filter (Figure 34).

      g027630
    4. If the air filter is damaged or is wet with oil or fuel, replace it.

    5. If the air filter is dirty, tap it on a hard surface several times or blow compressed air less than 207 kPa (30 psi) through the side of the filter that faces the engine.

      Do not brush the dirt off the filter; brushing forces dirt into the fibers.

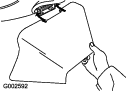
    6. Remove dirt from the air cleaner body and cover using a moist rag. Do not wipe dirt into the air duct.

    7. Install the filter into the air cleaner.

    8. Install the cover.

    Close section

    Changing the Engine Oil

    Run the engine a few minutes before changing the oil to warm it. Warm oil flows better and carries more contaminants.

    1. Perform the pre-maintenance procedures; refer to Preparing for Maintenance.

    2. Remove the dipstick.

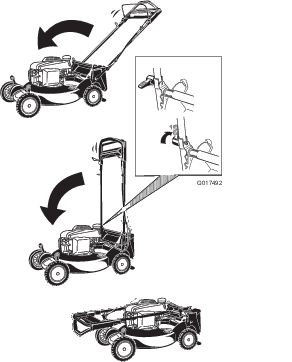
    3. Tip the machine onto its side, with the dipstick down, to drain the used oil out through the oil-fill tube (Figure 35).

      g017485
    4. After draining the used oil, return the machine to the normal operating position.

    5. Remove the dipstick and pour about 3/4 of the crankcase capacity of oil into the oil-fill tube.

      Note: Max. fill: 0.55 L (18.6 oz), type: SAE 30 or SAE 10W-30 detergent oil with an API service classification of SF, SG, SH, SJ, SL, or higher.

    6. Wipe off the dipstick end with a clean cloth.

    7. Insert the dipstick into the oil-fill tube.

    8. Remove the dipstick and read the oil level on the dipstick (Figure 36).

      g017491
      • If the oil level is too low, add a small amount of oil slowly to the oil-fill tube, and then repeat steps 6 through 8 until the oil level on the dipstick is correct.

      • If the oil level is too high, drain the excess oil until the oil level on the dipstick is correct.

        Important: If the oil level in the crankcase is too low or too high and you run the engine, you may damage the engine.

    9. Install the dipstick securely.

    10. Recycle the used oil properly.

    Close section

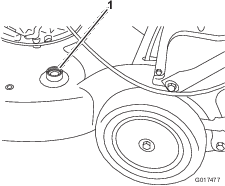
    Lubricating the Wheel Gears

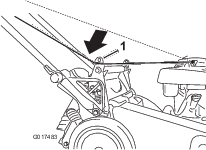
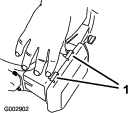
    1. Wipe the grease fittings just inside the rear wheels with a clean rag (Figure 37).

      g003234
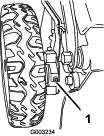
    2. Install a grease gun onto each fitting and gently apply 2 or 3 pumps of #2 multi-purpose, lithium-based grease.
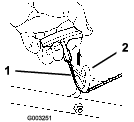
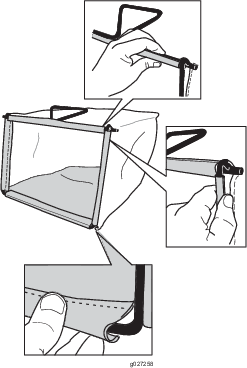
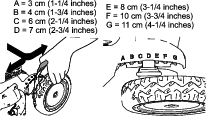
    Close section

    Replacing the Blade

    Important: You will need a torque wrench to install the blade properly. If you do not have a torque wrench or are uncomfortable performing this procedure, contact an Authorized Service Dealer.

    Examine the blade whenever you run out of gasoline. If the blade is damaged or cracked, replace it immediately. If the blade edge is dull or nicked, have it sharpened or replace it.

    Warning

    The blade is sharp; contacting the blade can result in serious personal injury.

    Wear gloves when servicing the blade.

    1. Disconnect the spark plug wire from the spark plug. Refer to Preparing for Maintenance.

    2. Tip the machine onto its side with the dipstick down.

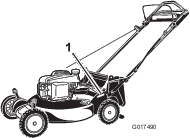
    3. Use a block a wood to hold the blade steady (Figure 38).

      g003235
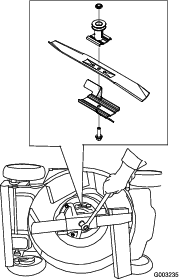
    4. Remove the blade, saving all mounting hardware.

    5. Install the new blade and all mounting hardware.

      Important: Position the curved ends of the blade to point toward the machine housing.

    6. Use a torque wrench to tighten the blade bolt to 82 N-m (60 ft-lb).

      Important: A bolt torqued to 82 N-m (60 ft-lb) is very tight. While holding the blade with a block of wood, put your weight behind the ratchet or wrench and tighten the bolt securely. This bolt is very difficult to overtighten.

    Close section

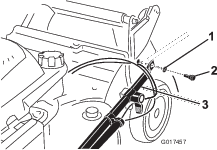
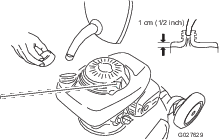
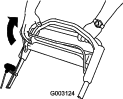
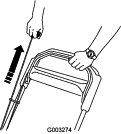
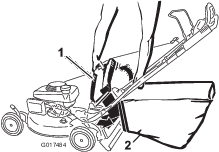
    Adjusting the Self-Propel Drive

    Whenever you install a new self-propel cable or if the self-propel drive is out of adjustment, adjust the self-propel drive.

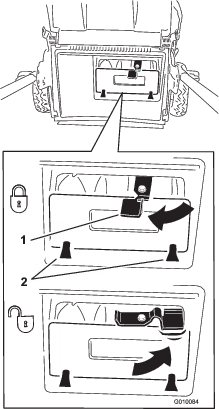
    1. Turn the adjustment knob counterclockwise to loosen the cable adjustment (Figure 39).

      g027709
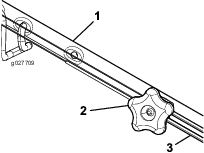
    2. Adjust the tension on the cable (Figure 39) by pulling it back or pushing it forward and holding that position.

      Note: Push the cable toward the engine to increase the traction; pull the cable away from the engine to decrease the traction.

    3. Turn the adjustment knob clockwise to tighten the cable adjustment.

      Note: Tighten the knob firmly by hand.

    Close section

    Cleaning the Machine

    Warning

    The machine may dislodge material from under the machine.

    • Wear eye protection.

    • Stay in the operating position (behind the handle) when the engine is running.

    • Do not allow bystanders in the area.

    For best results, clean the machine soon after you have completed mowing.

    1. Lower the machine to its lowest cutting-height setting. Refer to Adjusting the Cutting Height.

    2. Move the machine onto a flat paved surface.

    3. Attach a garden hose that is connected to a water supply to the washout port (Figure 40).

      g017477
    4. Turn the water on.

    5. Start the engine and run it until there are no more clippings that come out from under the machine.

    6. Stop the engine.

    7. Shut off the water and disconnect the garden hose from the machine.

    8. Start the engine and run it for a few minutes to dry the underside of the machine.

    Close section
    Close section

    Storage

    Store the machine in a cool, clean, dry place.

    Preparing the Machine for Storage

    Warning

    Gasoline vapors can explode.

    • Do not store gasoline more than 30 days.

    • Do not store the machine in an enclosure near an open flame.

    • Allow the engine to cool before storing it.

    1. On the last refueling of the year, add fuel stabilizer to the fuel as directed on the label.

    2. Run the machine until the engine stops from running out of fuel.

    3. Allow the engine to run until it stops. When you can no longer start the engine, it is sufficiently dry.

    4. Remove the wire from the spark plug and connect the wire onto the retaining post.

    5. Remove the spark plug, add 30 ml (1 oz) of oil through the spark plug hole, and pull the starter rope slowly several times to distribute oil throughout the cylinder to prevent cylinder corrosion during the off-season.

    6. Install the spark plug and tighten it with a torque wrench to 20 N-m (15 ft-lb).

    7. Tighten all nuts, bolts, and screws.

    Close section

    Folding the Handle

    Warning

    If, while folding the handle for storing or transporting the machine, you accidently bump the key and engage the blade-control bar, the engine could start and rotate the blade, causing serious personal injury.

    Always remove the ignition key before you fold the handle.

    1. Rotate the handle forward (Figure 41).

      Important: Route the cables to the outside of the handle knobs as you fold the upper handle.

      g017492
    2. To unfold the handle, refer to Assembling and Unfolding the Handle.

    Close section

    Remove the Machine from Storage

    1. Check and tighten all fasteners.

    2. Remove the spark plug and spin the engine rapidly by pulling the recoil-start handle to blow the excess oil from the cylinder.

    3. Install the spark plug and tighten it with a torque wrench to 20 N-m (15 ft-lb).

    4. Perform any maintenance procedures; refer to .

    5. Check the engine-oil level; refer to Checking the Engine-Oil Level.

    6. Fill the fuel tank with fresh gasoline; refer to Filling the Fuel Tank.

    7. Connect the wire to the spark plug.

    Close section
    Close section