Setup
Adding Fuel to the Machine
Add fuel to the machine before starting it. Refer to your Operator’s Manual for the correct fuel and procedure.
Checking the Engine-Oil Level
Before you start the engine and use the machine, check the oil level in the engine crankcase; refer to the Operator's Manual.
Checking the Tire Pressure
Front and rear tires air pressure specification: 124 kPa (18 psi).
Note: Check the tire pressure before starting the machine. Refer to your Operator’s Manual for the correct tire type, correct air pressure needed, and procedure.
Checking the Hydraulic-Fluid Level
-
Park the machine on a level surface, disengage the blade-control switch, and engage the parking brake.
-
Move the motion-control levers to the NEUTRAL-LOCK position and start the engine.
Note: Run the engine at the lowest possible rpm to purge any air in the system.
Important: Do not engage the PTO.
-
Raise the deck to extend the lift cylinders, shut off the engine, and remove the key.
-
Raise the seat to access the hydraulic-fluid tank.
-
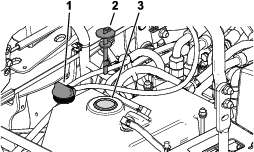
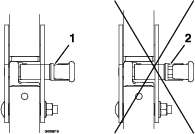
Remove the hydraulic-tank cap (Figure 1).
-
Remove the dipstick and wipe it with a clean rag (Figure 1).
-
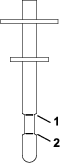
Place the dipstick into the filler neck, remove it, and check the fluid level (Figure 2).
Note: If the level is not within the notched area of the dipstick, add enough high-quality hydraulic fluid to raise the level to within the notched area.
Important: Do not overfill.
-
Replace the dipstick and thread the fill cap finger-tight onto the filler neck.
-
Check all hoses and fittings for leaks.
Checking the Deck Gearbox-Fluid Level
-
Park the machine on a level surface.
-
Lower the mower deck to the 2.5 cm (1 inch) height of cut.
-
Disengage the blade-control switch, move the motion-control levers to the NEUTRAL-LOCK position, and engage the parking brake.
-
Shut off the engine and remove the key.
-
Raise the deck-lift pedal to expose the top of the mower deck.
-
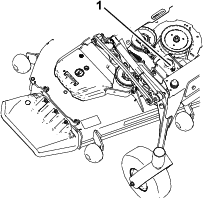
Remove the dipstick/fill plug from the top of the gearbox and ensure that the lubricant is between the marks on the dipstick (Figure 3).
-
If the fluid level is low, add fluid until the level is between the marks on the dipstick.
Important: Do not overfill the gearbox; overfilling the gearbox may damage it.
Checking the Wheel Lug Nut Torque
Before you start the engine and use the machine, check the wheel lug nut torque; refer to Checking the Wheel Lug Nuts in the Operator's Manual
Installing the Battery
Parts needed for this procedure:
| J-bolt | 2 |
| Wing nut | 2 |
| Hold-down clamp | 1 |
Important: This procedure only applies to machines that do not come with a battery installed.
Purchase a 12 V battery and install it into the machine. The engine requires a minimum of 540 A (cold cranking).
Use the hardware included to install the new battery. Refer to Installing the Battery in the Operator's Manual.
Raising the Rollover Protection System (ROPS)
-
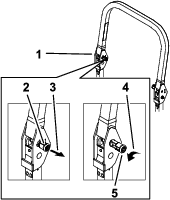
Pull the knob and rotate 90° to the unlatched position (Figure 4).
-
Raise the roll bar to the operate position, and rotate the knobs so that they move partially into the grooves (Figure 4).
-
Raise the roll bar to the full upright position while pushing on the upper roll bar and the pins snap into position when the holes align with the pins (Figure 4).
Important: Always use the seat belt with the roll bar in the raised position.
-
Push on the roll bar and ensure that both pins are engaged (Figure 5).
Checking the Machine Before Delivery to the Customer (All Machines)
Before delivering the machine to the customer, ensure that you perform or have performed the procedures listed in the following table and initial each when finished. Refer to the Operator's Manual for instructions on performing these procedures.
| Initial | Check Procedure |
| Check the tire pressure. | |
| Check the level of the machine. | |
| Check that all spindles are greased. | |
| Check the engine-oil level. | |
| Check the hydraulic-fluid level. | |
| Check ROPS is secure. | |
| On liquid cooled machines, check the level of the coolant in the radiator and overflow bottle. | |
| Check the adjustment of the parking brake. | |
| Ensure that the machine tracks correctly; refer to the Operator's Manual for the adjustment procedure. | |
| Check the safety interlock system; refer to the Operator's Manual. | |
| Ensure that the PTO works. | |
| Check all fasteners that you installed to ensure that they are tight. |
When you finish setting up the machine, sign and date in the space provided below:
Delivering the Machine to the Customer
Parts needed for this procedure:
| Operator's Manual | 1 |
| Engine owner's manual | 1 |
| Registration card | 1 |
| Operator training material | 1 |
| Key | 2 |
At delivery, fill in the model and serial number, complete the items listed in the following table, and initial each when finished.
| Dealer Initial | Customer Initial | Check Procedure | ||
|---|---|---|---|---|
| Show the customer where the following features are located and how they function: | ||||
| Fuel tank | ||||
| Oil fill cap/Oil dipstick | ||||
| Engine-oil filter | ||||
| Engine-oil drain | ||||
| Fuel gauge, valve and hose | ||||
| Air filter | ||||
| Radiator coolant (if applicable) | ||||
| Hydraulic-fluid reservoir | ||||
| Hydraulic filter | ||||
| Battery | ||||
| Key switch | ||||
| Throttle lever | ||||
| Choke (if applicable) | ||||
| Power take off switch (PTO) | ||||
| Motion-control levers | ||||
| Parking brake | ||||
| Height of cut | ||||
| Lift-assist lever (if applicable) | ||||
| Adjustable seat | ||||
| Hydraulic-bypass valves | ||||
| Rollover Protection System (ROPS) | ||||
| Deck-flow baffle | ||||
| Refer to theOperator's Manual to point out safety procedures, operation, and maintenance procedures. | ||||
| Review the warranty statement as shown in the Operator's Manual. | ||||
| Describe the post sale service procedures for your store. | ||||
| Assist the customer in filling out and mailing the registration card or register online at www.Toro.com | ||||
| Ensure that the customer receives the Operator's Manual, engine owner’s manual, Setup Instructions, and operator training material. | ||||
| Ensure that the customer knows the Parts Catalog is available at www.Toro.com. | ||||
| Assist the customer in loading the machine using a full-width trailer ramp. | ||||
Note: When you, the dealer representative, have finished delivering the machine to the customer, sign and date in the space provide below and keep a copy of this page for dealer records. Also, the dealer must remind the customer to use a full-width trailer ramp to load the machine.