Warning
CALIFORNIA
Proposition 65 Warning
This product contains a chemical or chemicals known to the State of California to cause cancer, birth defects, or reproductive harm.
Setup
Preparing the Machine
-
Park the machine on a level surface.
-
Disengage the PTO, engage the parking brake, and move the motion-control levers outward to the NEUTRAL-LOCK position.
-
Shut off the engine and remove the key.
-
Disconnect the spark-plug wires from the spark plugs.
Preparing the Mower Deck
-
Do one of the following:
-
Raise the deck to the highest position and raise the front of the machine so you can access beneath the mower deck. Support the frame of the machine using jackstands.
-
Remove the mower deck as described in the Operator's Manual for the machine.
-
-
Remove the existing mower blades; refer to the Operator’s Manual for the machine.
Installing the Baffle and Discharge Cover
Parts needed for this procedure:
| Discharge cover | 1 |
| Baffle | 1 |
| Knob | 1 |
-
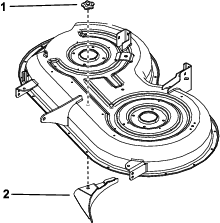
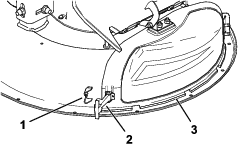
Install the baffle and knob (Figure 1).
-
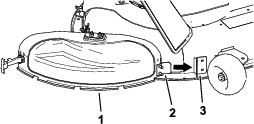
Angle the metal tab on the discharge cover into the slot in the bracket welded to the mower deck (Figure 2).
-
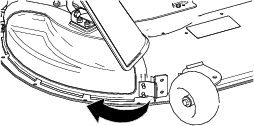
Pivot the discharge cover back and toward the deck so that the discharge cover aligns with the mower deck (Figure 3).
-
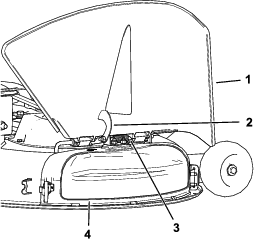
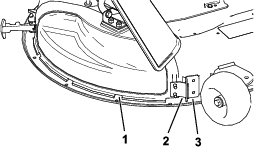
On the top of the discharge cover, engage the hook-shaped latch around the pivot rod of the deflector assembly (Figure 4).
-
Secure the discharge cover to the deck by hooking the flexible latch on the discharge cover into the retainer on the deck (Figure 6).
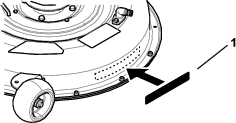
Installing the Decal
Parts needed for this procedure:
| Decal | 1 |
Install the decal on the left side of the mower deck (Figure 5).
Installing the Blades
Parts needed for this procedure:
| Mulching blade | 2 |
-
Install the mulching blades; refer to the Operator’s Manual for the machine.
Note: Do not install a blade stiffener. These blades do not require the blade stiffener.
-
Lower the machine or install the mower deck as described in Operator’s Manual for the machine.
-
Connect the spark plug wires.
Operation
Converting to Side Discharge
Note: To use the mower in side discharge mode, remove only the discharge cover.
-
Park the machine on a level surface, disengage the blade-control switch, and engage the parking brake.
-
Shut off the engine, remove the key, and wait for all moving parts to stop before leaving the operating position.
-
Release the flexible latch from the latch retainer on the discharge cover and pivot the discharge cover to the right (Figure 6).
-
Release the hook-shaped latch on top of the discharge cover from the pivot rod (Figure 4).
-
Angle the metal tab on the discharge cover out of the slot in the bracket welded to the mower deck (Figure 7).
Operating Tips
Selecting the Proper Height-of-Cut Setting to Suit the Conditions
Remove approximately 1 inch or no more than 1/3 of the grass blade when cutting. In exceptionally lush and dense grass you may need to raise the height-of-cut setting another notch or convert to side discharge or bagging operations.
Mowing in Extreme Conditions
Air is required to cut and recut grass clippings in the mower housing, so do not set the height-of-cut too low or totally surround the housing by uncut grass. Always have 1 side of the mower housing free from uncut grass, allowing air to be drawn into housing. When making an initial cut through the center of the uncut area, operate the machine at a slower speed and back up if the mower starts to clog.
Mowing at the Proper Intervals
Grass grows at different rates at different times of the year. To maintain the same cutting height, mow more often in early spring. As the grass growth rate slows in mid summer, mow less frequently. If you are unable to mow for an extended period due to the weather conditions or other reasons, convert to side discharge or bagging options or mow first with a high cutting height, then mow again 2 days later with a lower height setting.
Maintaining the Blade(s)
Maintain a sharp blade throughout the cutting season because a sharp blade cuts cleanly without tearing or shredding the grass blades. Tearing and shredding turns grass brown at the edges, which slows growth and increases the chance of disease. Check the mower blades after each use for sharpness, and for any wear or damage. File down any nicks and sharpen the blades as necessary. If a blade is damaged or worn, replace it immediately with a genuine the manufacturer replacement blade.
Cleaning after Operating
To ensure optimum performance, clean the underside of the mower housing. If residue builds up in the mower housing, cutting performance decreases.