Warning
CALIFORNIA
Proposition 65 Warning
This product contains a chemical or chemicals known to the State of California to cause cancer, birth defects, or reproductive harm.
Setup
Removing the Blades
-
Disengage the blade-control switch (PTO).
-
Shut off the engine, wait for all moving parts to stop, and remove the key before leaving the operating position.
-
To access the blades, do one of the following steps:
-
Raise the mower deck to the highest position and raise the front of the machine and support it with jack stands.
Note: Do not rely solely on mechanical or hydraulic jacks for support. Use adequate jack stands or equivalent support.
-
Remove the mower deck as described in the Operator’s Manual for the machine.
-
-
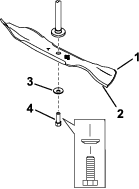
Hold the blade end using a rag or thickly-padded glove. Remove the blade bolt, curved washer, and blade from the spindle shaft (Figure 1).
Installing the Blades
Parts needed for this procedure:
| Blades | 2 |
-
Install the blade onto the spindle shaft (Figure 1).
Important: The sail area (curved part) of the blade must point upward toward the inside of the mower deck to ensure proper cutting.
-
Install the curved washer (cupped side toward the blade) and the blade bolt (Figure 1).
-
Torque the blade bolt to 47-88 N∙m (35-65 ft-lb).