| Maintenance Service Interval | Maintenance Procedure |
|---|---|
| Before each use or daily |
|
Introduction
This machine is intended to be used by residential homeowners. It is designed primarily for removing snow from paved surfaces, such as driveways and sidewalks, and other surfaces for traffic on residential or commercial properties. It is not designed for removing materials other than snow, nor is it designed for clearing gravel surfaces.
Note: The machine may leave rubber marks on new brushed or light-colored concrete. Test on an inconspicuous location before use.
Read this information carefully to learn how to operate and maintain your product properly and to avoid injury and product damage. You are responsible for operating the product properly and safely.
You may contact Toro directly at www.Toro.com for product and accessory information, help finding a dealer, or to register your product.
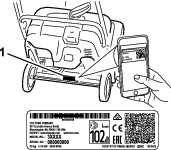
Whenever you need service, genuine Toro parts, or additional information, contact an Authorized Service Dealer or Toro Customer Service and have the model and serial numbers of your product ready. Figure 1 identifies the location of the model and serial numbers on the product. Write the numbers in the space provided.
Important: With your smartphone or tablet, scan the QR code on the serial number decal to access warranty, parts, and other product information.
This manual identifies potential hazards and has safety messages identified by the safety-alert symbol (Figure 2), which signals a hazard that may cause serious injury or death if you do not follow the recommended precautions.

This manual uses 2 words to highlight information. Important calls attention to special mechanical information and Note emphasizes general information worthy of special attention.
Warning
CALIFORNIA
Proposition 65 Warning
The engine exhaust from this product contains chemicals known to the State of California to cause cancer, birth defects, or other reproductive harm.
Important: If you are using this machine above 1500 m (5,000 ft) for a continuous period, ensure that the High Altitude Kit has been installed so that the engine meets CARB/EPA emission regulations. The High Altitude Kit increases engine performance while preventing spark-plug fouling, hard starting, and increased emissions. Once you have installed the kit, attach the high-altitude label next to the serial decal on the machine. Contact any Authorized Toro Service Dealer to obtain the proper High Altitude Kit and high-altitude label for your machine. To locate a dealer convenient to you, access our website at www.Toro.com or contact our Toro Customer Care Department at the number(s) listed in your Emission Control Warranty Statement. Remove the kit from the engine and restore the engine to its original factory configuration when running the engine under 1500 m (5,000 ft). Do not operate an engine that has been converted for high-altitude use at lower altitudes; otherwise, you could overheat and damage the engine.If you are unsure whether or not your machine has been converted for high-altitude use, look for the following label (Figure 3).

It is a violation of California Public Resource Code Section 4442 or 4443 to use or operate the engine on any forest-covered, brush-covered, or grass-covered land unless the engine is equipped with a spark arrester, as defined in Section 4442, maintained in effective working order or the engine is constructed, equipped, and maintained for the prevention of fire.
Safety
General Safety
This machine complies with ANSI B71.3 specifications.
-
Read and understand the contents of this Operator’s Manual before you start the engine. Ensure that everyone using this product knows how to use the product and understands the warnings.
-
Do not put your hands or feet near moving components on the machine.
-
Do not operate the machine without all guards and other safety protective devices in place and working on the machine.
-
Keep clear of any discharge opening. Keep bystanders a safe distance away from the machine.
-
Keep children out of the operating area. Never allow children to operate the machine.
-
Shut off the engine before unclogging, servicing, or fueling the machine.
You can find additional items of safety information in their respective sections throughout this manual.
Safety and Instructional Decals
 |
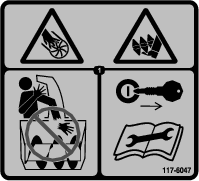
Safety decals and instructions are easily visible to the operator and are located near any area of potential danger. Replace any decal that is damaged or missing. |


Setup
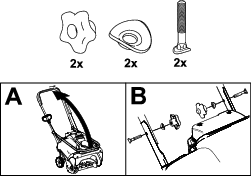
Installing the Handle
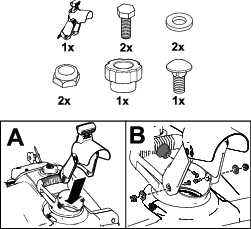
Installing the Discharge Chute
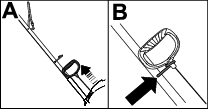
Installing the Recoil-Start Handle
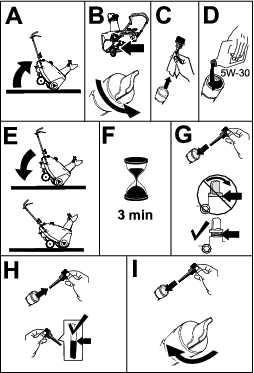
Filling the Engine with Oil
Adjusting the Control Cable
Refer to Checking and Adjusting the Control Cable.
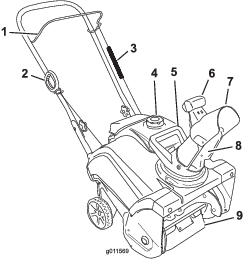
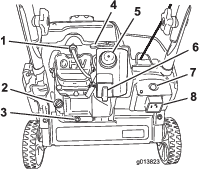
Product Overview
Operation
Note: Determine the left and right sides of the machine from the normal operating position.
Before Operation
Before Operation Safety
-
For electric-start models only: Use extension cords and receptacles as specified in the manual. Thoroughly inspect the electrical cord before plugging it into a power source. If the cord is damaged, do not use it. Replace the damaged cord. Unplug the power cord whenever you are not starting the machine.
-
Wear adequate winter garments whenever you operate the machine. Wear substantial, slip-resistant footwear that improves footing on slippery surfaces. Avoid loose-fitting clothing that can get caught in moving parts.
-
Always wear eye protection during operation or while performing an adjustment or repair to protect your eyes from foreign objects that the machine may throw.
-
Thoroughly inspect the area where you will use the machine, and remove all doormats, sleds, boards, wires, and other foreign objects.
-
If a shield, safety device, or decal is damaged, illegible, or missing, repair or replace it before beginning operation. Also tighten any loose fasteners.
Danger
Fuel is extremely flammable and explosive. A fire or explosion from fuel can burn you and others.
-
To prevent a static charge from igniting the fuel, place the container and/or machine on the ground before filling, not in a vehicle or on an object.
-
Fill the tank outdoors when the engine is cold. Wipe up spills.
-
Do not handle fuel when smoking or around an open flame or sparks.
-
Store fuel in an approved fuel container, out of the reach of children.
-
Do not tip the machine either forward or backward with fuel in the fuel tank; otherwise, fuel may leak out of the machine.
Filling the Fuel Tank
-
For best results, use only clean, fresh (less than 30 days old), unleaded gasoline with an octane rating of 87 or higher ((R+M)/2 rating method).
-
Oxygenated fuel with up to 10% ethanol or 15% MTBE by volume is acceptable.
-
Do not use ethanol blends of gasoline (such as E15 or E85) with more than 10% ethanol by volume. Performance problems and/or engine damage may result which may not be covered under warranty.
-
Do not use gasoline containing methanol.
-
Do not store fuel either in the fuel tank or fuel containers over the winter unless you use a fuel stabilizer.
-
Do not add oil to gasoline.
Do not fill above the bottom of the fuel tank neck (Figure 10).

Note: For best results, purchase only the quantity of fuel that you expect to use in 30 days. Otherwise, you may add fuel stabilizer to newly purchased fuel to keep it fresh for up to 6 months.
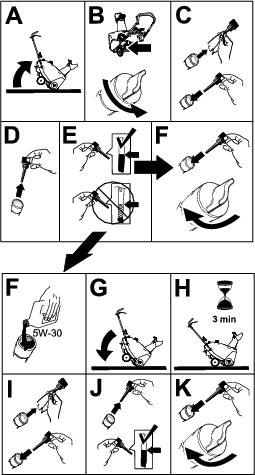
Checking the Engine-Oil Level
During Operation
During Operation Safety
-
Shut off the engine before unclogging the machine and always use a stick or the snow-cleanout tool (if provided).
-
A rotating auger can injure hands or feet. Stay behind the handles and away from the discharge opening while operating the machine. Keep your face, hands, feet, and any other part of your body or clothing away from moving or rotating parts.
-
Never direct the discharge toward people or areas where property damage can occur.
-
Exercise caution to avoid slipping or falling. Always be sure of your footing, and keep a firm hold on the handles. Walk; never run.
-
Exercise extreme caution when operating on slopes.
-
Never operate the machine without good visibility or light.
-
Do not operate the machine while ill, tired, or under the influence of alcohol or drugs.
-
Look behind and use care when backing up with the machine.
-
When not actively clearing snow, disengage power to the auger.
-
Exercise extreme caution when operating on or crossing gravel drives, walks, or roads. Stay alert for hidden hazards or traffic.
-
Never attempt to make any adjustments while the engine is running.
-
After striking a foreign object, shut off the engine, remove the ignition key (electric-start models only), thoroughly inspect the machine for any damage, and repair the damage before starting and operating the machine.
-
If the machine should start to vibrate abnormally, shut off the engine and check for the cause.
-
Do not run the engine indoors unless there is adequate ventilation (e.g., leaving an outside door open); exhaust fumes are dangerous.
-
Do not overload the machine capacity by attempting to clear snow at too fast a rate.
-
Never touch a hot engine or muffler.
Starting the Engine
-
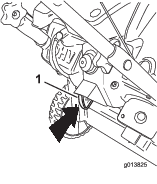
Push the ignition key fully inward to the ON position (Figure 12).
-
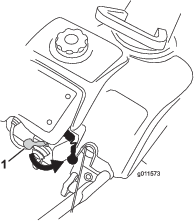
Move the choke lever fully to the right (Figure 13).
-
Firmly push in the primer with your thumb as indicated by the table below, holding the primer in for a second before releasing it each time (Figure 14).
Temperature Suggested Number of Primes Above -23°C (-10°F) 2 -23°C (-10°F) and below 4 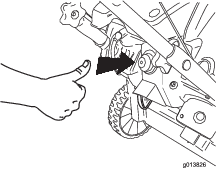
Note: Remove your glove when you push in the primer so that air cannot escape from the primer hole.
Important: Do not use the primer or the choke if the engine has been running and is hot. Excessive priming may flood the engine and prevent it from starting.
-
Connect an extension cord to a power source and the machine, and push the electric-start button (electric start only) as shown in Figure 15), or pull the recoil-start handle (Figure 16).
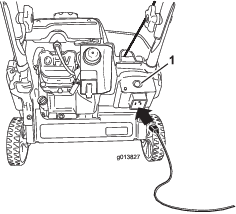
To use the electric starter (electric start only), connect a power cord to the electric-start plug-in first and then to a ground fault circuit interrupter (GFCI) power outlet. Use only a UL-listed, 16-gauge power cord recommended for outdoor use that is not longer than 15 m (50 ft).
Important: Important: Do not use a worn or damaged power cord.
Warning
The electrical cord can become damaged, causing a shock or fire.
Thoroughly inspect the electrical cord before plugging it into a power source. If the cord is damaged, do not use it. Replace or repair the damaged cord immediately. Contact an Authorized Service Dealer for assistance.
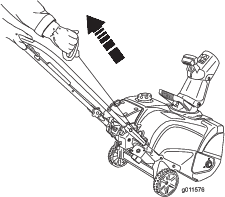
Important: Run the electric starter no more than 10 times at intervals of 5 seconds on, then 5 seconds off. Running the electric starter extensively can overheat and damage it. If the engine does not start after this series of attempts, wait at least 40 minutes to allow the starter to cool before attempting to start it again. If the engine does not start after the second series of attempts, take the machine to an Authorized Service Dealer for service (electric start only).
Note: If the recoil starter does not operate properly, it may be frozen. Thaw out the starter before attempting to start the machine.
-
While the engine is running, move the choke lever gradually to the left.
-
Unplug the extension cord from the power source and the machine (electric start only).
Caution
If you leave the machine plugged into a power source, someone can inadvertently start the machine and injure people or damage property (electric start only).
Unplug the power cord whenever you are not starting the machine.
Engaging the Rotor Blades
To engage the rotor blades, hold the control bar against the handle (Figure 17).
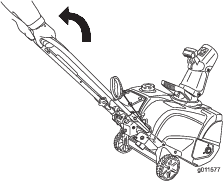
Disengaging the Rotor Blades
To disengage the rotor blades, release the control bar (Figure 18).
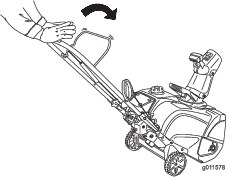
Shutting Off the Engine
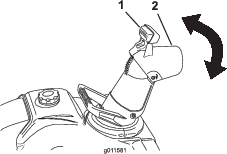
Adjusting the Discharge Chute and Chute Deflector
Clearing a Clogged Discharge Chute
To clear the chute:
-
Shut the engine off!
-
Wait 10 seconds to be sure the rotor blades have stopped rotating.
-
Always use a clean-out tool; never use your hands.
Self-Propelling the Snowthrower
Lift the machine handle until the wheels are just off the ground and the scraper and rotor blades touch the ground. The machine propels forward (Figure 22).
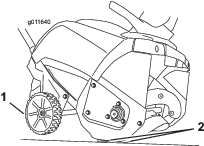
Note: By slightly varying lifting force on the handle, you can control the forward speed of the machine. In heavy snow, push forward on the handle, if necessary, but let the machine work at its own pace. Do not lift the handle any more than necessary, because the scraper lifts off the ground and snow escapes behind the machine.
Operating Tips
Warning
The rotor blades can throw stones, toys, and other foreign objects and cause serious personal injury to you or bystanders.
-
Keep the area to be cleared free of all objects that the rotor blades could pick up and throw.
-
Keep all children and pets away from the area of operation.
-
Remove the snow as soon as possible after it falls.
-
Overlap each swath to ensure complete snow removal.
-
Discharge the snow downwind whenever possible.
-
If the machine does not propel itself forward on slippery surfaces or in heavy snow, push forward on the handle, but allow the machine to work at its own pace.
After Operation
After Operation Safety
-
Never store the machine with fuel in the fuel tank inside a building where ignition sources are present, such as hot water heaters, space heaters, or clothes dryers. Allow the engine to cool before storing in any enclosure.
-
When storing the machine for more than 30 days, refer to Storing the Machine for important details.
Preventing Freeze-up after Use
-
Let the engine run for a few minutes to prevent moving parts from freezing. Shut off the engine, wait for all moving parts to stop, and remove ice and snow from the machine.
-
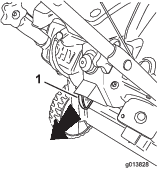
Clean off any snow and ice from the base of the chute.
-
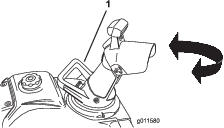
Rotate the discharge chute left and right to free it from any ice buildup.
-
With the ignition key in the OFF position, pull the recoil-start handle several times or connect the electrical cord to a power source and the machine and push the electric-start button once to prevent the recoil starter and/or the electric starter from freezing up (electric-start models only).
-
In snowy and cold conditions, some controls and moving parts may freeze. Do not use excessive force when trying to operate frozen controls. If you have difficulty operating any control or part, start the engine and let it run for a few minutes.
Maintenance
Recommended Maintenance Schedule(s)
| Maintenance Service Interval | Maintenance Procedure |
|---|---|
| After the first hour |
|
| After the first 2 hours |
|
| Before each use or daily |
|
| Yearly |
|
| Yearly or before storage |
|
Maintenance Safety
Read the following safety precautions before performing any maintenance on the machine:
-
Before performing any maintenance, service, or adjustment, shut off the engine and remove the key. If major repairs are ever needed, contact an Authorized Service Dealer.
-
Check all fasteners at frequent intervals for proper tightness to ensure that the machine is in safe working condition.
-
Do not change the governor settings on the engine.
-
Purchase only genuine Toro replacement parts and accessories.
Checking and Adjusting the Control Cable
Checking the Control Cable
| Maintenance Service Interval | Maintenance Procedure |
|---|---|
| After the first hour |
|
| Yearly |
|
Important: You must check and may need to adjust the control cable before you operate the machine for the first time.
Move the control bar back toward the handle to remove the slack in the control cable (Figure 23).
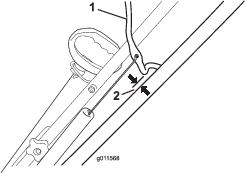
Note: Ensure that a gap of 2 to 3 mm (1/16 to 1/8 inch) exists between the control bar and the handle (Figure 23).
Important: The control cable must contain some slack when you disengage the control bar for the rotor blades to stop properly.
Adjusting the Control Cable
-
Slide up the spring cover and unhook the spring from the adjuster link (Figure 24).
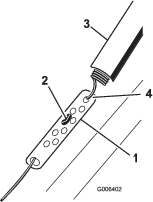
Note: You can pull up the adjuster link and cable to make unhooking the spring easier.
-
Move the Z-fitting to a higher or lower hole on the adjuster link as needed to obtain the 2 to 3 mm (1/16 to 1/8 inch) gap between the control bar and the handle (Figure 24).
Note: Moving the Z-fitting higher decreases the gap between the control bar and the handle; moving it lower increases the gap.
-
Hook the spring to the adjuster link and slide the spring cover over the adjuster link.
-
Check the adjustment; refer to Checking the Control Cable.
Note: The belt may slip (squeal) in wet conditions; to dry out the drive system, start the rotor and run it without a load for 30 seconds.
Inspecting the Rotor Blades
| Maintenance Service Interval | Maintenance Procedure |
|---|---|
| Yearly |
|
Before each session, inspect the rotor blades for wear. When a rotor-blade edge has worn down to the wear-indicator hole, have an Authorized Service Dealer replace the rotor blades and the scraper (Figure 25).

Changing the Engine Oil
| Maintenance Service Interval | Maintenance Procedure |
|---|---|
| After the first 2 hours |
|
| Yearly |
|
If possible, run the engine for a few minutes before changing the oil to warm it. Warm oil flows better and carries more contaminants.
| Engine oil capacity | 0.35 L (12 fl oz) |
| Oil viscosity | Refer to Figure 27. |
| API service classification | SJ or higher |
-
Ensure that the fuel tank is not overfilled (refer to Figure 10) and that the fuel cap is securely in place.
-
Move the machine to a level surface.
-
Place an oil-drain pan under the oil-drain plug (Figure 9), remove the oil-drain plug, and tip the machine backward (handle down) halfway to the ground to drain the used oil into the oil-drain pan.
Important: Do not tip the machine all the way back to the ground, or fuel may leak out of the machine.
-
After draining the used oil, return the machine to the operating position.
-
Install the oil-drain plug and tighten it securely.
-
Clean around the oil-fill cap (Figure 9).
-
Unscrew the oil-fill cap and remove it.
-
Slowly pour oil into the oil-fill hole. Wait 3 minutes, then check the oil level on the dipstick by wiping the dipstick clean and then inserting, but not screwing in, the oil-fill cap into the hole.
Note: To determine the proper oil level on the dipstick, refer to Figure 26.
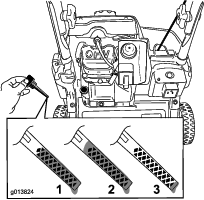
Note: You may tip the machine forward (handle up) a little to make adding oil easier. Remember to return the machine to the operating position before checking the oil level.
Important: Do not tip the machine all the way forward onto its nose, or fuel may leak out of the machine.
Use Figure 27 to select the best oil viscosity for the outdoor temperature range expected:
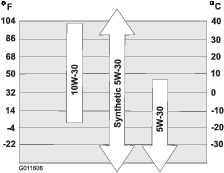
Note: Fill the engine crankcase with oil until the dipstick indicates that the engine-oil level is correct as shown in Figure 26. If you overfill the engine with oil, remove the excess oil from the drain plug into an oil-drain pan.
-
Screw the oil-fill cap into the oil-fill hole, and tighten it securely by hand.
-
Wipe up any spilled oil.
-
Dispose of the used oil properly at a local recycling center.
Servicing the Spark Plug
| Maintenance Service Interval | Maintenance Procedure |
|---|---|
| Yearly |
|
Use a Toro spark plug (Part No. 119-1961).
-
Shut off the engine and wait for all moving parts to stop.
-
Disconnect the wire from the spark plug (Figure 9).
-
Clean around the spark plug.
-
Remove the spark plug from the cylinder head.
Important: Replace a cracked, fouled, or dirty spark plug. Do not clean the electrodes because grit entering the cylinder can damage the engine.
-
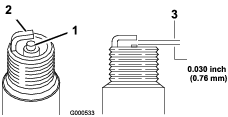
Set the gap on the plug to 0.76 mm (0.030 inch) as shown in Figure 28.
-
Install the spark plug and torque it to 27 to 30 N∙m (20 to 22 ft-lb).
-
Connect the wire to the spark plug.
Replacing the Drive Belt
If drive belt becomes worn, oil-soaked, excessively cracked, frayed, or otherwise damaged, replace the belt.
-
Remove the 4 bolts that hold the drive-belt cover (Figure 29) in place.
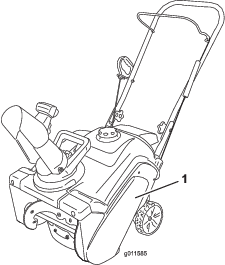
Note: The lower front corner of the drive-belt cover is fastened down with a smaller bolt, a washer, and a locknut.
-
Remove the belt from the rotor pulley.
-
Press down on the idler arm and remove the belt from between the tab on the idler-arm brake and the rotor pulley.
Note: The belt guide for the engine pulley is very close to the pulley, and the belt may not fit through the gap.
-
Twist the belt out in front of the belt guide so that the belt is wedged between the belt guide and the engine pulley.
-
Insert a screwdriver into the hole in the belt guide as shown in Figure 30, and flex the belt guide toward the rotor pulley enough to pull the belt through the gap.
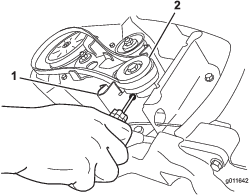
Note: Do not distort or damage the belt guide.
-
To install the new drive belt, reverse the steps above.
Important: Ensure that you install the drive belt so that it sits above the 2 tabs on the idler arm and below the idler-arm brake (Figure 31).
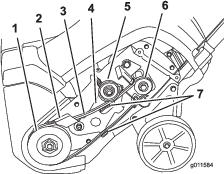
-
Install the drive-belt cover with the fasteners that you removed in step 1.
Storage
Storing the Machine
Warning
Fuel fumes are highly flammable, explosive, and dangerous if inhaled. If you store the product in an area with an open flame, the fuel fumes may ignite and cause an explosion.
-
Do not store the machine in a house (living area), basement, or any other area where ignition sources may be present, such as hot water and space heaters, clothes dryers, furnaces, and other appliances.
-
Do not tip the machine either forward or backward with fuel in the fuel tank; otherwise, fuel may leak out of the machine.
-
Do not store the machine with its handle tipped down onto the ground; otherwise, oil leaks into the engine cylinder and onto the ground, and the engine does not start or run.
-
On the last refueling of the season, add fuel stabilizer to fresh fuel as directed by the fuel-stabilizer manufacturer.
Important: Do not store fuel longer than that suggested by the fuel-stabilizer manufacturer.
-
Run the engine for 10 minutes to distribute the conditioned fuel through the fuel system.
-
Shut off the engine, allow it to cool, and siphon the fuel tank or run the engine until it shuts off.
-
Start the engine and run it until it shuts off.
-
Choke or prime the engine, start it a third time, and run the engine until it does not start.
-
Drain the fuel from the tank and carburetor by performing the following steps:
-
Loosen the fuel-tank cap.
-
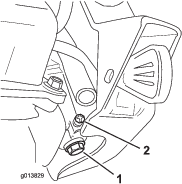
Unscrew, but do not remove, the small screw on the side of the carburetor fuel bowl (Figure 32) until the fuel begins to drain from the carburetor.
Important: Do not remove the carburetor bowl bolt on the bottom of the carburetor.
-
Wait for a few minutes until the fuel has drained, then install the fuel cap and tighten the small screw on the carburetor.
Note: Use a handheld Phillips screwdriver to tighten the carburetor screw. Overtightening the screw could strip it and cause leaking.
-
-
Dispose of unused fuel properly. Recycle it according to local codes, or use it in your automobile.
-
While the engine is still warm, change the engine oil. Refer to Changing the Engine Oil.
-
Remove the spark plug.
-
Squirt 10 ml (2 tsp) of oil into the spark-plug hole.
-
Install the spark plug by hand and then torque it to 27 to 30 N∙m (20 to 22 ft-lb).
-
With the ignition key in the OFF position, pull the recoil-start handle slowly to distribute the oil on the inside of the cylinder.
-
Clean the machine.
-
Touch up chipped surfaces with paint available from an Authorized Service Dealer. Sand affected areas before painting, and use a rust preventative to prevent the metal parts from rusting.
-
Tighten any loose fasteners. Repair or replace any damaged parts.
-
Cover the machine and store it in a clean, dry place out of the reach of children. Allow the engine to cool before storing the machine in any enclosure.
