Warning
CALIFORNIA
Proposition 65 Warning
This product contains a chemical or chemicals known to the State of California to cause cancer, birth defects, or reproductive harm.
Install this kit to meet CE requirements.
Setup
Preparing the Machine
-
Park the machine on a level surface.
-
Engage the parking brake.
-
Shut off the engine and remove the key.
Installing the Latch
Parts needed for this procedure:
| Hood latch bracket | 1 |
| Flange-head screw (5/16 x 3/4 inch) | 2 |
| Flange nut (5/16 inch) | 2 |
| Cover plate | 1 |
| Washer-head screw (1/4 x 3/4 inch) | 2 |
| Latch with nut | 1 |
| Key | 1 |
-
Open the hood.
-
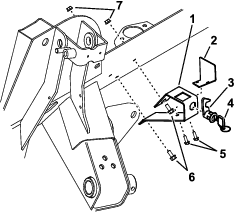
Locate the 2 holes in the left frame rail, behind the wing-deck lift arm (Figure 1).
-
Mount the hood-latch bracket to the frame with 2 flange-head screws (5/16 x 3/4 inch) and 2 flange nuts (5/16 inch), positioning the latch as shown in Figure 1.
-
Mount the latch cover to the hood-latch bracket with 2 washer-head screws (1/4 x 3/4 inch), positioning them as shown in Figure 1.
-
Install the locking latch through the hole in the side of the hood-latch bracket (Figure 1).
Note: Position the catch through the square hole in the top of the hood-latch bracket (Figure 1).
-
Install the locking nut onto the latch to secure it to the bracket.
-
Close the hood slowly and verify the latch catches.
-
If it does not catch, loosen the screws that secure the hood-latch bracket to the frame rail and adjust the bracket as necessary. Tighten the screws and verify that the latch catches.
-
Use the key to lock and unlock the latch. Store the key in a convenient and memorable place.
Installing the CE Decals
Parts needed for this procedure:
| CE warning decal | 1 |
| CE mark decal | 1 |
-
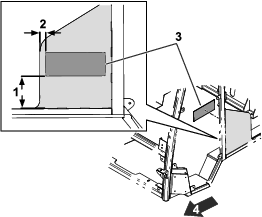
Install the CE warning decal (Part No. 117-2766) as indicated for your machine model:
-
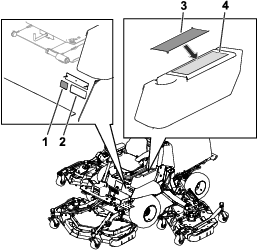
Place the CE mark decal next to the spark arrester decal; refer to Figure 2
Note: The spark arrester decal is located on the panel under the front, left side of the seat.