Introduction

The debris blower is towed behind a ride-on machine which is intended to be used by professional, hired operators in commercial applications. It is primarily designed to use wind power to quickly clear large areas of unwanted debris on well-maintained lawns in parks, golf courses, sports fields, and on commercial grounds.

Read this information carefully to learn how to operate and maintain your product properly and to avoid injury and product damage. You are responsible for operating the product properly and safely.

Visit www.Toro.com for product safety and operation training materials, accessory information, help finding a dealer, or to register your product.

Whenever you need service, genuine Toro parts, or additional information, contact an Authorized Service Dealer or Toro Customer Service and have the model and serial numbers of your product ready. Figure 1 identifies the location of the model and serial numbers on the product. Write the numbers in the space provided.

Important: With your mobile device, you can scan the QR code (if equipped) on the serial number plate to access warranty, parts, and other product information.

g262332g021671

This manual identifies potential hazards and has safety messages identified by the safety alert symbol (Figure 2), which signals a hazard that may cause serious injury or death if you do not follow the recommended precautions.

g000502

This manual uses 2 words to highlight information. Important calls attention to special mechanical information and Note emphasizes general information worthy of special attention.

This product complies with all relevant European directives; for details, please see the separate product specific Declaration of Conformity (DOC) sheet.

It is a violation of California Public Resource Code Section 4442 or 4443 to use or operate the engine on any forest-covered, brush-covered, or grass-covered land unless the engine is equipped with a spark arrester, as defined in Section 4442, maintained in effective working order or the engine is constructed, equipped, and maintained for the prevention of fire.

The DOT tire information is located on the side of each tire. This information gives load and speed ratings. Replacement tires should have the same or better ratings. Ensure that the tires meet or exceed the weight requirements of your machine.

Warning

CALIFORNIA

Proposition 65 Warning

Use of this product may cause exposure to chemicals known to the State of California to cause cancer, birth defects, or other reproductive harm.

Safety

This machine has been designed in accordance with ANSI standard B71.4-2017.

General Safety

This product is capable of amputating hands and feet and throwing objects. Always follow all safety instructions to avoid serious personal injury.

Using this product for purposes other than its intended use could prove dangerous to you and bystanders.

  • Read and understand the contents of both this Operator’s Manual and the operator’s manual of the traction unit before using this machine. Ensure that everyone using this product knows how to use this machine and the traction unit and understands the warnings.

  • Use your full attention while operating the machine. Do not engage in any activity that causes distractions; otherwise, injury or property damage may occur.

  • Do not put your hands or feet near moving components of the machine.

  • Do not operate the machine without all guards and other safety protective devices in place and working on the machine.

  • Keep children, bystanders, and pets out of the operating area. Never allow children to operate the machine.

  • Always shut off the engine, remove the key (if equipped), wait for all moving parts to stop, and allow the machine to cool before adjusting, repairing, cleaning, or storing the machine.

Improperly using or maintaining this machine can result in injury. To reduce the potential for injury, comply with these safety instructions and always pay attention to the safety-alert symbol (Figure 2), which means Caution, Warning, or Danger—personal safety instruction. Failure to comply with these instructions may result in personal injury or death.

Safety and Instructional Decals

Graphic

Safety decals and instructions are easily visible to the operator and are located near any area of potential danger. Replace any decal that is damaged or missing.

decal115-5106
decal119-0217
decal125-4283
decal115-5113
decal133-8061

Setup

Note: Determine the left and right sides of the machine from the normal operating position.

Note: To install and operate the debris blower, the traction unit must be a 4 Wheel Drive machine which is equipped with the Front Quick Attach Front Frame, Model 30509 and one of the following; the Electric Accessory Kit, part no. 115–0019 or the Joystick Kit, model 31219.

Removing the Blower from the Crate

Important: Install the jack stand to stabilize the blower before the blower frame is unbolted from the shipping crate or the crate is removed.

  1. Remove the top of the crate (Figure 3).

    g021672
  2. Remove the end of the crate which is toward the top of the machine (Figure 3).

  3. Remove the board that is under the blower housing (Figure 3).

  4. Secure a strap to the top end assembly and lift the pallet until the crate and blower is standing up vertically (Figure 4).

    g021673
  5. Remove the snapper pin securing the jack-stand tube to the storage tube (Figure 5). Remove the jack assembly from the storage position.

    g021674
  6. Remove the strap from the pallet and attach it to the lift loop on the blower (Figure 6).

  7. Lift the blower until the strap is tight.

    g021675
  8. Carefully remove the bolts holding the blower to the wood pallet.

  9. Slide the crate away from the blower and lower the blower until the castor wheels touch the floor keeping the strap tight (Figure 7).

    g021676
  10. Insert the jack-stand tube into the frame tube, align the holes, and secure it into position with the snapper pin (Figure 8).

    g021637
  11. Remove the cable tie securing the crank handle to the jack crank.

  12. Crank the jack stand down until the jack pad is level with the castor wheel tires.

  13. Remove the strap from the blower lift loop.

Installing the Drive Shaft to the Blower Gear Box Shaft

Parts needed for this procedure:

Drive shaft assembly 1
Roll pin 1
Bolt, 5/16 x 1-3/4 inch 2
Locknut, 5/16 inch 2
  1. Remove the cable tie securing the drive shaft to the shipping crate.

  2. Slide the drive shaft onto the gear box shaft.

  3. Align the mounting holes in the gear box shaft with the holes in the drive shaft and slide them together.

    g023911
  4. Secure the assembly with a roll pin (Figure 9).

  5. Secure the drive shaft to the gear box shaft with 2 bolts (5/16 x 1-3/4 inch) and 2 locknuts (5/16 inch) (Figure 9).

  6. Torque the bolts to 18 to 25 N∙m (175 to 225 in-lb).

  7. Remove the cable tie that is keeping the drive shaft together

  8. Secure the safety chain to the blower frame (Figure 9).

Installing the Mounting Plate to the Debris Blower Frame

Parts needed for this procedure:

Mounting plate 1
Bolt, 1/2 x 1-1/4 inches 4
Locknut, 1/2 inch 4
  1. Remove the bolts securing the mounting plate to the crate (Figure 10).

    g021682
  2. Install the mounting plate to debris blower frame with 4 bolts (1/2 x 1-1/4 inch) and 4 locknuts (1/2 inch) (Figure 11).

    Note: Use the lower set of holes on each side of the mounting plate.

    g021677
  3. Torque the bolts to 92 to 113 N∙m (68 to 82 ft-lb).

Mounting the Debris Blower to the Traction Unit

Parts needed for this procedure:

Debris blower assembly 1
Locking pin 1
Hairpin cotter 1
  1. Remove any attachments from the front of the machine.

  2. Move the traction unit into position behind the attachment adapter.

  3. Raise the traction unit adapter into the attachment adapter.

    Note: Raise the jack stand higher than the castors.

  4. Insert the locking pin through the adapters and secure it with a hairpin cotter (Figure 12).

    g023910
  5. Install the drive shaft to the quick attach frame by sliding the quick coupler onto the shaft (Figure 13).

    g021678
  6. Secure the safety chain to the quick attach frame (Figure 13).

  7. Remove the dust plugs from the hydraulic couplers and ensure that the couplers are free of any dirt or debris.

  8. Connect the attachment hydraulic hose couplers to the hydraulic couplers on the traction unit rear auxiliary hydraulic power kit.

    Important: Whenever the hydraulic hose couplers are disconnected, make sure the dust plugs are cleaned and then installed to prevent contamination from entering either hydraulic system.

Installing the Proximity Switch

Parts needed for this procedure:

Proximity switch assembly 1
Sensor plate 1
Carriage bolt, 5/16 x 1-1/4 inch 2
Flange nut, 5/16 inch 2
  1. Using the hole in the bottom of the front frame, loosely mount the proximity switch with the washers and jam nuts (Figure 14).

    g021679
  2. Loosely mount the sensor plate to the left lift arm with 2 carriage bolts (5/16 x 1-1/4 inch) and 2 flange nuts.

    Note: Do not tighten the jam nuts at this time.

  3. Position the sensor plate as shown in Figure 14.

    Note: Make sure the switch does not contact the sensor plate.

  4. Start the machine, raise the blower, then stop the machine.

  5. Adjust the sensor plate until it aligns with the proximity switch and tighten the carriage bolt nuts. Ensure that it does not contact the proximity switch.

  6. Using the jam nuts, adjust the proximity switch up or down until the gap between the switch plunger and the sensor plate is 3.8 to 4.3 mm (0.150 to 0.170 inch) (Figure 15).

  7. Torque the jam nuts to 20 N∙m (15 ft-lb) when the gap is attained.

    g021761
  8. Connect the wires from the proximity switch to the front attachment up switch on the Groundsmaster 360 electrical accessory kit

  9. When the switch is adjusted correctly, the blower should shut off if it is raised.

Note: When the traction unit is converted back to a mowing machine, the PTO will not come on when the front attachment is in the fully raised position. To engage the mower, the front attachment must be fully lowered.

Greasing the Machine

Parts needed for this procedure:

General Purpose Lithium Base Grease A/R

Product Overview

Raise/Lower Front Attachment Switch

Press the front or back of the rocker switch to raise or lower the front attachment (Figure 16).

Warning

Holding down the power down or front attachment lower switch can cause significant hydraulic system damage and result in front attachment damage.

Nozzle Direction Switch

Press the front or back of the rocker switch to rotate the nozzle to the desired direction (Figure 16).

g021041

Joystick (Optional)

Note: All references to right and left orientation are determined by normal operating position.

g017857
Joystick ActionFunction
ForwardLowers the blower
BackRaises the blower
LeftRotates the blower nozzle to the left
RightRotates the blower nozzle to the right
Left toggleDo not use this function
Right toggleDo not use this function
Weight171 kg. (376 lb.)

Operation

Note: Determine the left and right sides of the machine from the normal operating position.

Important: Do not operate the machine without the fan guard and gear-case guard in place (Figure 18).

g023971

Operation Safety

Before Operation Safety

  • Never allow children or untrained people to operate or service the machine. Local regulations may restrict the age of the operator. The owner is responsible for training all operators and mechanics.

  • Become familiar with the safe operation of the equipment, operator controls, and safety signs.

  • Always wait for all moving parts to stop and allow the machine to cool before adjusting, repairing, cleaning, or storing the machine. Know how to stop the machine quickly.

  • Keep all guards, safety devices, and decals in place. Repair or replace all safety devices and replace all illegible or missing decals. Do not operate the machine unless they are present and functioning properly.

  • Do not modify this equipment in any manner.

During Operation Safety

  • The owner/operator can prevent and is responsible for accidents that may cause personal injury or property damage.

  • Wear appropriate clothing, including eye protection; long pants; substantial, slip-resistant footwear; and hearing protection. Tie back long hair and do not wear loose jewelry.

  • Do not operate the machine while ill, tired, or under the influence of alcohol or drugs.

  • Use your full attention while operating the machine. Do not engage in any activity that causes distractions; otherwise, injury or property damage may occur.

  • Discharged air has considerable force and could cause injury or loss of footing. Stay away from the blower nozzle when the machine is operating.

  • Keep all bystanders away; shut off the machine when bystanders enter the area, do not direct discharge toward them.

  • Do not carry passengers on the machine and keep bystanders and pets away from the machine during operation.

  • Operate the machine only in good visibility to avoid holes or hidden hazards.

  • Look behind and down before backing up to be sure of a clear path.

  • Use care when approaching blind corners, shrubs, trees, or other objects that may obscure your vision.

  • Never leave a running machine unattended.

  • If the machine ever vibrates abnormally, stop the machine immediately, shut off the engine, remove the key, wait for all moving parts to stop, and inspect for damage. Repair all damage to the machine before resuming operation.

  • Reduce speed when operating on rough, uneven terrain, and near curbs, holes, and other sudden changes in terrain.

Slope Safety

  • Slopes are a major factor related to loss of control and rollover accidents, which can result in severe injury or death. You are responsible for safe slope operation. Operating the machine on any slope requires extra caution.

  • Review the traction unit specifications to ensure that you do not exceed its slope capabilities.

  • Evaluate the site conditions to determine if the slope is safe for machine operation, including surveying the site. Always use common sense and good judgment when performing this survey.

  • Review the slope instructions, listed below, for operating the machine on slopes. Before you operate the machine, review the site conditions to determine whether you can operate the machine in the conditions on that day and at that site. Changes in the terrain can result in a change in slope operation for the machine.

    • Avoid starting, stopping, or turning the machine on slopes. Avoid making sudden changes in speed or direction. Make turns slowly and gradually.

    • Do not operate a machine under any conditions where traction, steering, or stability is in question.

    • Remove or mark obstructions such as ditches, holes, ruts, bumps, rocks, or other hidden hazards. Tall grass can hide obstructions. Uneven terrain could overturn the machine.

    • Be aware that operating the machine on wet grass, across slopes, or downhill may cause the machine to lose traction.

    • Use extreme caution when operating the machine near drop-offs, ditches, embankments, water hazards, or other hazards. The machine could suddenly roll over if a wheel goes over the edge or the edge caves in. Establish a safety area between the machine and any hazard.

After Operation Safety

  • Park the machine on a level surface; shut off the engine, remove the key, wait for all moving parts to stop, and allow the machine to cool before adjusting, repairing, cleaning, or storing the machine.

  • Only disconnect the machine from the traction unit while on a level surface.

  • Keep all parts of the machine in good working condition and all hardware tightened.

  • Replace all worn, damaged, or missing decals.

Adjusting the Blower Nozzle Height

The blower nozzle can be operated at a height range from 114 to 216 mm (4.5 to 8.5 inches). To adjust the blower nozzle height, position the castor wheel axles in the upper or lower holes of the castor forks and add or remove an equal number of spacers from the castor forks.

  1. Start the engine and raise the blower off the floor so the castor wheels can be changed.

  2. Stop the engine and remove the key after the blower is raised.

  3. Position the castor wheel axles in the same holes in both castor forks (Figure 19).

    Note: Use the lower castor fork axle mounting holes to attain higher blower nozzle height.

    g008866
  4. Remove the tensioning cap from the spindle shaft (Figure 19) and slide the spindle out of the castor arm.

  5. Put the 2 shims (1/8 inch) onto the spindle shaft as they were originally installed.

    Note: These shims are required to achieve a level across the entire width of the blower.

  6. Slide the appropriate number of 1/2 inch spacers onto the spindle shaft to get the desired height; then slide the washer onto the shaft.

  7. Push the castor spindle through the castor arm.

  8. Install the shims (as they were originally installed) and the remaining spacers onto the spindle shaft.

  9. Install the tensioning cap to secure the assembly.

Operating Tips

Warning

Discharged air has considerable force and could cause injury or loss of footing.

  • Stay away from nozzle opening when machine is operating.

  • Keep bystanders away from nozzle opening when machine is running.

  • Practice operating the blower. It is advisable to blow the same direction the wind is blowing to prevent material from blowing back into the cleared area.

  • Be alert, slow down, and use caution when making turns. Look behind and to the side before changing directions.

  • Be aware of the blower nozzle direction and do not point it at anyone.

  • Use care when approaching blind corners, shrubs, trees, or other objects that may obscure vision.

  • Check carefully for overhead clearances (i.e. branches, doorways, electrical wires) before driving under any objects and do not allow them to contact the blower screen.

  • Reduce your speed when making sharp turns and when turning on hillsides.

  • Before backing up, look to the rear and ensure that no one is behind the machine.

  • Use caution when blowing around newly planted sod as the force of the air could disrupt the grass.

  • Stay away from the nozzle opening when the machine is operating. Keep all bystanders away from the nozzle opening and don’t direct discharge toward bystanders.

  • Do not take an injury risk. When a person or pet appears unexpectedly in or near the operating area, stop operation. Careless operation, combined with terrain angles, ricochets or improperly positioned guards can lead to thrown object injuries. Do not resume operation until the area is cleared.

Important: Raise the blower before transporting. If the nozzle is left in the down position during transport, the nozzle may contact the ground and damage to the nozzle may occur.

Maintenance

Note: Determine the left and right sides of the machine from the normal operating position.

Maintenance Safety

  • Before cleaning, servicing, or adjusting the machine, do the following:

    • Park the machine on a level surface.

    • Wait for all moving parts to stop.

    • Remove the machine from the traction unit.

    • Lower the jack stand

    • Allow machine components to cool before performing maintenance.

  • Perform only those maintenance instructions described in this manual. If major repairs are ever needed or you need assistance, contact an authorized Toro distributor.

  • Support the machine with blocks or jack stands when working beneath it.

  • Ensure that all guards are installed securely after maintaining or adjusting the machine.

  • Do not allow untrained personnel to service the machine.

  • Keep all parts in good working condition and all fasteners tightened. Replace all damaged or missing decals.

  • Do not interfere with the intended function of a safety device or reduce the protection provided by a safety device. Check their proper operation regularly.

  • If major repairs are ever necessary or assistance is required, contact an authorized Toro distributor.

  • Altering this machine in any manner may affect the operation of the machine, performance, durability, or its use may result in injury or death. Such use could void the product warranty of The Toro® Company.

Lubrication

Maintenance Service IntervalMaintenance Procedure
Every 50 hours
  • Lubricate all grease fittings
  • The debris blower has bearings and bushings that must be lubricated regularly. If the machine is operated under normal conditions, lubricate bearings with No. 2 general purpose lithium base grease after every 50 hours of operation. Lubricate fittings immediately after every washing, regardless of the interval listed.

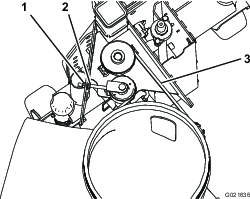
    The lubrication points are as follows:

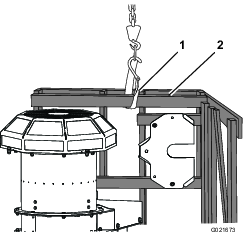
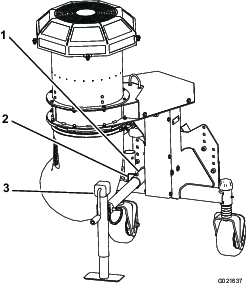
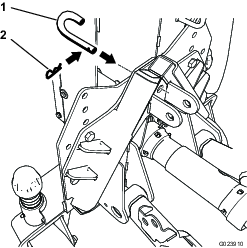
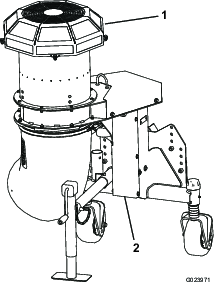
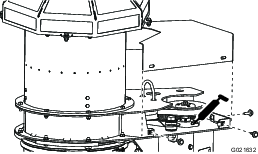
    Drive pulley (Figure 20)

    g021632

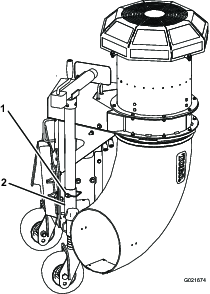
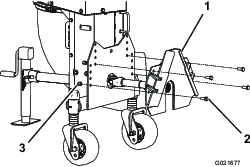
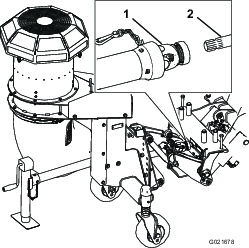
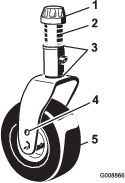
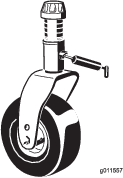
    Castor wheel shaft (2) (Figure 21)

    g011557

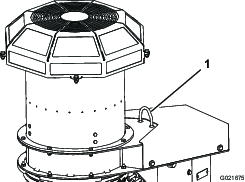
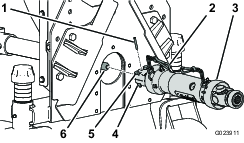
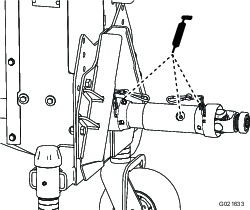
    Drive shaft (Figure 22)

    g021633

    Checking the Gear Box Lubrication

    Maintenance Service IntervalMaintenance Procedure
    Every 50 hours
  • Check the gear box lubrication
  • Gear box capacity: 207ml (7 oz).

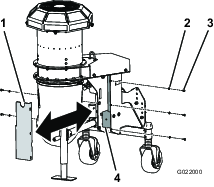
    1. Position the machine and blower on a level surface and lower the blower.

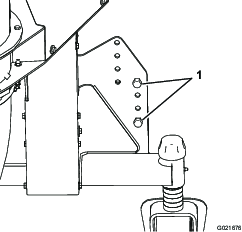
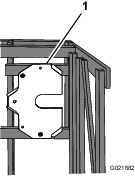
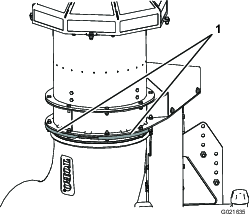
    2. Remove the 5 bolts and washers securing the gear case cover to the blower (Figure 23).

      g022000
    3. Remove the cover to expose the blower gear case (Figure 23).

    4. Remove the check/fill plug from the side of the gear box (Figure 24).

      g022001
    5. Check the oil level to make sure it is up to the plug hole in the gear box. If the lubricant level is low, add enough SAE 80-90 weight gear lube to raise the level up to the hole.

    6. Install the check/fill plug to the gear box.

    7. Install the cover.

    Checking the Nozzle

    Maintenance Service IntervalMaintenance Procedure
    Before each use or daily
  • Check the nozzle clamp and the nozzle guides
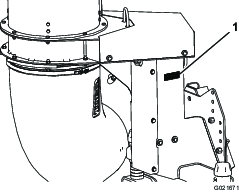
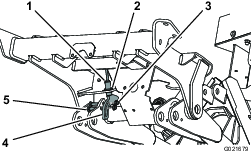
  • Checking the Nozzle Clamp

    1. Check the nozzle clamp (Figure 25) daily to ensure that is tight.

      Note: The nozzle can loosen if it is dragged over obstacles or through low areas in the terrain.

    2. Tighten the clamp fasteners to maintain a gap of 1.3 cm (0.50 inch).

      The nozzle must rotate freely when moved by hand.

    g023909

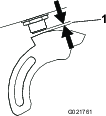
    Cleaning the Nozzle Guides

    Check and remove any grass, dirt or debris buildup around and in between the nozzle guides (Figure 26).

    Keep the nozzle free of debris to prevent the motor from stalling

    g021635

    Adjusting the Nozzle Belt

    Maintenance Service IntervalMaintenance Procedure
    After the first 8 hours
  • Check the condition and the tension of the belt
  • Every 50 hours
  • Check the condition and the tension of the belt
  • Adjust the belt if the belt slips when changing direction of the nozzle.

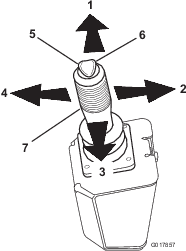
    1. Press the belt, at the center of the longest span, with 30 N∙m (22 lb) of force (Figure 27).

      Note: The belt should deflect 4.8 mm (0.19 inch).

    2. If the deflection is incorrect, proceed to the next step. If it is correct, continue operation.

      g021636
    3. Loosen the hex nut and tighten the flange nut to increase the belt tension (Figure 27).

      Note: Do not over tighten.

    4. Tighten the hex nut to lock the adjustment.

    Storage

    1. Remove grass clippings, dirt, and grime from the external parts of the entire blower.

      Important: You can wash the machine with mild detergent and water. Do not pressure wash the machine. Avoid excessive use of water.

    2. Check and tighten all bolts and nuts. Replace any worn parts.

    3. Paint all scratched or bare metal surfaces. Paint is available from your Authorized Service Dealer.

    4. Store the machine in a clean, dry garage, or storage area. Use the jack stand to store the blower in the upright position. Do not lay the blower down on the ground.