Introduction
This blower is intended to be used by residential homeowners to move leaf-like debris as needed outdoors. It is designed primarily to use battery pack Model 88540 (provided with Model 51690) or 88541.
Read this information carefully to learn how to operate and maintain your product properly and to avoid injury and product damage. You are responsible for operating the product properly and safely.
You may contact Toro directly at www.Toro.com for product and accessory information, help finding a dealer, complete warranty details, or to register your product.
Model 51690T does not include a battery or a charger.
 |
If you have questions or problems, call toll free 1-888-367-6631 (US) or 1-888-430-1687 (Canada) before returning this product. |
Warning
CALIFORNIA
Proposition 65 Warning
Use of this product may cause exposure to chemicals known to the State of California to cause cancer, birth defects, or other reproductive harm.
Safety
WARNING: When using electric gardening appliances, always follow basic safety precautions to reduce the risk of fire, electric shock, and personal injury, including the following:
Warning
Failure to follow all warnings and instructions may result in electric shock, fire and/or serious personal injury.
Read all safety warnings and all instructions.
Save all warnings and instructions for future reference.
The term “power tool” in all the warnings refers to your mains-operated (corded) power tool or battery-operated (cordless) power tool.
-
Work area safety
-
Keep the work area clean and well lit.Cluttered or dark areas invite accidents.
-
Do not operate power tools in explosive atmospheres, such as in the presence of flammable liquids, gasses, or dust.Power tools create sparks which may ignite the dust or fumes.
-
Keep children and bystanders away while operating a power tool.Distractions can cause you to lose control.
-
-
Personal safety
-
Stay alert; watch what you are doing and use common sense when operating a power tool. Do not use a power tool while you are tired or under the influence of drugs, alcohol, or medication.A moment of inattention while operating power tools may result in serious personal injury.
-
Use personal protective equipment. Always wear eye protection.Protective equipment such as a dust mask, non-skid safety shoes, a hard hat, or hearing protection used for appropriate conditions will reduce personal injuries.
-
Prevent unintentional starting. Ensure that the switch is in the OFF position before connecting to a power source and/or battery pack and picking up or carrying the tool.Carrying power tools with your finger on the switch or energizing power tools that have the switch on invites accidents.
-
Do not overreach. Keep proper footing and balance at all times.This enables better control of the power tool in unexpected situations.
-
Dress properly. Do not wear loose clothing or jewelry. Keep your hair tied back and keep your hair, clothing, and gloves away from venting areasLoose clothes, jewelry, or long hair can be caught in moving parts.
-
Keep your hands and feet away from the cutting area.
-
-
Power tool use and care
-
Do not force the power tool. Use the correct power tool for your application.The correct power tool will do the job better and safer at the rate for which it was designed.
-
Do not use the power tool if the switch does not turn it on and off.Any power tool that cannot be controlled with the switch is dangerous and must be repaired.
-
Remove the battery pack from the power tool before making any adjustments, changing accessories, or storing power tools.Such preventive safety measures reduce the risk of starting the power tool accidentally.
-
Store idle power tools out of the reach of children and do not allow persons unfamiliar with the power tool or these instructions to operate the power tool.Power tools are dangerous in the hands of untrained users.
-
Store idle appliances indoors.When not in use, appliances should be stored indoors in a dry and high or locked-up place, out of the reach of children.
-
Maintain power tools. Check for misalignment or binding of moving parts, breakage of parts and any other condition that may affect the power tools operation. If damaged, have the power tool repaired before use.Many accidents are caused by poorly maintained power tools.
-
Keep cutting tools sharp and clean.Properly maintained cutting tools with sharp cutting edges are less likely to bind and are easier to control.
-
Use the power tool in accordance with these instructions and in the manner intended for the particular type of power tool, taking into account the working conditions and the work to be performed.Using the power tool for operations different from those intended could result in a hazardous situation.
-
Keep guards in place and in working order.
-
-
Service
Have your power tool serviced by a qualified repair person using only identical replacement parts.This will ensure that the safety of the power tool is maintained.
-
Battery Safety
-
Do not charge appliance in rain, or in wet locations.
-
Do not use battery-operated appliance in the rain.
-
Use only the following type and size battery(ies): Toro battery Model 88540 or 88541.
-
Remove or disconnect the battery before servicing, cleaning, or removing material from the gardening appliance.
-
Do not dispose of the battery(ies) in a fire. The cell may explode. Check with local codes for possible special disposal instructions.
-
Do not open or mutilate the battery(ies). Released electrolyte is corrosive and may cause damage to the eyes or skin. It may be toxic if swallowed.
-
Exercise care in handling batteries in order not to short the battery with conducting materials such as rings, bracelets, and keys. The battery or conductor may overheat and cause burns.
-
SAVE THESE INSTRUCTIONS
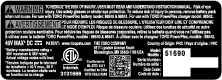
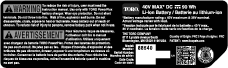
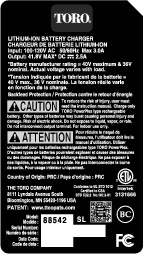
Safety and Instructional Decals
 |
Safety decals and instructions are easily visible to the operator and are located near any area of potential danger. Replace any decal that is damaged or missing. |


Setup
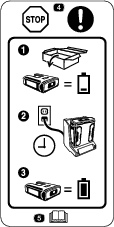
Note: The battery pack is not fully charged when you purchase it. Before using the tool for the first time, refer to Charging the Battery Pack.
Mounting the Battery Charger (Optional)
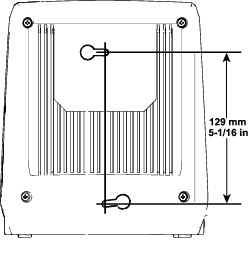
If desired, mount the battery charger securely on a wall using the wall-mount key holes on the back of the charger.
Mount it indoors (such as a garage or other dry place), near a power outlet, and out of the reach of children.
Refer to Figure 1 for assistance in mounting the charger.
Note: Slide and twist the charger over the appropriately positioned hardware to secure the charger in place (hardware not included).
Assembling the Blower
Parts needed for this procedure:
| Blower tube | 1 |
-
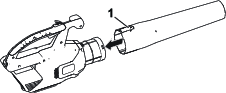
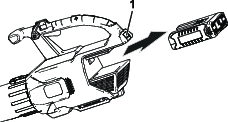
Slide the blower tube onto the blower housing. You may need to press down on the tab for the blower tube to lock into place (Figure 2).
-
Align the cavity on the battery pack with the tongue in the handle housing, grasp the handle, and push the battery pack into the handle until the latch locks into place (Figure 3).

Product Overview
| Charge the battery at | 0°C (32°F) to 40°C (104°F)* |
| Use products at | -15°C (5°F) to 60°C (140°F) |
| Store products at | -15°C (5°F) to 60°C (140°F) |
| Unplug the charger if | Below 0°C (32°F) or above 40°C (104°F) |
*Charging time will increase if you do not charge the battery within this range.
Store the tool, battery pack, and battery charger in an enclosed clean, dry area.
Operation
Warning
The blower can throw debris, possibly causing serious personal injury to you or bystanders.
-
Do not blow hard objects, such as nails, bolts, or rocks.
-
Do not operate the blower near bystanders or pets.
-
Use extra care when cleaning debris from stairs or other tight areas.
-
Wear safety goggles or other suitable eye protection, long pants, and shoes.
Starting the Blower
Adjusting the Air Speed of the Blower
Shutting Off the Blower
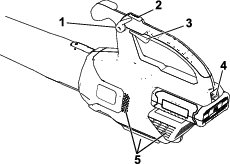
To shut off the blower, disengage the speed lock (if in use) and release the variable-speed trigger (Figure 4).
Important: After stopping the blower, do not leave the speed lock engaged with the battery pack in the blower.
Whenever you are not using the blower or are transporting the blower to or from the work area, remove the battery pack.
Removing the Blower Tube
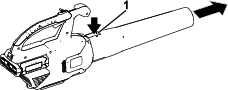
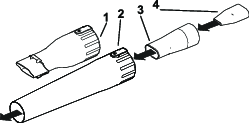
Press down on the tab to separate the blower tube from the blower (Figure 5).
Removing the Battery from the Blower
Press down on the battery latch to separate the battery from the blower (Figure 6).
Using the Attachments
Use the provided attachments as needed.
Note: The Gutter Cleaner Kit (Model 51667) and Oscillating Tube (Model 51664) are sold separately.
Charging the Battery Pack
Important: Read all safety precautions.
Important: Charge the battery pack only in temperatures that are within the appropriate range; refer to Specifications.
Note: At any time, press the battery-charge-indicator button on the battery pack to display the current charge (LED indicators).
-
Make sure that the vents on the battery are clear of any dust and debris.
-
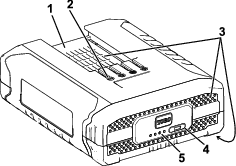
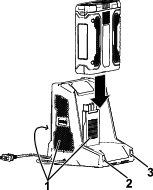
Line up the cavity in the battery pack (Figure 8) with the tongue on the charger.
-
Make sure that the vents on the battery charger are clear of any dust and debris.
-
Slide the battery pack into the charger until it is fully seated (Figure 9).
-
To remove the battery pack, slide the battery backward out of the charger.
-
Refer to the following table to interpret the LED indicators on the battery charger.
| Left Light | Right Light | Indicates: |
| Off | Red | Charger is on; no battery pack inserted |
| Red | Red | Battery pack is charging |
| Green | Red | Battery pack is charged |
| Orange | Red | Battery pack is too warm |
| Red Blinking | Red | Replace the battery pack |
Storage
Important: Store the tool, battery pack, and charger only in temperatures that are within the appropriate range; refer to Specifications.
Important: If you are storing the tool for a year or longer, remove the battery pack from the tool and charge the battery pack until 2 or 3 LED indicators turn blue on the battery. Do not store a fully charged or fully depleted battery. When you are ready to use the tool again, charge the battery pack until the left indicator light turns green on the charger or all 4 LED indicators turn blue on the battery.
-
Disconnect the product from the power supply (i.e., remove the plug from the power supply or the battery pack) and check for damage after use.
-
Clean all foreign material from the product.
-
When not in use, store the tool, battery pack, and battery charger out of the reach of children.
-
Keep the tool, battery pack, and battery charger away from corrosive agents, such as garden chemicals and de-icing salts.
-
To reduce the risk of serious personal injury, do not store the battery pack outside or in vehicles.
-
Store the tool, battery pack, and battery charger in an enclosed clean, dry area.
Preparing the Battery Pack for Recycling
Important: Upon removal, cover the terminals of the battery pack with heavy-duty adhesive tape. Do not attempt to destroy or disassemble the battery pack or remove any of its components. Recycle or properly dispose of lithium-ion battery packs at a battery recycling facility.
 |
For more information on recycling lithium-ion battery packs and to locate the battery recycling facility closest to you, visit www.Call2Recycle.org (US and Canada only). If you are located outside of the US and Canada, please contact your authorized Toro distributor. |
Troubleshooting
Perform only the steps described in these instructions. All further inspection, maintenance, and repair work must be performed by an authorized service center or a similarly qualified specialist if you cannot solve the problem yourself.
| Problem | Possible Cause | Corrective Action |
|---|---|---|
| The battery pack loses charge quickly. |
|
|
| The battery charger is not working. |
|
|
| The tool does not run or run continuously. |
|
|
| The battery pack shows only 3 LED indicators after only a few seconds of using a fully charged battery. |
|
|
| All 4 LED indicators are blinking on the battery pack after you press the battery-charge-indicator button on the battery pack and the current charge displays (when the battery pack is not in use). |
|
|
| All 4 LED indicators are blinking on the battery pack after releasing the trigger (when the battery pack is in use). |
|
|
| 2 LED indicators are blinking on the battery pack after you press the battery-charge-indicator button on the battery pack and the current charge displays (when the battery pack is not in use). |
|
|
| 2 LED indicators are blinking on the battery pack after releasing the trigger (when the battery pack is in use). |
|
|
| 1 LED indicator is blinking on the battery pack. |
|
|
| It is difficult to remove the battery pack from the tool. |
|
|
| The speed lock does not hold when engaged. |
|
|