Introduction

This hedge trimmer is intended to be used by residential homeowners to maintain bushes and hedges. It is designed to use only battery pack Model 88540 (provided with Model 51491) or 88541.

Read this information carefully to learn how to operate and maintain your product properly and to avoid injury and product damage. You are responsible for operating the product properly and safely.

You may contact Toro directly at www.Toro.com for product and accessory information, help finding a dealer, complete warranty details, or to register your product.

Model 51491T does not include a battery or a charger.

Graphic

If you have questions or problems, call toll free 1-800-237-2654 (US) or 1-800-248-3258 (Canada) before returning this product.

Warning

CALIFORNIA

Proposition 65 Warning

Use of this product may cause exposure to chemicals known to the State of California to cause cancer, birth defects, or other reproductive harm.

Safety

Warning

Failure to follow all warnings and instructions may result in electric shock, fire and/or serious personal injury.

Read all safety warnings and all instructions.

Save all warnings and instructions for future reference.

The term “power tool” in the warnings refer to your mains-operated (corded) power tool or battery-operated (cordless) power tool.

  1. Work area safety

    1. Keep the work area clean and well lit.Cluttered or dark areas invite accidents.

    2. Do not operate power tools in explosive atmospheres, such as in the presence of flammable liquids, gasses, or dust.Power tools create sparks, which may ignite the dust or fumes.

    3. Keep children and bystanders away while operating a power tool.Distractions can cause you to lose control.

    4. Avoid dangerous environments.Do not use appliances in damp or wet locations.

  2. Personal safety

    1. Stay alert; watch what you are doing and use common sense when operating a power tool. Do not use a power tool while you are tired or under the influence of drugs, alcohol, or medication.A moment of inattention while operating power tools may result in serious personal injury.

    2. Use personal protective equipment. Always wear eye protection.Protective equipment such as a dust mask, non-skid safety shoes, a hard hat, or hearing protection used for appropriate conditions will reduce personal injuries.

    3. Prevent unintentional starting. Ensure that the switch is in the OFF position before connecting to a power source and/or battery pack and picking up or carrying the tool.Carrying power tools with your finger on the switch or energizing power tools that have the switch on invites accidents.

    4. Remove any adjusting key or wrench before turning on the power tool.A wrench or a key left attached to a rotating part of the power tool may result in personal injury.

    5. Do not overreach. Keep proper footing and balance at all times.This enables better control of the power tool in unexpected situations.

    6. Dress properly. Do not wear loose clothing or jewelry. Keep your hair tied back and your clothing and gloves away from moving parts.Loose clothes, jewelry, or long hair can be caught in moving parts.

    7. If devices are provided for the connection of dust extraction and collection facilities, ensure that these are connected and properly used.Use of dust collection can reduce dust-related hazards.

  3. Power tool use and care

    1. Do not force the power tool. Use the correct power tool for your application.The correct power tool will do the job better and safer at the rate for which it was designed.

    2. Do not use the power tool if the switch does not turn it on and off.Any power tool that cannot be controlled with the switch is dangerous and must be repaired.

    3. Disconnect the plug from the power source and/or the battery pack from the power tool before making any adjustments, changing accessories, or storing power tools. Such preventive safety measures reduce the risk of starting the power tool accidentally.

    4. Store idle power tools out of the reach of children and do not allow persons unfamiliar with the power tool or these instructions to operate the power tool.Power tools are dangerous in the hands of untrained users.

    5. Maintain power tools. Check for misalignment or binding of moving parts, breakage of parts and any other condition that may affect the power tools operation. If damaged, have the power tool repaired before use.Many accidents are caused by poorly maintained power tools.

    6. Keep cutting tools sharp and clean.Properly maintained cutting tools with sharp cutting edges are less likely to bind and are easier to control.

    7. Use the power tool, accessories and tool bits etc. in accordance with these instructions, taking into account the working conditions and the work to be performed. Using the power tool for operations different from those intended could result in a hazardous situation.

  4. Battery tool use and care

    1. Charge only with the charger specified by the manufacturer.A charger that is suitable for 1 type of battery pack may create a risk of fire when used with another battery pack.

    2. Use power tools only with specifically designated battery packs.Using any other battery packs may create a risk of injury and fire.

    3. When battery pack is not in use, keep it away from other metal objects, such as paper clips, coins, keys, nails, screws, or other small metal objects that can make a connection from one terminal to another.Shorting the battery terminals together may cause burns or a fire.

    4. Under abusive conditions, liquid may be ejected from the battery; avoid contact. If contact accidentally occurs, flush with water. If liquid contacts eyes, additionally seek medical help.Liquid ejected from the battery may cause irritation or burns.

    5. Charging time increases if the battery pack is not charged within the appropriate temperature range; refer to Specifications.

  5. Service

    Have your power tool serviced by a qualified repair person using only identical replacement parts.This will ensure that the safety of the power tool is maintained.

Hedge Trimmer Safety Warnings

  • Keep all parts of the body away from the cutter blade. Do not remove cut material or hold material to be cut when blades are moving. Make sure that the switch is off when clearing jammed material. The blades coast after you turn them off.A moment of inattention while operating the hedge trimmer may result in serious personal injury.

  • Carry the hedge trimmer by the handle with the cutter blade stopped.Proper handling of the hedge trimmer reduces possible personal injury from the cutter blades.

  • Hold the power tool by insulated gripping surfaces only, because the cutter blade may contact hidden wiring or its own cord.Cutter blades contacting a “live” wire may make exposed metal parts of the power tool “live” and could give you an electric shock.

  • DANGER—Keep your hands away from blade.Contact with blade will result in serious personal injury.

Additional Safety Warnings

  • Keep hands and feet away from the cutting device at all times and especially when switching the product on.

  • Do not try to grasp or remove trimmings when the product is running. Remove only trimmings when the product is switched off and disconnected from the power supply.

  • Never hold the product by the guard.

  • Always be sure of a safe and secure operating position while using the product.

  • Never use the product while standing on steps or a ladder. Do not work over shoulder height.

  • Always ensure the safety guard supplied is fitted before using the product. Never attempt to use an incomplete product or one fitted with an unauthorized modification.

  • Check the cutting device regularly for damage, and if damaged, repair immediately.

  • Do not overload the product.

  • Check immediately if the product starts to vibrate abnormally. Excessive vibration can cause injury.

  • Switch the product off when the cutting device is blocked. Disconnect it from power supply (i.e., remove the battery pack) and remove the blockage. Inspect the cutting device for damage before using the product again.

  • Follow the maintenance and repair instructions for this product. Never carry out any modifications to the product. Information about maintenance and repair is provided in this instruction manual.

  • Know how to stop the product quickly in an emergency.

  • Do not expose the product to rain. Do not operate the product on a wet hedge.

  • Use the product only in daylight or good artificial light.

  • Check the hedge for foreign objects before operation (e.g., wire fences). Take care that the cutting device does not come into contact with wire or other metal objects.

  • Hold the hedge trimmer properly (e.g., with both hands if 2 handles are provided). Loss of control can cause personal injury.

Additional Safety Warnings for the Charger

  • This charger can be used by persons with reduced physical, sensory, or mental capabilities, or a lack of experience and knowledge if they have been given supervision or instruction concerning use of the charger in a safe way and understand the hazards involved.

  • Children shall not play with the charger.

  • Cleaning and user maintenance shall not be made by children without supervision.

  • If the supply cord is damaged, it must be replaced by the manufacturer, its service agent, or similarly qualified persons in order to avoid a hazard.

  • Disconnect the charger from the power supply and allow it to cool down before cleaning, maintenance, storage, and transportation.

  • Before using the charger, read all the instructions and cautionary markings on the charger and battery pack.

  • The charger and battery pack supplied with it are specifically designed to work together. Use the charger only with the battery pack for this tool.

  • Charge the battery pack indoors only as the charger is designed for indoor use only.

  • Do not charge non-rechargeable batteries.

  • Protect the charger against moisture and wet conditions. There is a danger of electric shock.

  • Do not place any object on top of the charger as it could cause overheating. Do not place the charger near any heat source.

  • Do not use an extension cord on the charger unless it is absolutely necessary. The use of an improper extension cord could cause the risk of fire, electric shock, or electrocution.

  • Do not use the charger if it has been subjected to a heavy knock, dropped,or otherwise damaged in any way. Have the charger checked and repaired by an authorized service center.

Additional Safety Warnings for Battery Packs

  • Do not attempt to charge the battery pack with any other charger than the one supplied. The charger and battery pack supplied with it are specifically designed to work together.

  • To ensure the longest battery life and best performance, only charge and store the battery pack in temperatures that are within the appropriate range; refer to Specifications. Do not charge or store the battery pack in temperatures outside of the suggested range.

  • Small leakage of liquid from the battery pack may occur under extreme usage or temperature conditions. However, if the outer seal is broken and this leakage comes into contact with your skin, wash the affected area quickly with water. If the leakage gets in your eyes, flush your eyes with clean water for a minimum of 10 minutes and seek immediate medical attention.

  • Never attempt to open the battery pack for any reason. If the plastic housing of the battery pack breaks open or cracks, immediately discontinue its use and do not recharge it.

  • Do not store or carry a spare battery pack in a pocket or toolbox or any other place where it may come into contact with metal objects. The battery pack may short-circuit, causing damage to the battery pack, burns, or a fire.

  • Do not pierce the battery with nails, strike the battery with a hammer, step on the battery, or otherwise subject it to strong impacts or shocks.

  • Protect the battery pack against heat. Do not place the battery in direct sunlight or use or store the battery inside cars in hot weather. Doing so may cause the battery to generate heat, explode or ignite.

  • Never try to charge a battery pack that is cracked or damaged in any other way. There is a danger of electric shock or electrocution.

Safety and Instructional Decals

Graphic

Safety decals and instructions are easily visible to the operator and are located near any area of potential danger. Replace any decal that is damaged or missing.

SymbolDesignation/Explanation
GraphicRead the instruction manual.
GraphicWear hearing protection.
GraphicWear eye protection.
GraphicWear a dust mask.
GraphicWear protective gloves.
GraphicWear protective, slip-resistant footwear.
GraphicDo not expose the product to rain or wet conditions (moisture).
GraphicKeep fingers away from moving cutting device.
GraphicWEEE symbol. Waste electrical products should not be disposed of with household waste. Please recycle where facilities exist. Check with your Local Authority or local store for recycling advice.
decal136-2461
decal136-2462
decal136-2471
decal136-2473
decal136-2476
decal136-2539
decal136-2533
decal136-2534

Setup

Note: The battery pack is not fully charged when it is purchased. Before using the tool for the first time, refer to Charging the Battery Pack.

Mounting the Battery Charger (Optional)

If desired, mount the battery charger securely on a wall using the wall-mount key holes on the back of the charger.

Mount it indoors (such as a garage or other dry place), near a power outlet, and out of the reach of children.

Refer to Figure 1 for assistance in mounting the charger.

Note: Slide and twist the charger over the appropriately positioned hardware to secure the charger in place (hardware not included).

g194202

Product Overview

g204357
Model5149151491T
Cutting Length610 mm
Rated Voltage40 VDC maximum, 36 VDC nominal usage
No-load Speed3000 spm at 40 VDC max
Cutting width18 mm
Charger Type88542
Battery Type88540 (included with 51491), 88541 (sold separately)

Appropriate Temperature Ranges

Charge the battery at0°C (32°F) to 40°C (104°F)*
Use products at-15°C (5°F) to 60°C (140°F)
Store products at-15°C (5°F) to 60°C (140°F)
Unplug the charger ifBelow 0°C (32°F) or above 40°C (104°F)

*Charging time will increase if you do not charge the battery within this range.

Store the tool, battery pack, and battery charger in an enclosed clean, dry area.

Operation

Starting the Hedge Trimmer

  1. Remove the protective cover from the blades (Figure 3).

    Warning

    The hedge trimmer blades can cause cuts or amputation.

    Be careful when handling the hedge trimmer with the protective cover removed.

    g203890
  2. Make sure that the vents on the hedge trimmer are clear of any dust and debris.

  3. Align the cavity of the battery pack with the tongue in the handle housing, grasp the handle, and push the battery pack into the handle until the latch locks into place (Figure 4).

    g228569
  4. Place 1 hand on the trigger handle. Place the other hand on the auxiliary handle (Figure 4).

  5. Press the lock switch and then squeeze the trigger switch while engaging the auxiliary-handle switch to turn on the hedge trimmer (Figure 4).

    The trimmer stays on as long as the auxiliary-handle switch is engaged and the trigger is squeezed. You may release the lock switch once the hedge trimmer is running (Figure 4).

Rotating the Hedge Trimmer Handle

  1. Press and hold the rotational lock button (A of Figure 5).

  2. Rotate the handle 90° to the right or left depending on desired cutting direction, then release the rotational lock button to lock the handle in the desired position (B of Figure 5).

g190070

Shutting Off the Hedge Trimmer

To shut off the hedge trimmer, release the trigger, auxiliary-handle switch, or both (Figure 4). Allow at least 5 seconds for the cutting blade to stop moving.

Whenever you are not using the trimmer or are transporting the trimmer to or from the work area, remove the battery pack.

Removing the Battery Pack

Press the battery latch on the tool to release the battery pack and slide the battery pack out of the tool (Figure 6).

g194190

Charging the Battery Pack

Important: Read all safety precautions.

Important: Charge the battery pack only in temperatures that are within the appropriate range; refer to Specifications.

Note: At any time, press the battery-charge-indicator button on the battery pack to display the current charge (LED indicators).

  1. Make sure that the vents on the battery are clear of any dust and debris.

  2. Line up the cavity in the battery pack (Figure 7) with the tongue on the charger.

    g228487
  3. Make sure that the vents on the battery charger are clear of any dust and debris.

  4. Slide the battery pack into the charger until it is fully seated (Figure 8).

    g194423
  5. To remove the battery pack, slide the battery backward out of the charger.

  6. Refer to the following table to interpret the LED indicators on the battery charger.

Left LightRight LightIndicates
OffRedCharger is on; no battery pack inserted
RedRedBattery pack is charging
GreenRedBattery pack is charged
OrangeRedBattery pack is too warm
Red BlinkingRedReplace the battery pack

Operating Tips

  • Use the power tool for cutting in either direction in a slow, sweeping action from side to side.

  • Stand so that you are stable and balanced on both feet. Do not overreach.

  • Inspect and clear the area of any hidden objects.

  • Never use the hedge trimmer near power lines, fencing, posts, buildings, or other immovable objects.

  • Never use a blade after hitting a hard object without first inspecting it for damage. Do not use if it is damaged.

  • Never touch blades or service unit with the power supply connected.

  • Do not force the hedge trimmer through heavy shrubbery. This can cause the blades to bind and slow down. If the blades slow down, reduce the pace.

  • Do not attempt to cut stems or twigs that are larger than 18 mm (0.71 inch) in diameter, or those obviously too large to feed into the cutting blade. Use a non-powered hand saw or pruning saw to trim large stems.

  • If the blades do become jammed, stop the motor, allow the blades to stop, and remove the battery before attempting to remove the obstruction. CAUTION: The blades may move slightly due to residual tension.

  • If desired, you can use a string to help cut your hedge level. Decide how high you want the hedge. Stretch a piece of string along the hedge at the desired height. Trim the hedge just above the guide line of string.

  • Wear gloves when trimming thorny or prickly growth. When trimming new growth, use a wide sweeping action so that the stems are fed directly into the cutting blade.

Maintenance

Disconnect the product from the power supply (i.e., remove the plug from the power supply or the battery pack) before maintenance or cleaning work.

Use only the manufacturer’s recommended replacement parts and accessories.

Inspect and maintain the product regularly. Have the product repaired only by an Authorized Service Dealer.

Oiling the Trimmer Blade

Note: Oil the trimmer blade before and after each use.

  1. Stop the motor and remove the battery.

  2. Clean dirt and debris from the body of the hedge trimmer, using a damp cloth with a mild detergent.

    Note: Do not use any strong detergents on the plastic housing or the handle. They can be damaged by certain aromatic oils, such as pine and lemon, and by solvents such as kerosene.

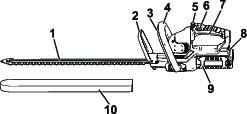
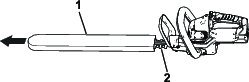
  3. Lay the hedge trimmer on a flat surface. Apply light-weight machine oil along the edge of the top blade. If you will be using the hedge trimmer for an extended period of time, oil the blade during use.

    Note: Do not oil the hedge trimmer while it is running.

Storage

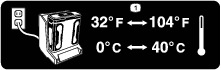
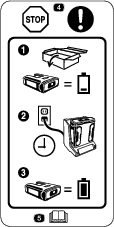
Important: Store the tool, battery pack, and charger only in temperatures that are within the appropriate range; refer to Specifications.

Important: If you are storing the tool for a year or longer, remove the battery pack from the tool and charge the battery pack until 2 or 3 LED indicators turn blue on the battery. Do not store a fully charged or fully depleted battery. When you are ready to use the tool again, charge the battery pack until the left indicator light turns green on the charger or all 4 LED indicators turn blue on the battery.

  • Disconnect the product from the power supply (i.e., remove the plug from the power supply or the battery pack) and check for damage after use.

  • Clean all foreign material from the product.

  • When not in use, store the tool, battery pack, and battery charger out of the reach of children.

  • Keep the tool, battery pack, and battery charger away from corrosive agents, such as garden chemicals and de-icing salts.

  • To reduce the risk of serious personal injury, do not store the battery pack outside or in vehicles.

  • Store the tool, battery pack, and battery charger in an enclosed clean, dry area.

Preparing the Battery Pack for Recycling

Important: Upon removal, cover the terminals of the battery pack with heavy-duty adhesive tape. Do not attempt to destroy or disassemble the battery pack or remove any of its components. Recycle or properly dispose of lithium-ion battery packs at a battery recycling facility.

Graphic

For more information on recycling lithium-ion battery packs and to locate the battery recycling facility closest to you, visit www.Call2Recycle.org (US and Canada only). If you are located outside of the US and Canada, please contact your authorized Toro distributor.

Troubleshooting

Perform only the steps described in these instructions. All further inspection, maintenance, and repair work must be performed by an authorized service center or a similarly qualified specialist if you cannot solve the problem yourself.

ProblemPossible CauseCorrective Action
The tool does not start.
  1. The battery is not fully installed in the tool.
  2. The battery pack is not charged.
  3. The battery pack is damaged.
  4. There is another electrical problem with the tool.
  1. Remove and then replace the battery into the tool, making sure that it is fully installed and latched.
  2. Remove the battery pack from the tool and charge it.
  3. Replace the battery pack.
  4. Contact an Authorized Service Dealer.
The tool does not reach full power.
  1. The battery pack charge capacity is too low.
  2. The air vents are blocked.
  1. Remove the battery pack from the tool and fully charge the battery pack.
  2. Clean the air vents.
The tool is producing excessive vibration or noise.
  1. The blades are dull or damaged.
  1. Contact an Authorized Service Dealer.
The battery pack loses charge quickly.
  1. The battery pack is over or under the appropriate temperature range.
  1. Move the battery pack to a place where it is dry and the temperature is between 0°C (32°F) and 40°C (104°F).
The battery charger is not working.
  1. The battery charger is over or under the appropriate temperature range.
  2. The outlet that the battery charger is plugged into does not have power.
  1. Unplug the battery charger and move it to a place where it is dry and the temperature is between 0°C (32°F) and 40°C (104°F).
  2. Contact your licensed electrician to repair the outlet.
The battery pack shows only 3 LED indicators after only a few seconds of using a fully charged battery.
  1. This is a normal occurrence.
  1. Stop the tool and press the battery-charge-indicator button or the remove the battery from the tool to display the actual battery charge.
All 4 LED indicators are blinking on the battery pack after you press the battery-charge-indicator button on the battery pack and the current charge displays (when the battery pack is not in use).
  1. The battery pack is over or under the appropriate temperature range.
  1. Move the battery pack to a place where it is dry and the temperature is between 0°C (32°F) and 40°C (104°F).
All 4 LED indicators are blinking on the battery pack after releasing the trigger (when the battery pack is in use).
  1. The battery pack is over or under the appropriate temperature range.
  1. Move the battery pack to a place where it is dry and the temperature is between 0°C (32°F) and 40°C (104°F).
2 LED indicators are blinking on the battery pack after you press the battery-charge-indicator button on the battery pack and the current charge displays (when the battery pack is not in use).
  1. There is a difference in voltage between cells in the battery pack.
  1. Place the battery on the charger until it is fully charged.
2 LED indicators are blinking on the battery pack after releasing the trigger (when the battery pack is in use).
  1. There is a difference in voltage between cells in the battery pack.
  1. Place the battery on the charger until it is fully charged.
1 LED indicator is blinking on the battery pack.
  1. The battery pack voltage is low.
  1. Place the battery pack on the charger.
It is difficult to remove the battery pack from the tool.
  1. The battery pack/tool is new or there is corrosion in the battery terminals and/or the terminals on the tool.
  1. Clean the terminals on the battery pack and the tool. Then apply dielectric grease to the battery terminals; do not use any other type of lubricant as it can damage the terminals.