


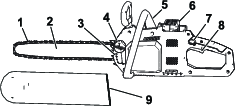
Maintenance
Recommended Maintenance Schedule(s)
| Maintenance Service Interval | Maintenance Procedure |
|---|---|
| Before each use or daily |
|
| After each battery drain cycle |
|
| Yearly or before storage |
|
Checking the Oil Level and Adding Bar and Chain Oil
| Maintenance Service Interval | Maintenance Procedure |
|---|---|
| Before each use or daily |
|
| After each battery drain cycle |
|
-
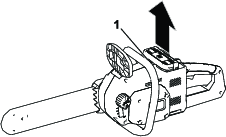
Place the chain saw on a flat surface and remove the battery pack; refer to Removing the Battery Pack.
-
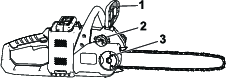
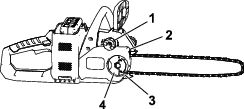
Check the oil level in the window. If you cannot see oil in the window, add bar and chain oil to the chain saw (Figure 26).
-
Clean the area around the oil cap (Figure 26).
Note: Make sure that you do not allow debris/wood chips to enter the oil tank.
-
Remove the cap and pour oil into the chain saw until the oil fills the window (Figure 26).
Note: Do not fill the chain saw higher than the bottom of the fill neck.
-
Clean up any spilled oil and replace the oil cap.
Checking the Chain Brake
| Maintenance Service Interval | Maintenance Procedure |
|---|---|
| Before each use or daily |
|
| After each battery drain cycle |
|
-
Place the chain saw on a flat surface and remove the battery pack; refer to Removing the Battery Pack.
-
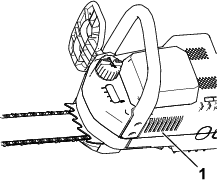
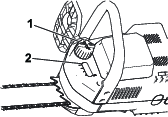
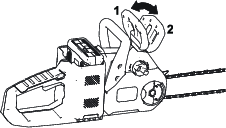
Engage the chain brake by moving the chain brake forward to the STOP position (Figure 27).
-
Grip the chain with a gloved hand and attempt to pull it around the guide bar; the chain should not move around the guide bar. If it does, take the chain saw to an Authorized Service Dealer for repair.
-
Disengage the chain brake by moving the chain brake rearward to the OPERATING position (Figure 27).
-
Grip the chain with a gloved hand and attempt to pull it around the guide bar; the chain should move around the guide bar. If it does not, take the chain saw to an Authorized Service Dealer for repair.
Adjusting the Chain Tension
| Maintenance Service Interval | Maintenance Procedure |
|---|---|
| Before each use or daily |
|
| After each battery drain cycle |
|
Ensure that the chain is properly tensioned. A loose chain will shorten the life of the drive sprocket and the guide bar and may break the chain. An overtightened chain will overheat the guide bar and chain, causing rapid wear and possible motor burnout. Also, check the chain tension after a few cuts. A new chain usually stretches and requires adjustment after its first use.
The chain tension is correct when you are able to use a gloved hand to pull the chain smoothly around the guide bar. The chain should remain in contact with the bottom edge of the guide bar.
Danger
Contact with the chain saw teeth can cause serious personal injury.
-
Remove the battery pack before adjusting or maintaining the chain saw.
-
Always wear gloves when adjusting or maintaining the chain saw.
-
Place the chain saw on a level surface and remove the battery pack; refer to Removing the Battery Pack.
-
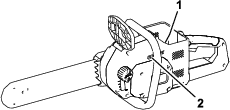
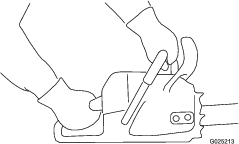
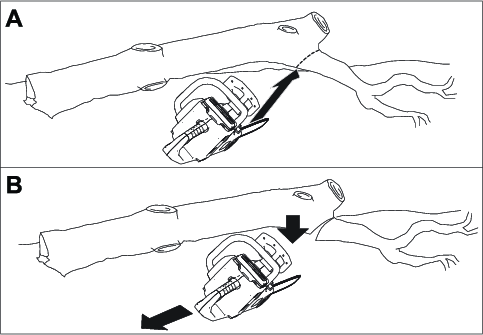
Unfold the wing-nut tab and loosen, but do not remove the wing nut on the cover (Figure 29).
-
Hold up the tip of the guide bar (Figure 28).

-
Adjust the chain.
-
To tighten the chain, turn the chain tensioning knob clockwise.
-
To loosen the chain, turn the chain tensioning knob counterclockwise
Adjust the chain until the chain touches the bottom edge of the guide bar, then tighten the knob an additional 1/8 to 1/4 turn.
-
-
Tighten the wing nut until it is snug and fold the wing-nut tab (Figure 29).
-
Check the chain tension; if the chain is loose, repeat this procedure.
Servicing the Guide Bar, Chain, and Drive Sprocket
| Maintenance Service Interval | Maintenance Procedure |
|---|---|
| Yearly or before storage |
|
Danger
Contact with the chain saw teeth can cause serious personal injury.
-
Remove the battery pack before adjusting or maintaining the chain saw.
-
Always wear gloves when adjusting or maintaining the chain saw.
-
Place the chain saw on a flat surface and remove the battery pack; refer to Removing the Battery Pack.
-
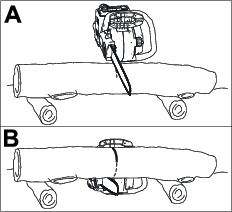
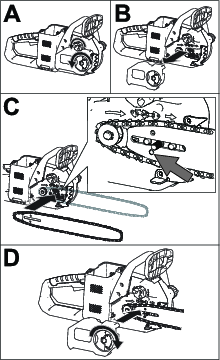
Unfold the wing-nut tab and remove the wing nut that secures the cover (Figure 29).
-
Loosen the chain by turning the chain-tightening screw counterclockwise (Figure 29).
-
Separate the chain from the guide bar and set them aside.
-
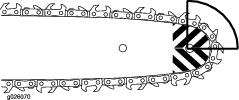
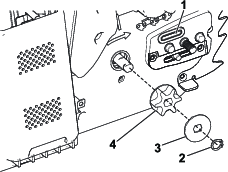
Remove the clip, spacer, and drive sprocket from the chain saw (Figure 30).
-
Inspect the drive sprocket; if it is excessively worn or damaged, replace it.
-
Check the oil passage (Figure 30) for debris and clean the area if necessary.
-
Install the drive sprocket, spacer, and clip.
-
Clean the guide bar and chain; use a wire or a small flat-head screwdriver to remove dirt and debris from the groove along the edge of the guide bar, starting from the sprocket on the front end and moving rearward.
If the guide bar or grooves are damaged or the sprocket on the front end does not rotate freely, replace the guide bar; if the chain is excessively worn or damaged, replace it.
-
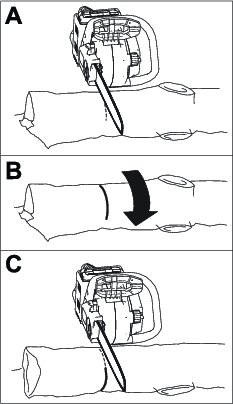
Place the chain around the drive sprocket on the front end of the guide bar, with the cutting edge of the chain teeth on the top of the bar facing forward as shown in the diagram on the side of the chain saw (Figure 31C).
-
Feed the chain around the guide bar and align the chain teeth into the groove of the bar.
-
Position the open loop of the chain (not on the guide bar) around the drive sprocket on the chain saw and install the guide bar and attached chain onto the chain saw as shown in Figure 31.
Important: Ensure that the chain adjusting stud is inserted into the hole indicated by the arrow in Figure 31C. You may need to rotate the chain tensioning knob to fit the stud into the hole in the guide bar.
-
Install the cover and the wing nut, but do not fully tighten the wing nut (Figure 31D). Fold the wing-nut tab.
-
Adjust the chain tension; refer to Adjusting the Chain Tension.
Sharpening the Chain
| Maintenance Service Interval | Maintenance Procedure |
|---|---|
| Before each use or daily |
|
| Yearly or before storage |
|
The chain needs sharpening or replacement when you must force it onto the wood or it produces smaller chips than when it was new.
Contact an Authorized Service Dealer to have the chain sharpened or replaced.
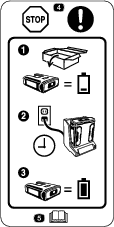
Preparing the Battery Pack for Recycling
Important: Upon removal, cover the terminals of the battery pack with heavy-duty adhesive tape. Do not attempt to destroy or disassemble the battery pack or remove any of its components. Recycle or properly dispose of lithium-ion battery packs at a battery recycling facility.
 |
For more information on recycling lithium-ion battery packs and to locate the battery recycling facility closest to you, visit www.Call2Recycle.org (US and Canada only). If you are located outside of the US and Canada, please contact your authorized Toro distributor. |
Service
Should the chain saw need service, take the product to your Authorized Service Dealer.