Setup
Preparing the Machine
-
Park the machine on a level surface.
-
Engage the parking brake.
-
Shut off the engine and remove the key.
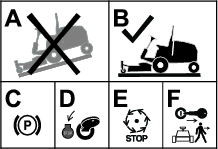
Caution
If you leave the key in the ignition switch, someone could accidently start the engine and seriously injure you or other bystanders.
Remove the key from the ignition switch before you install the kit.
Installing the Decals on the Side of the Hood
Parts needed for this procedure:
| Decal (16 KPH) | 2 |
-
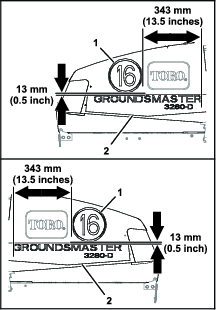
Measure the hood for the location of the decal (16 KPH) as shown in Figure 2, and mark the location with a piece of masking tape.
-
Remove the backing from the decal (16 KPH).
-
Align the decal to the side of the hood (Figure 2) at the location you determined in step 1.
-
Apply and smooth out the decal to the surface of the hood (Figure 2).
-
Repeat steps 1 through 4 for the decal (16 KPH) at the other side of the hood.
Installing the Rear Speed Sign
Parts needed for this procedure:
| Sign (aluminum) | 1 |
| Decal (16 KPH) | 1 |
| Screw (6 x 30 mm) | 3 |
| Spacer | 3 |
| Washer | 6 |
| Locknut | 3 |
| Cap | 3 |
Assembling the Decal to the Sign
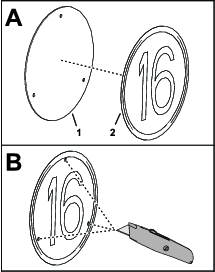
Assembling the Speed Sign to the Grill
Have another person help install the sign to the grill.
-
Open the hood of the machine; refer to the Operator’s Manual for your machine.
-
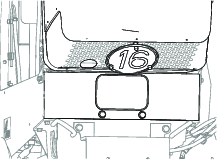
Align the speed sign that you prepared in Assembling the Decal to the Sign to the grill of the hood, centering the sign vertically and horizontally.
-
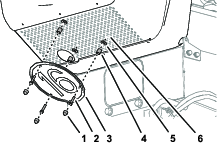
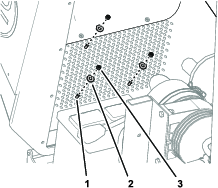
Assemble the speed sign to the rear of the grill with the 3 screws (6 x 30 mm), 3 bushings, and 3 washers (Figure 4).
-
Inside the hood, assemble 3 washers and 3 locknuts (Figure 5) onto the bolts that you installed in step 3.
-
Tighten the bolts and nuts by hand.
-
Close and latch the hood.
-
Assemble the caps onto the heads of the bolts (Figure 4).
Assembling the Speed Sign to the Slow-Moving-Vehicle Sign
-
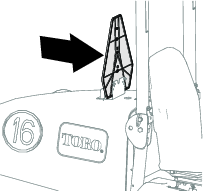
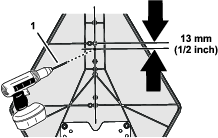
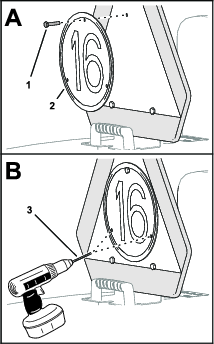
At the front of the slow-moving-vehicle sign, drill a hole (6 mm) in the sign as shown in Figure 8.
-
Remove burrs from the edges of the hole.
-
At the back side of the slow-moving-vehicle sign, align the top hole of the speed sign (Figure 9) to the hole that you drilled in step 1.
-
Use a screw (6 x 30 mm) to align the signs (Figure 9).
-
Using the sign as a drilling template, drill the 2 other holes through the slow-moving-vehicle sign (Figure 9) and remove the burrs the holes.
-
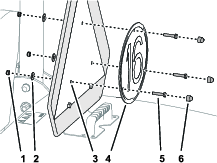
Assemble the speed sign to the slow-moving-vehicle sign with the 3 screws (6 x 30 mm), 3 washers, and 3 locknuts (Figure 10), and tighten the bolts and nuts by hand.
-
Assemble the caps onto the heads of the bolts (Figure 10).