Safety
Safety and Instructional Decals
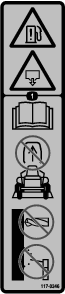
 | Safety decals and instructions are easily visible to the operator and are located near any area of potential danger. Replace any decal that is damaged or missing. |
Setup
Preparing the Machine
-
Park the machine on a level surface.
-
Move the motion-control levers to the NEUTRAL-LOCK position.
-
Engage the parking brake.
-
Shut off the engine and remove the key.

Assembling the Upper Trimmer Mount Assembly
Parts needed for this procedure:
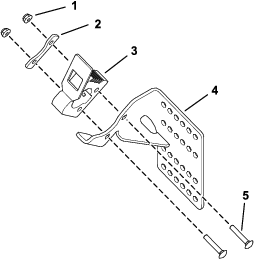
| Upper trimmer mount bracket | 1 |
| Large fist clamp | 1 |
| Large backer plate | 1 |
| Carriage bolt (1/4 x 1-1/2 inches) | 2 |
| Flange nut (1/4 inch) | 2 |
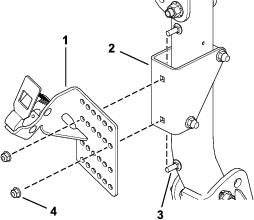
Assemble the upper trimmer mount assembly (Figure 2).
Installing the Support Bracket
Parts needed for this procedure:
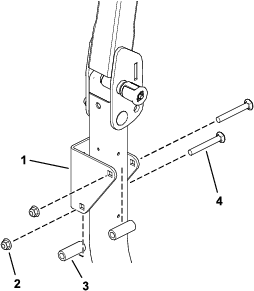
| Support bracket | 1 |
| Tube spacer | 2 |
| Carriage bolt (3/8 x 3 inches) | 2 |
| Flange nut (3/8 inch) | 2 |
-
Lower the roll bar.
-
Install the support bracket to the right post of the roll bar using 2 tube spacers, 2 carriage bolts (3/8 x 3 inches), and 2 flange nuts (3/8 inch) as shown in Figure 3.
-
Raise the roll bar.
Applying the Decal
Parts needed for this procedure:
| Decal 117-0346 | 1 |
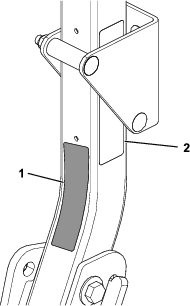
If decal 117-0346 is applied to the right post of the roll bar on your machine and the support bracket now covers that decal, apply the new decal to the inner, lower side of the right post of the roll bar (Figure 4).
Note: If decal 117-0346 is not applied to the right post of the roll bar on your machine, discard the decal.
Securing the Upper Trimmer Mount Assembly to the Support Bracket
Parts needed for this procedure:
| Carriage bolt (5/16 x 7/8 inch) | 2 |
| Flange nut (5/16 inch) | 2 |
Secure the upper trimmer mount assembly to the support bracket using 2 carriage bolts (5/16 x 7/8 inch) and 2 flange nuts (5/16 inch) as shown in Figure 5.
Note: Multiple mounting hole locations are provided to adjust the mounting position of the trimmer for clearance.
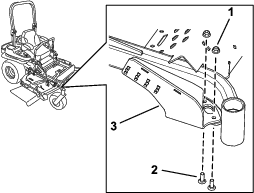
Installing the Lower Trimmer Mount Assembly
Parts needed for this procedure:
| Lower trimmer mount assembly | 1 |
| Carriage bolt (3/8 x 1 inch) | 2 |
| Flange nut (3/8 inch) | 2 |
Install the lower trimmer mount assembly to the tie-down hook mounting location on the front, right side of the frame using 2 carriage bolts (3/8 x 1 inch) and 2 flange nuts (3/8 inch) as shown in Figure 6.
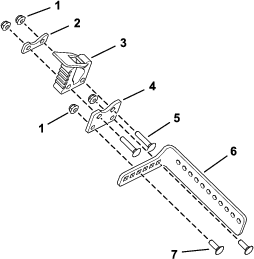
Assembling the Trimmer Mount Bracket
Parts needed for this procedure:
| Trimmer mount bracket | 1 |
| Fist-mount plate | 1 |
| Small fist clamp | 1 |
| Small backer plate | 1 |
| Flange nut (1/4 inch) | 4 |
| Carriage bolt (1/4 x 3/4 inch) | 2 |
| Carriage bolt (1/4 x 1-1/4 inches) | 2 |
Assemble the trimmer mount bracket (Figure 7).
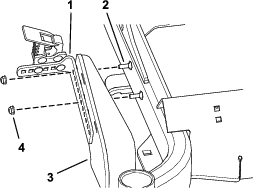
Securing the Trimmer Mount Bracket to the Lower Trimmer Mount Assembly
Parts needed for this procedure:
| Carriage bolt (1/4 x 3/4 inch) | 2 |
| Flange nut (1/4 inch) | 2 |
-
Fully lower the mower deck.
-
Secure the trimmer mount bracket assembly to the lower trimmer mount assembly using 2 carriage bolts (1/4 x 3/4 inch) and 2 flange nuts (1/4 inch) as shown in Figure 8.
Note: Multiple mounting hole locations are provided to adjust the mounting position of the trimmer for clearance.
Securing a Trimmer to the Mount Assemblies
Insert the handle end of the trimmer into the large fist clamp and the trimming end into the small fist clamp.
Check the fit of the trimmer for interference, and adjust the mounting hole locations as required for clearance to the machine.