Setup
Preparing the Machine
-
Park the machine on a level surface.
-
Engage the parking brake.
-
Lower the cutting units.
-
Shut off the engine and remove the key.
Accessing the Machine
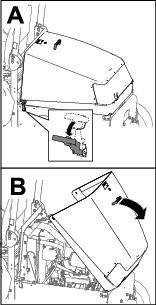
Opening the Hood
Removing the Battery Cables
Warning
Battery terminals or metal tools could short against metal components, causing sparks.
-
When removing or installing the battery, do not allow the battery terminals to touch any metal parts of the machine.
-
Do not allow metal tools to short between the battery terminals and metal parts of the machine.
-
Always keep the battery strap in place to protect and secure the battery.
Warning
Electrical sparks can cause the battery gasses to explode, resulting in personal injury.
Incorrect battery cable routing could damage the machine and cables, causing sparks.
-
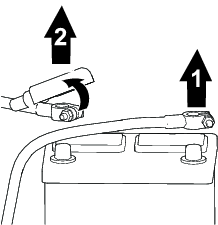
Always disconnect the negative (black) battery cable before disconnecting the positive (red) cable.
-
Always connect the positive (red) battery cable before connecting the negative (black) cable.
Routing the Wire Harness
Installing the Wire Harness
Important: Whenever working with the electrical system, always disconnect the battery cables, black (-) cable first, to prevent possible wiring damage from short-outs.
-
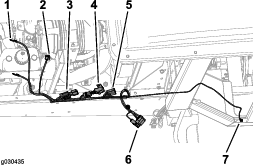
Route the wire harness on the right side of the machine frame (Figure 3).
-
Remove the nut that secures the positive-battery clamp to the positive-battery terminal.
-
Attach the positive battery terminal from the wire harness to the bolt used to secure the battery clamp.
-
Secure the clamp with the nut you removed previously.
-
Repeat the previous steps for the negative battery terminal on the wire harness.
Connecting the Washer Bottle
-
Connect the plug into the washer bottle (Figure 4).
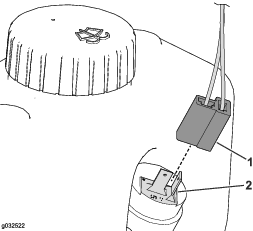
-
Use the cable ties to secure the wire harness to the frame.
Note: Do not secure the wire harness to hot or moving parts.
Connecting the Battery
-
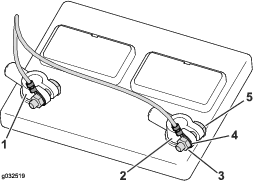
Route the 10-gauge red and black wires along the ROPS tube on the left side of the frame and toward the battery (Figure 5).
-
Loosen and remove the negative-post clamp and then the positive-post clamp from the battery (Figure 5).
-
Remove the nuts from the post bolts (Figure 5).
-
Install the positive-terminal connector (red wire) over the positive-post bolt and loosely install the nut (Figure 5).
-
Install the negative-terminal connector (black wire) over the negative-post bolt and loosely install the nut (Figure 5).
-
Install the positive-post clamp to the positive-battery post and then the negative-post clamp to the negative-battery post (Figure 5).
-
Use the cable ties to secure the wire harness to the frame.
Note: Do not secure the wire harness to hot or moving parts.
Connecting to the Cab Harness
-
Route the harness along the right side of the frame.
-
Connect the harness to the cab harness (Figure 6).