Setup
Preparing the Machine
-
Park the machine on a level surface.
-
Engage the parking brake.
-
Shut off the engine and remove the key.

Disconnecting the Battery
Warning
Incorrect battery cable routing could damage the machine and cables, causing sparks. Sparks can cause the battery gasses to explode, resulting in personal injury.
-
Always disconnect the negative (black) battery cable before disconnecting the positive (red) cable.
-
Always connect the positive (red) battery cable before connecting the negative (black) cable.
-
Always keep the battery strap in place to protect and secure the battery.
Warning
Battery terminals or metal tools could short against metal machine components, causing sparks. Sparks can cause the battery gasses to explode, resulting in personal injury.
-
When removing or installing the battery, do not allow the battery terminals to touch any metal parts of the machine.
-
Do not allow metal tools to short between the battery terminals and metal parts of the machine.
Installing the Kit
Parts needed for this procedure:
| Adapter wire harness | 1 |
| Cable tie | 1 |
-
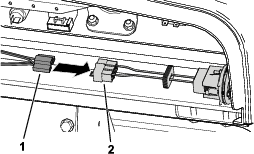
Connect the adapter wire harness to the wireless hour meter (Figure 3).
-
Connect the machine wire harness to the adapter wire harness.
-
Connect the adapter wire harness to the hour meter on the machine.
-
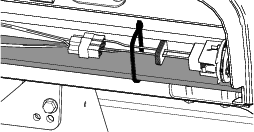
Secure the adapter wire harness and wireless hour meter to the steering support tube using the cable tie (Figure 4).