Add the following statement: This product complies with all relevant European directives. For details, please see the Declaration of Incorporation (DOI) at the back of this publication.
Installing the Spiker Units
Park the unit on a level surface, set the parking brake, turn the ignition off, and remove the key.
-
Position the spiker unit under the suspension arm.
-
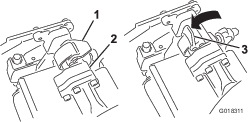
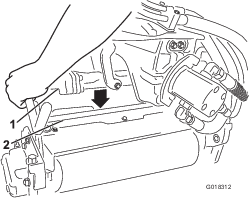
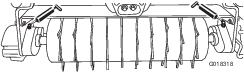
With the latches on the suspension-arm bar in the Open position (Figure 1), push the suspension arm down so that it fits over the bar across the top of the spiker unit (Figure 2).
-
Move the latches to the Closed position to lock the spiker unit in place (Figure 1).
Note: When the latches are properly locked a “click” can be heard and felt.
-
Insert the motor into the left side of the spiker unit (as viewed from the operator’s position), and pull the motor retaining bar on the spiker unit toward the motor until you hear an audible “click” from both sides of the motor (Figure 3).
Removing the Spiker Units
Park the unit on a level surface, set the parking brake, turn the ignition off, and remove the key.
-
Park the machine on a clean level surface, lower the spiker units to the ground until the suspension hydraulics are fully extended, shut off the engine, set the parking brake, and remove the key from the ignition switch.
-
Push the motor retaining bar out of the slots on the motor toward the spiker unit and remove the motor from the spiker unit.

-
Move the motor to the storage location on the front of the suspension arm.
Note: Do not raise the suspension to the transport position when the reel motors are in the holders in the machine frame. Damage to the motors or hoses could result. If you must move the traction unit without the spiker units installed, secure the motors to the suspension arms using cable ties.
-
Open the latches on the suspension-arm bar of the spiker unit you are removing.
-
Disconnect the latches from the spiker unit bar.
-
Roll the spiker unit out from under the suspension arm.
-
Repeat steps 2 through 6 for the other spiker units as required.
Operation
Installing the Electrical Counterweights
Note: If the Tri-roller is installed on greensmower models 04530 or 04540, you must use an additional hybrid counterweight.
-
Remove and discard the counterweight bolts.
-
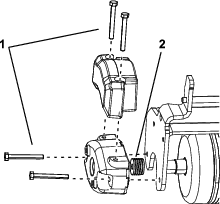
Install 2 bolts (5/16-18 x 2 3/4 inch) as shown in Figure 5.
Note: These bolts are not included with this kit. Toro part number: 322-33.
-
Install 4 spacers (1/8 inch) per bolt between the counterweight and the tri-roller side plate (Figure 5).
Note: These spacers are not included with this kit. Toro part number: 63-8410.
-
Install the hybrid auxiliary weight provided with the traction unit with the provided bolts.
Training
Before spiking greens, find a clear area to practice starting, stopping, raising, lowering, and rolling with the spiker. This training will help the operator gain experience and confidence with the spiker before using it on a green.
Operating Tips
-
Survey the green to determine if there are any obstacles that will be damaged or will damage the spikers, such as sprinkler heads or other protruding objects.
-
Maintain a straight line when spiking. Do not turn the machine when the spikers are on the ground.
-
When you reach the edge of the green, raise the spikers before turning or stopping the machine. The spikers must be raised completely before making turns.
Maintenance
Lubrication
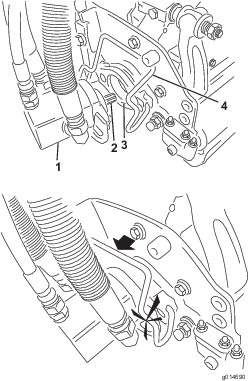
Lubricate the 2 grease fittings (Figure 6) on each spiker unit after every 15 hours of operation using a #2 multi-purpose lithium-based grease. For best results, use a hand-operated grease gun.
-
Wipe each grease fitting with a clean rag.
-
Apply grease to the spiker shaft bearings until you feel pressure (Figure 6).
-
Wipe excess grease away.