Introduction

Read this information carefully to learn how to operate and maintain your product properly and to avoid injury and product damage. You are responsible for operating the product properly and safely.

Visit www.Toro.com for product safety and operation training materials, accessory information, help finding a dealer, or to register your product.

Whenever you need service, genuine Toro parts, or additional information, contact an Authorized Service Dealer or Toro Customer Service and have the model and serial numbers of your product ready. Figure 1 identifies the location of the model and serial numbers on the product. Write the numbers in the space provided.

This manual identifies potential hazards and has safety messages identified by the safety-alert symbol (Figure 1), which signals a hazard that may cause serious injury or death if you do not follow the recommended precautions.

g000502

This manual uses 2 words to highlight information. Important calls attention to special mechanical information and Note emphasizes general information worthy of special attention.

Safety

Danger

The engine can become hot when operating. Severe burns can occur from contacting hot surfaces.

Allow engines, especially the muffler, to cool before touching.

Danger

Debris, such as leaves, grass, or brush can catch fire. A fire in the engine area can cause personal injury and property damage.

  • Keep the engine and muffler area free of debris.

  • Take care when opening the bagger cover to keep debris from falling onto the engine and muffler area.

  • Allow the machine to cool before storing it.

  • Become familiar with the safe operation of the equipment, with the operator controls, and safety signs.

  • Use extra care with grass catchers or other attachments. These can change the operating characteristics and the stability of the machine.

  • Do not operate with the discharge deflector raised, removed or altered, unless using a grass catcher.

  • Keep hands and feet away from moving parts. Do not make adjustments with the engine running.

  • Stop the machine on level ground, disengage the drives, chock or block the wheels, shut off the engine, and remove the key before leaving the operator's position for any reason, including emptying the grass catcher or unclogging the chute.

  • If you remove the grass catcher, install any discharge deflector or guard that might have been removed to install the grass catcher. Do not operate the machine without either the entire grass catcher or the grass deflector in place.

  • Grass catcher components are subject to wear, damage and deterioration, which could expose moving parts or allow objects to be thrown. Frequently check components and replace with manufacturer's recommended parts, when necessary.

Safety and Instructional Decals

Graphic

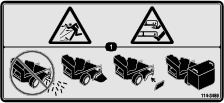
Safety decals and instructions are easily visible to the operator and are located near any area of potential danger. Replace any decal that is damaged or missing.

decal114-3489

Setup

Note: Determine the left and right sides of the machine from the normal operating position.

Assembling the Bagger

Parts needed for this procedure:

Back plate1
Support1
Mounting bracket1
Bolt (1/4 x 5/8 inch)7
Locknut (1/4 inch)7
Left latch1
Right latch1
Phillips head screw (#10)4
Locknut (#10)4
Lock washer (#10)4
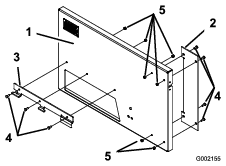
  1. Install the support on the back plate using 4 bolts (1/4 x 5/8 inch) and locknuts (1/4 inch) as shown in Figure 2.

  2. Install the mounting bracket on the back plate using 3 bolts (1/4 x 5/8 inch) and locknuts (1/4 inch) as shown in Figure 2.

    g002155
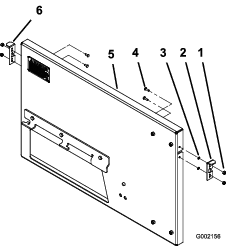
  3. Install the latches to both sides of the back plate using 4 phillips-head screws, lock washers, and locknuts (#10) as shown in Figure 3.

    Important: Do not completely tighten the nuts; the latches should be able to move up and down.

    g002156

Assembling the Bag and Frame

Parts needed for this procedure:

Bag and pan1
Catcher frame1
Handle2
Bolt (1/4 x 1 inch)4
Locknut (1/4 inch)4
Washer (1/4 inch)4
  1. Slide the upper curved portion of the bagger frame into the bag and the long straight rod down toward the pan.

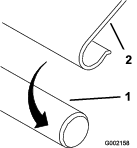
  2. Snap the J-strips over the frame rods (Figure 4).

    g002158
  3. Arrange the bag around the frame.

  4. Place the handles over the slots on each side of the frame.

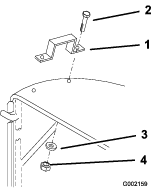
  5. Push 2 bolts (1/4 x 1 inch) through each handle and the fabric from the outside, and secure them with 4 washers (1/4 inch), and locknuts (1/4 inch) as shown in Figure 5.

    g002159

Installing the Bagger onto the Mower

Parts needed for this procedure:

Bagger clamp1
Bolt (3/8 x 1 inch)1
Locknut (3/8 inch)1

Warning

An uncovered discharge opening could allow the lawn mower to throw objects toward you or bystanders, resulting in serious injury. Also, contact with the blade could occur.

  • Do not operate the machine without the bag installed or the grass deflector down.

  • Ensure that the grass deflector is down when the back plate and bag are removed.

Note: In the steps below, the bolts are threaded into the mower deck. Remove the nuts first before removing bolts.

  1. Lift the grass deflector all the way up.

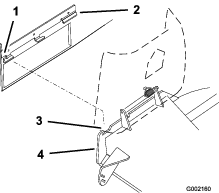
  2. Position the front hook on the bagger mounting bracket into the front slot of the mower mounting bracket (Figure 6).

  3. Place the rear hook over the mower mounting bracket (Figure 6).

    g002160
  4. If you are installing the bagger for the first time or moving it to a mower of a different size, install or move the bagger clamp as follows:

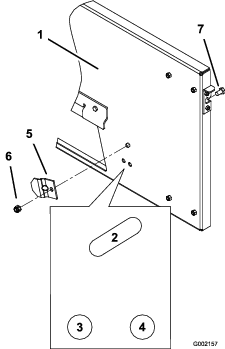
    1. Select the appropriate hole in the back plate for your mower size (Figure 7).

    2. Install the bagger clamp in the hole using a bolt (3/8 x 5/8 inch) and locknut (3/8 inch), as illustrated in Figure 7. The clamp should fit over the mower frame securing the back plate.

      Note: Do not remove or install the clamp to remove or install the back plate when using it on a mower of the same size. Lift the back plate off of the mower.

      g002157
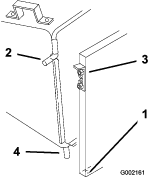
  5. Insert the lower pins of the bagger frame into the holes in the back plate (Figure 8).

  6. Lift the latches and slide the frame side pins into them (Figure 8).

  7. Lower the latches to secure the bagger.

    g002161

Operation

Warning

To avoid personal injury, follow these procedures:

  • Become familiar with all operating and safety instructions in the Operator's Manual for your machine before using this attachment.

  • Before doing any of the following procedures or leaving the operator’s position:

    • Disengage the machine PTO, move the motion control levers to the neutral locked position, and set the machine parking brake.

    • Shut off the engine, remove the key, and wait for all moving parts to stop.

  • Do not remove the bag while the engine is running.

  • Always shut off the engine, wait for all moving parts to stop, and remove the key before clearing an obstruction from the bagging system.

  • Do not do maintenance or repairs while the engine is running.

Removing the Bagger from the Machine

  1. Disengage the machine PTO, move the motion control levers to the neutral locked position and set the machine parking brake.

  2. Shut off the engine, remove the key, and wait for all moving parts to stop before leaving the operating position.

  3. Lift the latches and remove and empty the grass bag.

  4. Lift the back plate off of the mower.

  5. Lower the grass deflector back into place.

Emptying the Bagger

  1. Disengage the PTO, bring the machine to neutral position and set the parking brake.

  2. Shut off the engine, remove the key, and wait for all moving parts to stop before leaving the operating position.

  3. Lift the latches and remove and empty the grass bag.

  4. Insert the lower pins of the bagger frame into the holes in the back plate (Figure 8).

  5. Lift the latches and slide the frame side pins into them (Figure 8).

  6. Lower the latches to secure the bagger.

Clearing Obstructions

Warning

When the machine is in operation, the blade can be rotating and cut off or injure hands.

  • Before adjusting, cleaning, repairing and inspecting the blower, or unclogging the chute, shut off the engine, wait for all moving parts to stop, and remove the key.

  • Use a stick, not your hands, to remove an obstruction from the blower and tube.

  • Keep your face, hands, feet, and any other part of your body or clothing away from concealed, moving, or rotating parts.

  1. Disengage the PTO, move the motion control levers to the neutral locked position and set the parking brake.

  2. Shut off the engine, remove the key, and wait for all moving parts to stop before leaving the operating position.

  3. Lift the latches and remove and empty the grass bag.

  4. Use a stick or similar object, not your hands to remove and clear the obstruction from the mower.

  5. Insert the lower pins of the bagger frame into the holes in the back plate (Figure 8).

  6. Lift the latches and slide the frame side pins into them (Figure 8).

  7. Lower the latches to secure the bagger.

Operating Tips

Mower Width

The mower is wider with the bagger installed. By turning too sharply in confined places you may damage the bagger.

Mowing Side

Mow with the left side towards objects such as trees or landscaping. Do not mow with the right side of the mower near objects because you could damage the bagger.

Mowing Rough Terrain

When mowing rough or uneven terrain, use care to avoid damaging the bagger against the turf.

Avoid Cutting Too Low

Air flow is required to cut grass and propel it into the bag. Setting the height-of-cut too low, especially in heavy or long grass, can restrict the air flow and plug the mower or grass catcher.

Avoid Plugging

To avoid plugging when cutting long grass, double-cut the grass, first at a high height-of-cut and then lower the mower to the desired setting. Also, try to leave one side of the mower out of the uncut grass, allowing air to be drawn into the mower housing.

Maintenance

Caution

If you leave the key in the ignition switch, someone could accidently start the engine and seriously injure you or other bystanders.

Remove the key from the ignition and disconnect the wire from the spark plug before you do any maintenance. Set the wire aside so that it does not accidentally contact the spark plug.

Danger

Engines can become hot when they are operating. Severe burns can occur from contacting hot surfaces.

Allow engines, especially the muffler, to cool before touching.

Danger

Debris, such as leaves, grass, or brush can catch fire. A fire in the engine area can cause personal injury and property damage.

  • Keep the engine and muffler area free of debris accumulation.

  • Take care when opening the bagger cover to keep debris from falling onto the engine and muffler area.

  • Allow the machine to cool before storing it.

Inspecting the Bagger

Maintenance Service IntervalMaintenance Procedure
After the first 10 hours
  • Inspect the bagger.
  • Before storage
  • Inspect the bagger.
    1. Inspect all the fasteners and latches; replace any that are missing or damaged.

    2. Inspect the bag for damage and replace any damaged parts.

    3. Tighten all hardware.

      Warning

      You or bystanders could be severely injured by flying debris or thrown objects that may pass through torn, worn, or deteriorated grass bags.

      • Check the grass bags for holes, rips, wear, and other deterioration.

      • If the bag has deteriorated, install new grass bags supplied by the manufacturer of this bagger attachment.

    Cleaning the Bagger

    Maintenance Service IntervalMaintenance Procedure
    Before each use or daily
  • Clean the bagger.
  • Clean the bagger after each use.

    1. Remove the bag and wash the back plate and the underside of the mower. Use a mild automotive detergent to remove stubborn dirt.

      Important: Do not pressure wash the bagger.

    2. Remove matted grass from all parts.

    3. After washing, let all parts dry thoroughly.

      Note: Do not wash the grass bags.

    Storing the Grass Catcher

    1. Clean the bagger; refer to Cleaning the Bagger.

    2. Inspect the bagger for damage; refer to Inspecting the Bagger.

    3. Ensure that the bag is empty and dry.

    4. Store the bagger in a clean, dry place, out of direct sunlight. This extends the life of the bagger. If you must store it outside, cover it with a weatherproof cover.