Installation
Wire Harness Connections
Refer to the table below for the wire harness connections using the wire harness colors.
| Wireless Hour Meter Wire Harness | ||
| Yellow | Blue | Machine Wire Harness |
| Black | Black | |
| Yellow | Green | Engine Wire Harness |
| Black | White |
Installing the Kit
Parts needed for this procedure:
| Wire Harness | 1 |
| Bracket | 1 |
| Regulator | 1 |
| Bolt | 2 |
| Cable tie | 6 |
-
Unplug and remove the Delta module and unplug the power connections from the back of the engine.
-
Remove the 2 nuts securing the fuel tank to the engine.
-
Remove the old bracket.
-
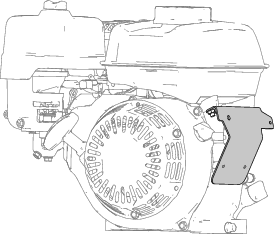
Install the new bracket and machine wire harness ground with the 2 nuts previously removed. Install the Delta module onto the new bracket using the hardware previously removed (Figure 1).
-
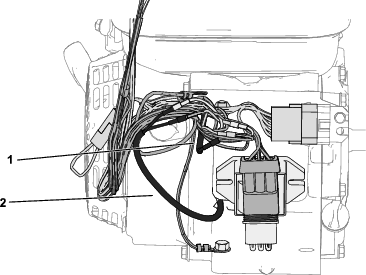
Install the wireless hour meter regulator to the new bracket (Figure 2) using the 2 bolts.
Note: Ensure that the regulator ground terminal is installed under the bolt head.
-
Connect the bottom connector, of the wireless hour meter wire harness, to the wireless hour meter regulator.

-
Remove the engine bolt from the engine and install the wire harness ground connector under the engine bolt head.
-
Install the engine bolt.
-
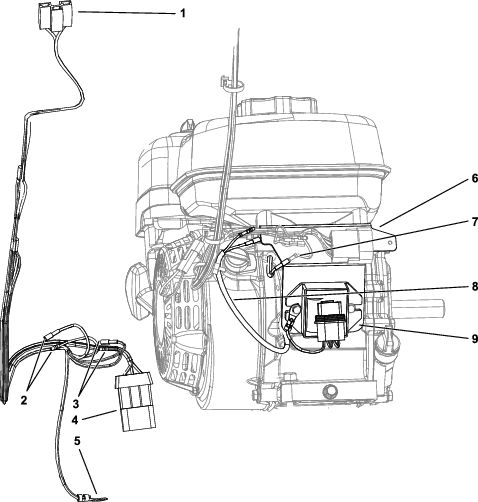
Connect the other connectors to the machine and engine accessory connectors. Refer to Wire Harness Connections and Figure 3.
-
Connect the power harness to the engine wire harness connector.
-
Connect the top of the wire harness to the wireless hour meter (Figure 4).
-
Use cable ties to secure the wire harness to the handle and out of the way of hot or sharp parts.
Note: If your machine is equipped with an hour meter, the wireless hour meter should be put in its place. Do not disconnect the old hour meter, but secure it under the console shroud instead.