You may contact Toro directly at www.Toro.com for product and accessory information, help finding a dealer, the complete warranty details, or to register your product.

Warning

CALIFORNIA

Proposition 65 Warning

The power cord on this product contains lead, a chemical known to the State of California to cause birth defects or other reproductive harm. Wash hands after handling.

Use of this product may cause exposure to chemicals known to the State of California to cause cancer, birth defects, or other reproductive harm.

General Safety Rules

WARNING: When using electric gardening appliances, basic safety precautions should always be followed to reduce the risk of fire, electric shock, and personal injury, including the following:

Read all instructions.

The term “power tool” in all of the warnings refers to your mains-operated (corded) power tool or battery-operated (cordless) power tool.

  1. Work area safety

    1. Keep work area clean and well lit.Cluttered or dark areas invite accidents.

    2. Do not operate power tools in explosive atmospheres, such as in the presence of flammable liquids, gases or dust.Power tools create sparks which may ignite the dust or fumes.

    3. Keep children and bystanders away while operating a power tool.Distractions can cause you to lose control.

  2. Electrical safety

    1. Power tool plugs must match the outlet. Never modify the plug in any way. Do not use any adapter plugs with earthed (grounded) power tools. Unmodified plugs and matching outlets will reduce risk of electric shock.

    2. Avoid body contact with earthed or grounded surfaces.There is an increased risk of electric shock if your body is earthed or grounded.

    3. Do not abuse the cord. Never use the cord for carrying, pulling or unplugging the power tool. Keep cord away from heat, oil, sharp edges or moving parts. Damaged or entangled cords increase the risk of electric shock.

    4. Do not expose power tools to rain or wet conditions.Water entering a power tool will increase the risk of electric shock.

    5. If operating a power tool in a damp location is unavoidable, use a supply protected by a residual current device (RCD) in AUS or a ground fault interrupt (GFI) in the USA.

      Use of an RCD or GFI reduces the risk of electric shock.

  3. Personal safety

    1. Stay alert; watch what you are doing and use common sense when operating a power tool. Do not use a power tool while you are tired or under the influence of drugs, alcohol or medication.A moment of inattention while operating power tools may result in serious personal injury.

    2. Use personal protective equipment. Always wear eye protection.Protective equipment such as dust mask, non-skid safety shoes, hard hat, or hearing protection used for appropriate conditions will reduce personal injuries.

    3. Prevent unintentional starting. Ensure the switch is in the off-position before connecting to power source and/or battery pack, picking up or carrying the tool.Carrying power tools with your finger on the switch or energizing power tools that have the switch on invites accidents.

    4. Do not overreach. Keep proper footing and balance at all times.This enables better control of the power tool in unexpected situations.

    5. Dress properly. Do not wear loose clothing or jewelry. Keep your hair, clothing and gloves away from moving parts.Loose clothes, jewelry, or long hair can be caught in moving parts.

    6. Keep hands and feet away from the cutting area.

  4. Power tool use and care

    1. Do not force the power tool. Use the correct power tool for your application.The correct power tool will do the job better and safer at the rate for which it was designed.

    2. Do not use the power tool if the switch does not turn it on and off.Any power tool that cannot be controlled with the switch is dangerous and must be repaired.

    3. Store idle power tools out of the reach of children and do not allow persons unfamiliar with the power tool or these instructions to operate the power tool.Power tools are dangerous in the hands of untrained users.

    4. Store idle appliances indoors.When not in use, appliances should be stored indoors in a dry and high or locked-up place, out of the reach of children.

    5. Maintain power tools. Check for misalignment or binding of moving parts, breakage of parts and any other condition that may affect the power tools operation. If damaged, have the power tool repaired before use.Many accidents are caused by poorly maintained power tools.

    6. Keep cutting tools sharp and clean.Properly maintained cutting tools with sharp cutting edges are less likely to bind and are easier to control.

    7. Use the power tool in accordance with these instructions and in the manner intended for the particular type of power tool, taking into account the working conditions and the work to be performed.Use of the power tool for operations different from those intended could result in a hazardous situation.

    8. Keep guards in place and in working order.

  5. Service

    Have your power tool serviced by a qualified repair person using only identical replacement parts.This will ensure that the safety of the power tool is maintained.

  6. Battery Safety

    1. Do not charge appliance in rain, or in wet locations.

    2. Do not use battery-operated appliance in the rain.

SAVE THESE INSTRUCTIONS

Safety and Instructional Decals

Important: Safety and instruction decals are located near areas of potential danger. Replace damaged or missing decals.

decal112-1577
decal127-7003b
decal127-7003a
decal138-6695

Setup

Assembling the Trimmer

g023771

Installing the Guard

Snap the guard into place (Figure 2).

g023772

Operation

Charging the Battery

Charge the battery for 24 hours or until the charge light on the charger is green before the first use and after each use thereafter.

Important: Always charge the battery after each use. Storing the unit with a discharged battery will reduce the life of your battery. This lead-acid battery has no memory and does not need to be fully discharged before charging.

  1. Insert the charge plug into the trimmer receptacle (Figure 3).

    g023773

    Important: Use only the charger supplied with the trimmer or a Toro charger obtained from an Authorized Service Dealer.

  2. Plug the charger into a power outlet.

    Note: The charge light is red while the battery is charging; it turns green when the battery is fully charged or when the trimmer is not connected.

  3. Charge the battery for 24 hours or until the charge light turns green.

  4. Disconnect the charger from the power outlet and the trimmer.

    Note: The charge light is always on when the trimmer is connected to the charger and to the power outlet; it stays on even after the battery is fully charged.

Starting the Trimmer

Push in the side button and then pull the trigger (Figure 4).

g023774

Stopping the Trimmer

Release the trigger.

Operating Tips

Warning

When the trimmer is running, the cutting head is spinning. If you contact the cutting line or cutting head, you could be injured.

  • Keep the cutting head away from your feet and bystanders.

  • Ensure that the cutting head has stopped and the trimmer is unplugged before inverting it. Do not start the trimmer when it is inverted.

Warning

During operation, the trimmer may throw objects in the operator's or a bystander's direction, causing injury.

  • Wear safety goggles or other suitable eye protection, long pants, and shoes while operating the trimmer.

  • Do not use the trimmer as an edger.

  • Keep people and pets away from the trimming area.

To reduce line wear and improve trimming performance, use the following techniques when trimming:

  • Inspect the area to be trimmed for any wire, rope, or string-like matter which could become entangled in the rotating line. Remove any objects or debris that could be thrown by the trimmer.

  • Trim only when the grass and weeds are dry.

  • Slowly move the trimmer in and out of the area being cut (Figure 5).

    g023775
  • Cut grass or weeds over 20 cm (8 inches) tall from the top to the bottom in small increments.

  • Do not force the trimmer. Allow the very tip of the nylon line to do the cutting, especially along walls.

  • Do not drag the trimmer spool on the ground while trimming.

  • After each use, feed out some line to prevent it from retracting into the cutting head.

  • The trimmer cannot be overcharged. Keep it on the charger when you are not using it during the trimming season.

  • Store the trimmer in a cool, dry location away from direct sunlight and heat sources.

Lengthening the Line

The tip of the cutting line will wear during use and reduce the cutting swath.

To increase the length of the line, tap the spool on the ground while the trimmer is running (Figure 6).

g023776

Note: The blade under the guard will automatically cut the line to the correct length.

Important: Take the following precautions to ensure optimal line performance:

  • Do not hold the spool on the ground.

  • Tap the spool only once to lengthen the line. If you need additional line, wait a few seconds before tapping the spool.

  • Do not allow the line to wear too short.

  • Keep the line length at full cutting diameter as much as possible.

  • If the line is not advanced occasionally, it will wear down to the eyelet. When the trimmer stops, the line tends to relax and may retract into the cutter head. Should this occur, remove the spool, re-feed the line through the eyelet, and assemble the spool to the trimmer.

Replacing the Line

For replacement line, you can purchase either a new, pre-wound spool of line (Model 88185 or 88045) or bulk line (0.065 inch diameter x 10 ft) that you can wind onto the old spool. Both are available from an Authorized Service Dealer.

Caution

If you use line other than Toro 0.065 inch diameter nylon monofilament, it could cut through clothes and skin causing injury and/or overload the motor, possibly causing a fire or electrical shock.

Do not use metal wire, rope, plastic knives, or any cutting line or material other than Toro 0.065 inch diameter nylon monofilament, 10 ft. maximum line length.

The spool may wear during normal use and require occasional replacement.

Note: If the line should tangle or break at the eyelet, stop the trimmer, remove the spool as described below, feed the line through the eyelet, and reassemble the spool to the cutting head.

Caution

If you do not fully install the spool and cap, the trimmer could throw them during operation, causing injury to the operator or bystanders.

Ensure that you fully install the spool and cap, with the two locking tabs on the cap secured in the spool housing.

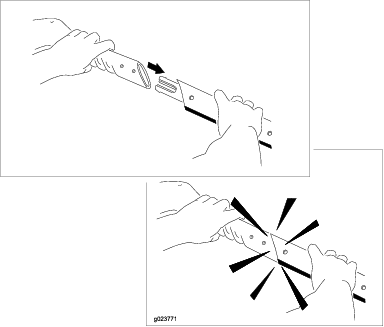
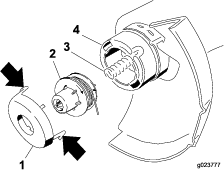
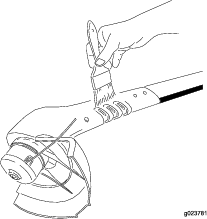
  1. Press in the tabs on each side of the cap (Figure 7).

    g023777

    Note: You may need a screwdriver to press in the tabs on the cap of a new trimmer.

    Note: If the spring falls off the trimmer head, install the spring before installing the spool and cap.

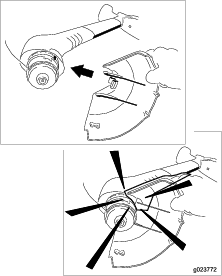
  2. If there is any cutting line left (there should be a short piece), remove and discard it.

  3. Thoroughly clean the trimmer head. Inspect for any damaged or worn parts.

  4. If you are winding a new line onto the old spool, complete the following steps:

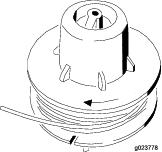
    1. Hook one end of line into the slot on the spool, allowing no more than 3 mm (1/8 inch) to protrude, and push the end of the line all the way to the inner end of the slot.

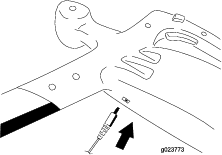
    2. Wind the line in the direction of the arrow on the spool, in level rows, between the spool flanges (Figure 8).

      g023778

      The trimmer will not function properly if the line is wound in the wrong direction, the end of the line protrudes more than 3 mm (1/8 inch), or the line is wound beyond the outer edges of the spool.

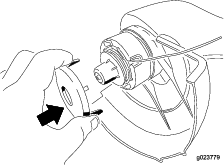
  5. Unwind no more than 7.6 cm (3 inches) of line from spool (either new or re-wound) and hold the line and spool to prevent the line from unraveling.

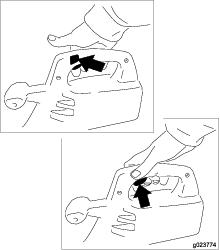
  6. While holding the line and spool, place the cap on the spool.

  7. Insert the line into the eyelet, aligning the cap tabs with the slots in the cutter head.

  8. Press in the tabs and push down the cap and spool to lock the cap in place (Figure 9).

    g023779

    Note: You may need to rotate the spool to fully install it.

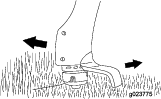
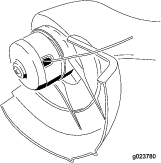
The fully installed cutting head should appear as shown in Figure 10.

g023780

Maintenance

After each use of the trimmer, do the following:

  • Wipe the trimmer clean with a damp cloth. Do not hose the trimmer down or submerse it in water.

  • Wipe or scrape clean any accumulation of dirt or cuttings from the trimmer head and spool.

  • Check and tighten all fasteners. If any part is damaged or lost, repair or replace it.

  • Remove any debris away from air intake vents (Figure 11).

    g023781

    Important: Keep the air intake vents free of grass and debris to prevent the motor from overheating.

Disposing of the Battery

When the battery no longer holds a charge, you can purchase a new battery and have it installed by an Authorized Service Dealer. If you want to discard the trimmer, remove and recycle the battery before discarding the trimmer.

  1. Remove the 8 screws that secure the two halves of the handle section together and pull the halves apart.

  2. Remove the battery and disconnect it from the wire leads.

  3. Discard the trimmer.

  4. Recycle the lead-acid battery according to local codes.

Service

Toro has designed this product to give you years of trouble-free use. Should it need service, take the product to an Authorized Service Dealer.

Storage

For idle periods of more than a month, disconnect the charger from the power outlet and trimmer after the trimmer is fully charged. Do not store the trimmer with the charger plugged in. Storing the trimmer in a warm area will decrease the battery life. If you must store the trimmer in a warm area, charge the battery for 24 hours every 2 to 3 months during storage.