Warning
CALIFORNIA
Proposition 65 Warning
Use of this product may cause exposure to chemicals known to the State of California to cause cancer, birth defects, or other reproductive harm.
Installation
Preparing the Machine
-
Park the machine on a level surface.
-
Engage the parking brake.
-
Shut off the engine and remove the key.
Removing the Existing Seat
-
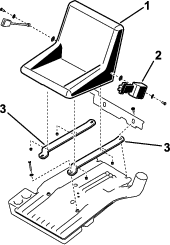
Remove the 4 bolts and washers that secure the seat-support straps to the fuel tank (Figure 1).
Note: Retain the bolts and washers for installing the new seat.
-
Disconnect the electrical harness from the seat switch on the bottom of the seat.
-
Remove and discard the bolts and washers that secure the seat belt to the existing seat (Figure 1).
Note: Retain the seat belt for installing the new seat.
-
Remove and discard the 4 locknuts that secure the seat to the seat-support straps (Figure 1).
Note: You may discard the seat straps.

Installing the Seat
Parts needed for this procedure:
| Seat | 1 |
| Support strap (4-hole) | 2 |
| Support strap (3-hole) | 2 |
| Screw | 2 |
| Flange nut | 4 |
| Flat washer (1/2 inch) | 2 |
| Flat washer (9/16 inch) | 2 |
| Spacer | 4 |
-
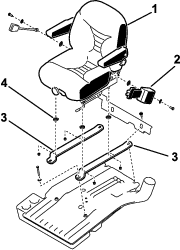
Mount the seat belt to the seat with 2 bolts, 2 flat washers (1/2 inch), and 2 flat washers (9/16 inch); refer to Figure 2.
Note: Mount the seat belt retractor to the left side of the seat.
-
Torque the bolts to 49 to 61 ft-lb (66 to 83 N∙m).
-
Mount the new seat to the seat support straps with the 4 flange locknuts and 4 spacers (Figure 2).
Important: For Reelmaster 3100-D machines: Use the straps with 3-hole pattern in the center.
Important: For Greensmaster 3500-D/3505-D machines: Use the straps with 4-hole pattern in the center.
Note: Use the inner-front set of holes in the seat support straps.
-
Torque the nuts to 15 to 19 ft-lb (20 to 26 N∙m).
-
Connect the electrical harness to the seat switch on the bottom of the seat.
-
Mount the seat-support straps to the fuel tank with the previously removed bolts and washers (Figure 2).
-
Torque the bolts to 27 to 33 ft-lb (37 to 45 N∙m).
