Safety

Safety and Instructional Decals

Graphic

Safety decals and instructions are easily visible to the operator and are located near any area of potential danger. Replace any decal that is damaged or missing.

decal125-6128

Installation

Preparing the Machine

Important: This kit requires the installation of the leveler before installation.

Note: Determine the left and right sides of the machine from the normal operating position.

  1. Park the traction unit on a level surface.

  2. Disengage the auxiliary hydraulics.

  3. Lower any equipped attachments; refer to your Operator’s Manual.

  4. Engage the traction unit parking brake.

  5. Shut off the traction unit engine and remove the key.

  6. Disconnect the traction unit battery; refer to your Operator’s Manual.

Installing the Scarifier

Parts needed for this procedure:

Left claw1
Center claw1
Right claw1
Shaft1
Bolt (1/2 x 3 inches)6
Locknut (1/2 inch)6
Hydraulic cylinder assembly1
Bolt (3/4 x 4 inches)1
Nut (3/4 inch)1
Safety decal (125-6128)1
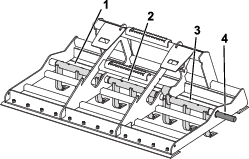
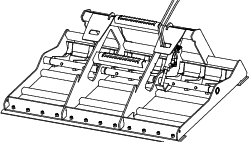
  1. Align the scarifier claws with the claws facing toward the traction unit while inserting the shaft (Figure 1)

    g270274

    Note: The left scarifier claw is aligned so that the hydraulic cylinder can contact the plate to raise or lower the claws.

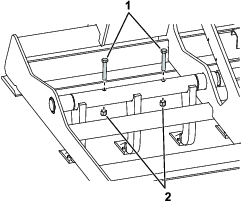
  2. Secure each claw with 2 bolts and locknuts as shown in Figure 2.

    g270272
  3. Torque the bolts securing the claws to 91 to 113 N⋅m (67 to 83 ft-lb).

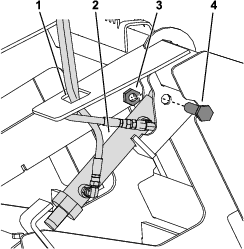
  4. Install the hydraulic cylinder assembly to the mount on the left side of the leveler (Figure 3).

    g270273
  5. Route the hydraulic hoses through the opening on the top of the leveler and up the attachment arm to the couplers.

  6. Attach the hydraulic hoses to your tractions unit, refer to your Operator’s Manual.

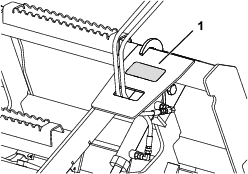
  7. Install the safety decal above the hydraulic cylinder mount as shown in Figure 4.

    g272413

Operation

Using the Scarifier

Operate the traction unit auxiliary hydraulics to raise and lower the scarifier claws.

g270275

Maintenance

Checking the Hydraulic Lines

Maintenance Service IntervalMaintenance Procedure
Before each use or daily
  • Check the hydraulic lines for leaks, loose fittings, kinked lines, loose mounting supports, wear, weather, and chemical deterioration.(Make necessary repairs before operating.)
  • Warning

    Hydraulic fluid escaping under pressure can penetrate skin and cause injury. Fluid injected into the skin must be surgically removed within a few hours by a doctor familiar with this form of injury; otherwise, gangrene may result.

    • Keep your body and hands away from pinhole leaks or nozzles that eject high-pressure hydraulic fluid.

    • Use cardboard or paper to find hydraulic leaks; never use your hands.