Installation
Parts List
 |  |  |
| 1x | 1x | 1x |
 |  |  |  |
| 1x | 1x | 1x | 2x |
 |  |  |  |
| 4x | 2x | 2x | 1x |
 |  |
| 3x | 43 cm (17-1/2 inch) — 1x |
 | 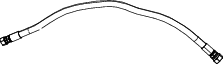 |
| 45 cm (18-1/2 inch) — 1x | 84 cm (33 inch) — 1x |
Installing the Manifold
-
Move the machine to a level surface, shut off the engine, remove the key, turn the battery disconnect switch to the OFF position, and wait for the engine to cool; refer to the Operator’s Manual.
-
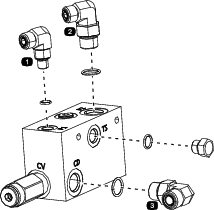
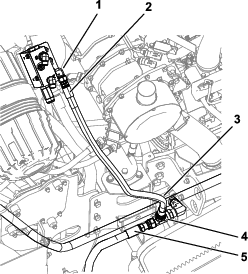
Install and hand tighten the fittings onto the manifold (Figure 2).
-
Install the plug onto the manifold (Figure 2) and torque to 46 to 57 N∙m (34 to 42 ft-lbs).
-
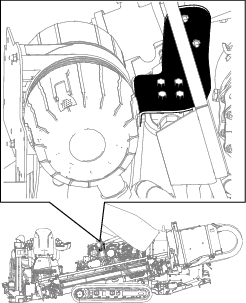
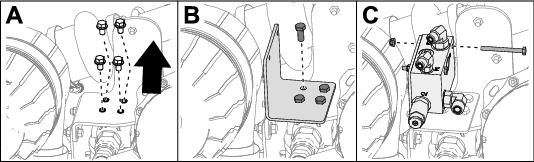
Remove and discard the bolts on the charge filter mount (Box A of Figure 3).
-
Install the bracket using 4 bolts (3/8 inch) as shown in Box B of Figure 3.
-
Install the manifold and fittings onto the bracket using 2 bolts (1/4 x 2-3/4 inches) and 2 nuts (1/4 inch) as shown in Box C of Figure 3).
Installing the Hoses
Installing the 84 cm (33 inch) Hose
-
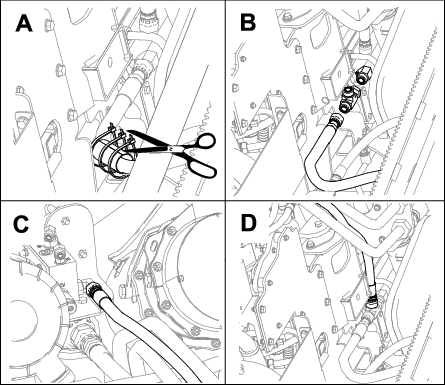
Cut the cable ties on the hose guard and set the guard aside (Box A of Figure 4).
-
Disconnect the hose from the fitting on the case drain hard line (Box B of Figure 4).
-
Install the large tee between the fitting and disconnected hose (Box B of Figure 4).
-
Install the 84 cm (33 inch hose) in port CD on the manifold and the top of the tee fitting (Box C and D of Figure 4).
-
Torque the fittings (Figure 5):
Important: Support the tee fitting with a crows foot on a long extension or from the side with a board or hammer handle.
-
Fitting on the manifold: 78 to 98 N∙m (58 to 72 ft-lb)
-
84 cm (33 inch) hose in port CD: 50 to 64 N∙m (37 to 47 ft-lb)
-
84 cm (33 inch) hose connecting to the tee fitting: 81 to 100 N∙m (60 to 74 ft-lb)
-
Tee fitting: 81 to 100 N∙m (60 to 74 ft-lb)
-
Existing hose connecting to the tee fitting: 81 to 100 N∙m (60 to 74 ft-lb)
-
-
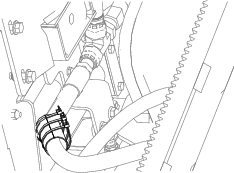
Install the hose guard using the 3 cable ties (Figure 6).
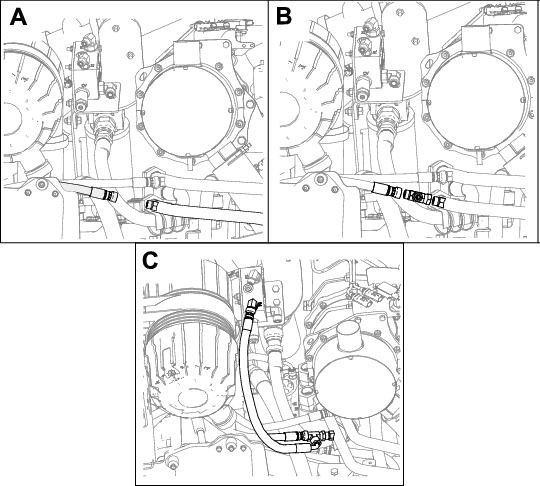
Installing the 43 cm (17-1/2 inch) Hose
-
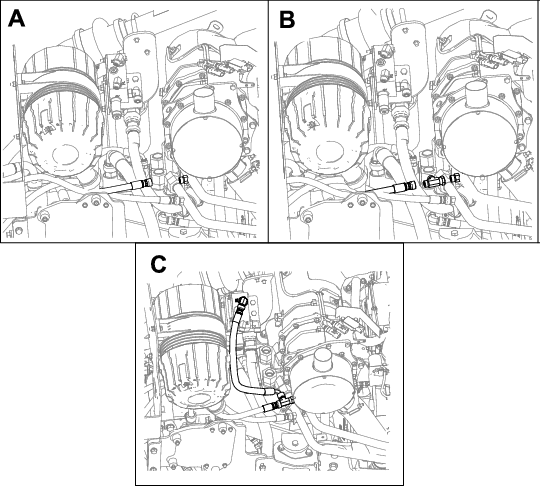
Disconnect the hose from the upper hard line going to the rotary hydrostat (Box A of Figure 7).
-
Install a small tee between the hard line fitting and the disconnected hose (Box B of Figure 7).
-
Connect the 43 cm (17-1/2 inch) hose to the P2 fitting to the tee fitting (Box C of Figure 7).
-
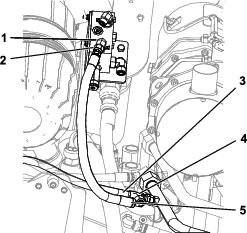
Torque the fittings (Figure 8):
-
Fitting on the manifold: 78 to 98 N∙m (58 to 72 ft-lb)
-
43 cm (17-1/2 inch) hose in port P2: 37 to 45 N∙m (27 to 33 ft-lb)
-
43 cm (17-1/2 inch) hose connecting to the tee fitting: 37 to 45 N∙m (27 to 33 ft-lb)
-
Tee fitting: 37 to 45 N∙m (27 to 33 ft-lb)
-
Existing hose connecting to the tee fitting: 37 to 45 N∙m (27 to 33 ft-lb)

-
Installing the 45 cm (18-1/2 inch) Hose
-
Disconnect the hose from the lower hard line going to the rotary hydrostat (Box A of Figure 9).
-
Install a small tee between the hard line fitting and the disconnected hose (Box B of Figure 9).
-
Connect the 45 cm (18-1/2 inch) hose to the P1 fitting to the tee fitting (Box C of Figure 9).
-
Torque the fittings (Figure 10):
-
Fitting on the manifold: 20 to 26 N∙m (15 to 19 ft-lb)
-
45 cm (18-1/2 inch) hose in port P1: 37 to 45 N∙m (27 to 33 ft-lb)
-
45 cm (18-1/2 inch) hose connecting to the tee fitting: 37 to 45 N∙m (27 to 33 ft-lb)
-
Tee fitting: 37 to 45 N∙m (27 to 33 ft-lb)
-
Existing hose connecting to the tee fitting: 37 to 45 N∙m (27 to 33 ft-lb)
-