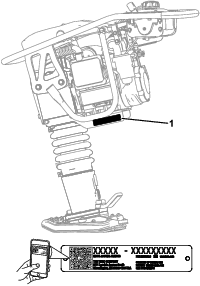

 , which means: Caution, Warning, or Danger—personal safety instruction. Failure to comply with the instruction
may result in personal injury or death.
, which means: Caution, Warning, or Danger—personal safety instruction. Failure to comply with the instruction
may result in personal injury or death.


Maintenance
Note: Determine the left and right sides of the machine from the normal operating position.
Important: You may tip the machine forward, if you drain the fuel tank or move the engine on/off switch to the STOP position, to make cleaning or servicing the machine easier. If you lay the machine onto the side, oil can drain out of the crankcase into the air cleaner or the muffler.Allow the oil to settle for at least 2 minutes after standing the machine upright before you start the engine.
Recommended Maintenance Schedule(s)
| Maintenance Service Interval | Maintenance Procedure |
|---|---|
| After the first 25 hours |
|
| Before each use or daily |
|
| Every 50 hours |
|
| Every 100 hours |
|
| Every 200 hours |
|
| Yearly or before storage |
|
Important: Refer to your engine owner’s manual for additional maintenance procedures.
Pre-Maintenance Procedures
Before performing maintenance on the machine, do the following:
-
Ensure that the engine and muffler are cool.
-
Disable the engine by disconnecting the spark-plug wire; refer to Disconnecting the Spark-Plug Wire.
Engine Maintenance
Servicing the Air Cleaner
| Maintenance Service Interval | Maintenance Procedure |
|---|---|
| Before each use or daily |
|
| Every 50 hours |
|
| Every 200 hours |
|
Important: Do not operate the engine without the air-filter assembly; extreme engine damage can occur.
Note: If the engine is low on power, produces black smoke, or runs unevenly, the air filter may be clogged.
Cleaning the Prefilter
| Maintenance Service Interval | Maintenance Procedure |
|---|---|
| Every 50 hours |
|
-
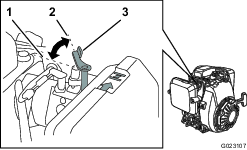
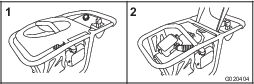
Open the cover of the machine (Figure 13).
-
Remove the screws that secure the cover to the prefilter housing (Figure 14), and remove the cover.
-
Remove the prefilter.
-
Clean the prefilter as follows:
-
Wash the prefilter using a mild detergent and water.
-
Squeeze it dry with a clean cloth.
-
Soak it with new engine oil.
-
Gently wind the prefilter in an absorbent cloth, and squeeze out the excess oil.
-
-
Install the prefilter as follows:
-
Align the prefilter inside of the cover.
-
Align the prefilter cover to the housing.
-
Secure the cover to the housing with the screws.
-
Servicing the Air Filter
-
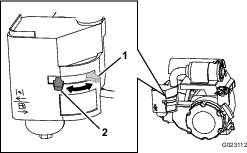
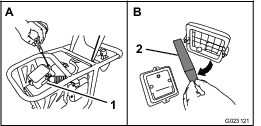
Remove the screws that secure the cover to the air-filter housing (Figure 15)
-
Remove the air filter from the housing as shown in Figure 15.
-
Inspect the air filter and replace it if it is damaged, excessively dirty, or saturated with oil or fuel.
-
Align the air filter inside of the cover.
-
Align the air filter cover to the housing.
-
Secure the cover housing with the screws.
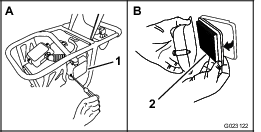
Servicing the Air Filter
-
Open the latch of the air-filter cover (Figure 16).
-
Remove the air filter from the housing as shown in Figure 16.
-
Remove the foam element from the paper element.
-
Inspect the elements and replace them if they are damaged or excessively dirty.
Note: If the paper element is saturated with oil or fuel, replace it.
-
Tap the paper element several times on a hard surface to remove the dirt.
-
Clean the foam element in warm, soapy water or in a nonflammable solvent.
Note: Do not use fuel to clean the foam element because it could create a risk of fire or explosion.
-
Rinse and dry the foam element thoroughly.
-
Dip the foam element in clean engine oil, then squeeze out the excess oil.
Note: Excess oil in the foam element restricts the air flow through the element and may reach the paper filter and clog it.
-
Wipe dirt from the housing and the cover with a moist rag.
Note: Be careful to prevent dirt and debris from entering the air duct leading to the carburetor.
-
Install the air-cleaner elements and ensure that they are properly positioned (Figure 17).
Important: Ensure that the open end of the air-cleaner elements are facing inward toward the machine, as the machine will not run if the elements are not placed in the proper air orientation due to air restriction (Figure 17).
-
Secure the cover to the housing with the latch.
Servicing the Engine Oil
Oil Type: 4-cycle engine oil that meets or exceeds the requirements for API service category SJ, SL, SM, or higher.
Crankcase Capacity:
-
0.28 L (9.47 fl oz) for models 68034 and 68035
-
0.40 L (13.53 fl oz) for model 68036
Viscosity: SAE 10W-30 is recommended for general use.
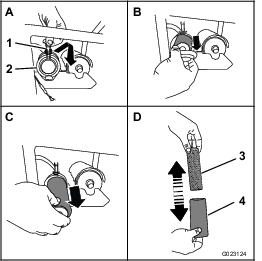
Checking the Engine-Oil Level
-
Shut off the engine and allow it to cool.
-
Tilt the machine so that the engine is level.
Important: Prop the machine in this position to ensure that it does not fall over.
-
Clean around the oil dipstick.
-
Remove the dipstick and wipe the end clean.
-
Slide the dipstick fully into the dipstick tube without threading it into the filler neck.
-
Pull the dipstick out and look at the end.
The oil should be level with the upper-limit mark (Figure 18).
Important: Running the engine with a low oil level can cause engine damage. This type of damage is not covered by warranty.
-
If the oil level is low, slowly pour only enough oil into the crankcase to raise the level to the upper limit.
Important: Do not overfill the crankcase with oil because the engine may be damaged.
-
Install and secure the dipstick.
Changing the Engine Oil
| Maintenance Service Interval | Maintenance Procedure |
|---|---|
| After the first 25 hours |
|
| Every 100 hours |
|
| Yearly or before storage |
|
Toro Premium Engine Oil is available from your authorized Toro distributor.
-
Start the engine and let it run for 5 minutes; refer to Starting the Engine.
-
Shut off the engine; refer to Shutting Off the Engine.
-
Tilt the machine so that the drain side is slightly lower than the opposite side to ensure that the oil drains completely.
-
Place a drain pan under the oil-drain hole.
-
Remove the drain plug and drain the oil from the engine (Figure 19).
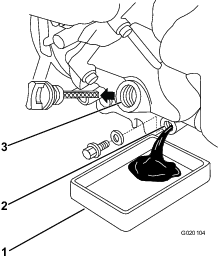
-
When the oil has drained completely, install the plug and wipe up any spilled oil.
Note: Dispose of the used oil at a certified recycling center.
-
Remove the dipstick and slowly pour approximately 80 percent of the specified amount of oil into the engine (Figure 19).
-
Slowly add additional oil to bring the oil level to the upper-limit mark on the dipstick; refer to Checking the Engine-Oil Level.
-
Install and secure the dipstick.
Servicing the Spring-Housing Oil
Oil Type: 4-cycle engine oil that meets or exceeds the requirements for API service category SJ, SL, SM, or higher.
Capacity: 0.47 L (15.89 fl oz)
Viscosity: SAE 10W-30 is recommended for general use.
Checking the Spring-Housing Oil
| Maintenance Service Interval | Maintenance Procedure |
|---|---|
| Before each use or daily |
|
Check the spring-housing oil as follows:
-
Carefully tip the machine slightly backward so that the machine stands completely upright and vertical.
Important: Prop the machine in this position to ensure that it does not fall over.
-
Check the oil sight plug (Figure 20), and ensure that the oil level is halfway between the top and bottom of the oil sight plug.
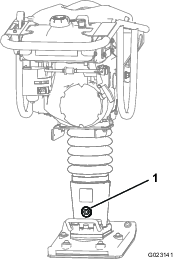
-
If the oil level is low, add oil; refer to Adding Oil to the Spring Housing.
Changing the Spring-Housing Oil
| Maintenance Service Interval | Maintenance Procedure |
|---|---|
| After the first 25 hours |
|
| Every 100 hours |
|
| Yearly or before storage |
|
-
Start the engine and let it run for 5 minutes; refer to Starting the Engine.
-
Shut off the engine; refer to Shutting Off the Engine.
-
Ensure that the engine on/off switch is in the STOP position so that the fuel does not leak out of the fuel tank.
-
Tilt the machine so that the oil sight plug faces downward to ensure that the oil drains completely (Figure 21).

-
Place a drain pan under the oil sight plug (Figure 21).
-
Remove the oil sight plug (Figure 21).
-
Drain the oil out of the hole in the housing (Figure 21).
-
Clean the threads on the oil sight plug and apply 3 layers of PTFE thread-sealing tape.
-
Add oil to the spring housing; refer to Adding Oil to the Spring Housing.
-
Install and torque the oil sight plug to 54 N∙m (39.8 ft-lb).
Important: Allow the oil to settle for at least 2 minutes after standing the machine upright before starting the engine.
Adding Oil to the Spring Housing
-
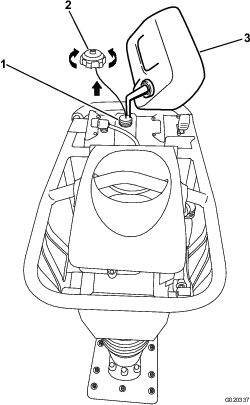
Tilt the machine so that the oil sight plug is facing upward (Figure 22).
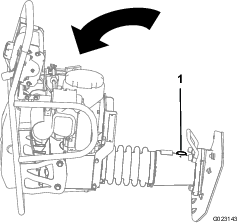
-
Remove the oil sight plug.
-
Clean the threads on the oil sight plug and apply 3 layers of PTFE thread-sealing tape.
-
Add the oil to the spring housing in increments to ensure that you do not overfill the machine; refer to Checking the Spring-Housing Oil to ensure that the oil is at the correct level.
Note: The oil capacity of the spring housing is 0.47 L (0.5 US qt); add the full amount only if the spring housing is empty.
-
Install and torque the oil sight plug to 54 N∙m (39.8 ft-lb).
Important: Allow the oil to settle for at least 2 minutes after standing the machine upright before starting the engine.
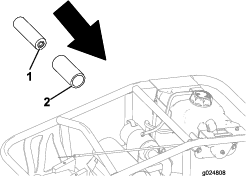
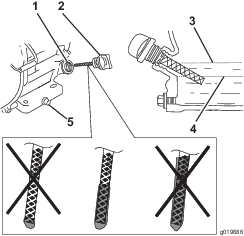
Servicing the Spark Plug
| Maintenance Service Interval | Maintenance Procedure |
|---|---|
| Every 100 hours |
|
Ensure that the air gap between the center electrode and the side electrode is correct before installing the spark plug. Use a spark-plug wrench for removing and installing the spark plug and a gapping tool/feeler gauge to check and adjust the air gap. Install a new spark plug if necessary.
Models 68034 and 68035: Use a DENSO U16FSR-UB or an NGK CR5HSB spark plug.
Model 68036: Use a DENSO W14EPR-U or an NGK BP4ES spark plug.
Removing the Spark Plug
-
Shut off the machine and let it cool.
-
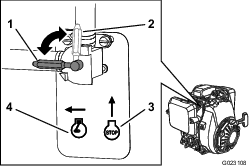
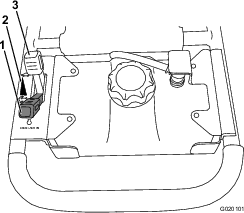
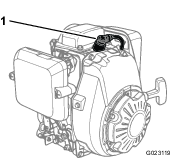
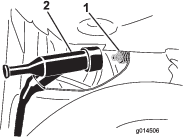
Disconnect the wire from the spark plug (Figure 23).
-
Clean around the spark plug.
-
Use a spark-plug wrench to remove the spark plug and the metal washer.
Checking the Spark Plug
-
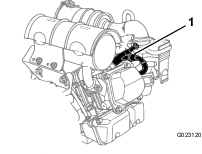
Look at the center of the spark plug (Figure 24). If you see light brown or gray on the insulator, the engine is operating properly. A black coating on the insulator usually means that the air cleaner is dirty.
Important: Do not clean the spark plug. Always replace the spark plug when it has a black coating, worn electrodes, an oily film, or cracks.
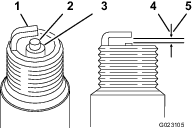
-
Check the gap between the center and side electrodes (Figure 24).
-
If the gap is not within the specified range, do the following:
-
If the gap is too small, carefully bend the side electrode away from the center electrode until the gap between the electrodes is correct.
-
If the gap is too large, carefully bend the side electrode toward the center electrode until the gap between the electrodes is correct.
-
Installing the Spark Plug
-
Thread the spark plug into the spark-plug hole.
-
Tighten the spark plug to 27 N∙m (20 ft-lb).
Important: Ensure that the spark plug is tightened to the specified torque value. A loose spark plug may cause damage to the cylinder, while an overtightened spark plug may cause damage to the cylinder-head threads.
-
Connect the wire to the spark plug.
Compactor Shoe Maintenance
Checking the Compactor Shoe
| Maintenance Service Interval | Maintenance Procedure |
|---|---|
| Before each use or daily |
|
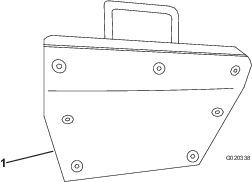
Among the most critical elements of the machine is the compactor shoe. It is also the most subject to damage and wear. In the course of compacting a wide array of granular objects, the machine encounters numerous abrasives and objects, such as dirt, stones, and occasionally a large rock or buried scrap.
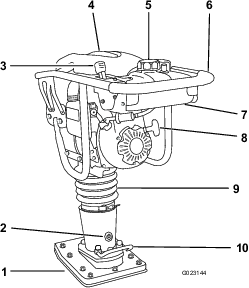
The wear of the compactor shoe can significantly impair the efficiency and performance of the machine. Therefore, it is important to make frequent checks of the condition of the compactor shoe for leaks and cracks. (Figure 25).
Cleaning
Removing Debris from the Machine
| Maintenance Service Interval | Maintenance Procedure |
|---|---|
| Before each use or daily |
|
Regular cleaning and washing will increase the life span of the machine. Clean the machine immediately after use, before the dirt hardens.
Check before cleaning that the fuel tank cap is properly in place to avoid getting water in the tank.
Use care when using a high-pressure sprayer because it can damage warning decals, instruction signs, and the engine.