
 , which means Caution, Warning,
or Danger—personal safety instruction. Failure to comply with
these instructions may result in personal injury or death.
, which means Caution, Warning,
or Danger—personal safety instruction. Failure to comply with
these instructions may result in personal injury or death.


Maintenance
Greasing the Broom
| Maintenance Service Interval | Maintenance Procedure |
|---|---|
| Before each use or daily |
|
-
Park the machine on a level surface and disengage the auxiliary hydraulics.
-
Shut off the engine, remove the key, and wait for all moving parts to stop before leaving the operating position.
-
Grease the fittings on the 2 hinges and the bearing (Figure 7).
Replacing the Brushes
| Maintenance Service Interval | Maintenance Procedure |
|---|---|
| Before each use or daily |
|
Removing the Brushes
Replace the brushes when the outside diameter of the brushes is 33 cm (13 inches, or half the original diameter).
Note: Replace all bristles at the same time; otherwise, a mix of old and new bristles reduces performance.
-
Park the machine on a level surface and disengage the auxiliary hydraulics.
-
Shut off the engine, remove the key, and wait for all moving parts to stop before leaving the operating position.
-
Remove the hoses from the hose clamp.
-
Remove the 4 nuts securing the motor assembly and remove the assembly.
-
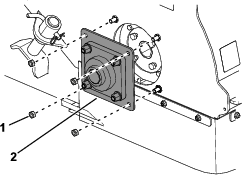
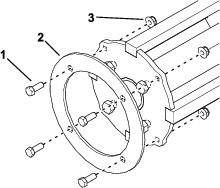
On the right side of the machine, remove the 4 nuts (1/2 inch) securing the bearing mount plate and remove the bearing mount plate (Figure 8).
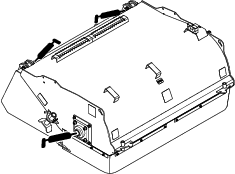
Note: The broom core should be free from the hood. Push the broom core toward the motor end to allow it to drop from the hood.
-
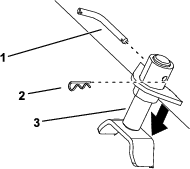
Remove the 4 bolts, 4 nuts, and the retaining plate (Figure 9).
-
Slide the brushes off the broom.
Installing the Brushes
-
Inspect the broom core for damage or excessive wear. Replace it if it is damaged.
-
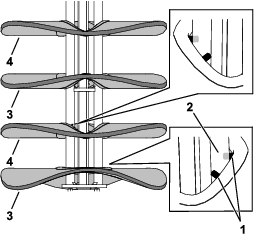
Stand the broom core on end. Starting with a polypropylene brush, install new brushes, ensuring the prongs straddle the rods of the core (Figure 10). Alternate between polypropylene and wire brushes, with each consecutive brush 180° apart.
Note: The last brush installed should be a polypropylene brush.
-
Install the retaining plate (Figure 9).
-
Lay the core on the ground.
Important: Do not move the core using the brushes.
-
Lower the hood over the core.
Note: You may need to push the broom core toward the motor end to bypass the side of the hood when installing it.
-
Install the bearing mount plate (Figure 8).
-
Install the mount plate and secure it with the nuts.
-
Remove the bolt (3/8 x 3-1/2 inches) and washer securing the drive adapter to the hydraulic motor and apply a thin layer of grease to the splines of the motor (Figure 11).

-
Secure the drive adapter using the bolt (3/8 x 3-1/2 inches) and washer (Figure 11).
-
Install the motor assembly using the 4 bolts removed previously.
-
Install the hoses in the clamp.
Checking the Hydraulic Lines
| Maintenance Service Interval | Maintenance Procedure |
|---|---|
| Before each use or daily |
|
Warning
Hydraulic fluid escaping under pressure can penetrate skin and cause injury. Fluid injected into the skin must be surgically removed within a few hours by a doctor familiar with this form of injury; otherwise, gangrene may result.
-
Keep your body and hands away from pinhole leaks or nozzles that eject high-pressure hydraulic fluid.
-
Use cardboard or paper to find hydraulic leaks; never use your hands.