Safety

Safety and Instructional Decals

Graphic

Safety decals and instructions are easily visible to the operator and are located near any area of potential danger. Replace any decal that is damaged or missing.

decal138-0543
decal139-2835

Installation

Preparing the Machine

Important: This kit requires the installation of the pick-up broom before installation.

Note: Determine the left and right sides of the machine from the normal operating position.

  1. Park the traction unit on a level surface.

  2. Disengage the auxiliary hydraulics.

  3. Lower any equipped attachments; refer to your Operator’s Manual.

  4. Engage the traction unit parking brake.

  5. Shut off the traction unit engine and remove the key.

  6. Disconnect the traction unit battery; refer to your Operator’s Manual.

Installing the Water Kit

Parts needed for this procedure:

Water tank assembly1
Tank mount1
Bolt (5/16 x 3/4 inch)6
Flat washers (5/16 inch)6
Bolt (1/2 inch x 1-1/4 inches)4
Locknut (1/2 inch)6
Ratchet straps2
Spray bar mounting brackets2
Bolt (5/8 x 1-1/2 inches)2
Locknut (5/8 inch)2
Spray bar assembly1
Carriage bolt (1/2 x 1-1/4 inches)2
Flat washer (1/2 inch)2
Long hose1
Hose clamp1
Long wire harness1
Switch and switch wire harness1
Capacity decal1
  1. Install the water tank assembly to the water tank mount using 6 bolts (5/16 x 3/4 inch) and flat washers (5/16 inch) as shown in Figure 1.

    Important: Do not overtighten the hardware; overtightening may cause damage to the tank.

    g269777
  2. Install the tank and mount assembly to the mount tab on top of the pick-up broom using the 4 bolts (1/2 inch x 1-1/4 inches) and locknuts (1/2 inch) as shown in Figure 2.

    g269790
  3. Secure the tank with the 2 ratchet straps (Figure 3).

    g269791
  4. Secure the spray bar mounting brackets to the tabs on the front of the pick-up broom with the 2 bolts (5/8 x 1-1/2 inch) and locknuts (5/8 inch), but do not completely tighten the hardware.

    g272312
  5. Install the spray bar assembly to the spray bar mounting brackets with the carriage bolts (1/2 x 1-1/4 inches), flat washers (1/2 inch), and locknuts (1/2 inch) in the lowest hole on the spray bar mounting brackets (Figure 13).

    Note: For the most efficient spraying pattern, the spray nozzle tips should be approximately 13 inches above the ground with the broom sitting on the ground.Adjust the spray bar position until the correct height is achieved; refer to Adjusting the Spray-Bar Height.

  6. Tighten the hardware that secures the spray bar mounting brackets.

  7. Route the long hose below the tank mount, through the center hose guide and connect it to the center tee on the spray bar.

  8. Secure the hose to the tee with a hose clamp.

  9. Connect the short wire harness to the long wire harness (Figure 5).

    g270369
  10. Connect the opposite end of the long wire harness to the switch wire harness.

  11. Route the switch wire harness and switch along the hydraulic lines, past the machine couplers, and to the control panel of the traction unit.

    Important: Route the wire harness away from any sharp, hot, or moving parts, and secure it with cable ties as needed. Ensure that the harness will not be pinched when the machine is operating.

  12. Plug the power connector into the 12 V accessory outlet on the control panel (Figure 6).

    g269951
  13. Install the kit capacity decal over the existing capacity decal (Figure 7).

    g283980

Installing the Gutter Brush Spray Nozzle (Optional)

Parts needed for this procedure:

Tee1
Hose clamp2
Spray nozzle mount1
Hose clip1
Bolt (3/8 x 1 inch)1
Locknut (3/8 inch)1

If the pick-up broom is equipped with a gutter brush, this kit includes a spray nozzle that can be mounted to it.

  1. On the spray bar, cut the hose between the last 2 nozzles nearest the gutter brush and install the tee with hose clamps.

    g269813
  2. Loosen the hardware securing the gutter brush motor, slide the spray nozzle mount under the gutter brush motor mount, and tighten the hardware (Figure 9).

    g269815
  3. Secure the hose to the hole in the gutter brush arm with the hose clip (7/8 inch) and bolt (3/8 x 1 inch) and locknut (3/8 inch) as shown in Figure 10.

    g269816

Operation

Warning

A full water tank can affect the stability of the machine, which may lead to a tip-over, causing serious injury or death.

  • Do not extend the attachment arms when operating the pick-up broom.

  • Do not raise the arms higher than necessary to dump the bucket.

  • Do not travel with the pick-up broom raised above the ground.

Preparing to Operate

  1. Always ensure that the ratchet straps holding the tank are secure before operating the machine.

  2. Always fill the tank with water before turning the pump on.

    Important: Operating the pump without water in the tank may damage the pump.

    Note: A full tank of water (30 gallons) lasts approximately 20 minutes of continuous spraying depending on conditions and settings.

Turning On the Water Pump

Use the water pump switch to control the water pump.

g283983

Adjusting the Flow Rate

Adjust the flow rate to the desired setting using the knob on the pressure regulator.

g269753

Adjusting the Spray-Bar Height

As the pick-up broom bristles wear, the spray-bar height may need to be adjusted to ensure complete spray coverage. Refer to the following steps:

  1. Turn on the spray pump and ensure that the spray pattern provides complete coverage to the area in front of the pick-up broom.

  2. If the spray pattern does not provide full coverage, loosen the nut on the carriage bolt (1/2 inch) and slide the spray bar up in the slots on the spray bar or move the spray bar up to the next available hole in the spray bar mounting bracket (Figure 13).

    g269754
  3. Tighten the hardware that secures the spray bar to the mounting brackets.

  4. Test and adjust until the spray pattern provides complete coverage.

Maintenance

Unclogging the Nozzles

Maintenance Service IntervalMaintenance Procedure
Before each use or daily
  • Check and unclog any clogged spray nozzles.
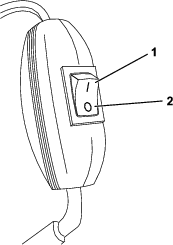
    1. Turn on the spray pump and ensure that all nozzles are operating correctly.

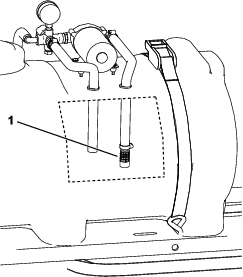
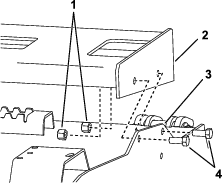
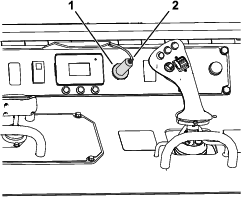
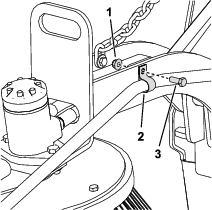
    2. Remove the nozzle cap from the clogged nozzle (Figure 14).

    3. Clean the screen inside the nozzle cap with a small brush.

      g269732
    4. Install the clean nozzle cap and ensure that it operates correctly.

    Cleaning the Strainer

    Maintenance Service IntervalMaintenance Procedure
    Before each use or daily
  • Check and clean the tank strainer.
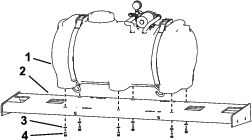
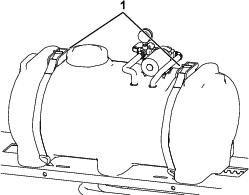
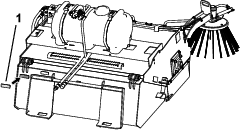
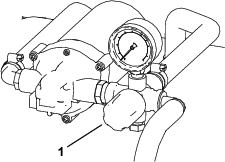
    1. Locate the tank strainer from the inside of the tank (Figure 15).

    2. Clean any debris from the strainer screen.

      g269730

    Storage

    Storing the Machine

    1. If the tank is not going to be used for an extended period of time, completely drain the tank, pump, and lines.

    2. In areas prone to freezing, you must also winterize the machine to prevent damage from freezing; pump a solution of RV anti-freeze through the entire system.