Installation
Preparing the Machine
-
If you are installing seat Model No. 04508 onto model year 2018 or older traction units, you must first install kit Model No. 139-6479.
-
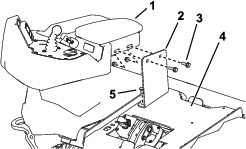
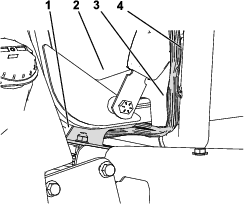
If you are installing this kit on a new, diesel or eTriflex traction unit without a seat, remove the 2 carriage bolts, 2 flange bolts, and 4 nuts securing the shipping bracket to the seat pan and armrest (Figure 1). Discard the shipping bracket and seat pan fasteners. Save the armrest fasteners.
Important: Ensure that you support the armrest after removing it so that it does not crimp or hang by the cables and wires.
-
If you are installing a premium seat on a traction unit with a standard seat installed, complete the following procedure:
-
Park the machine on level ground, shut off the engine (if equipped), engage the parking brake, and remove the ignition key.
-
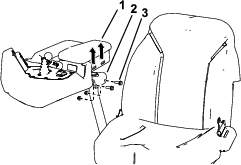
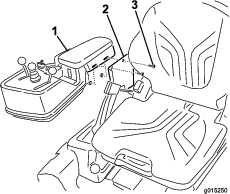
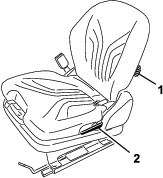
Remove the 2 flange bolts and nuts securing the armrest to the seat (Figure 2). Save the fasteners.
Important: Ensure that you support the armrest after removing it so that it does not crimp or hang by the cables and wires.
-
Disconnect the seat wire harness from the machine wire harness (Figure 7).
-
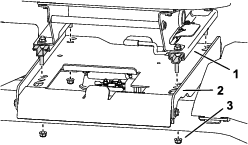
Remove and discard the 4 nuts securing the seat rails to the seat pan and remove the seat (Figure 3).
-
Installing the New Seat
Parts needed for this procedure:
| Seat assembly | 1 |
| Flange nut | 4 |
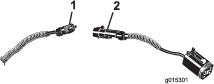
| Short wire harness | 1 |
| Cable tie | 2 |
-
Install the 4 studs on the seat rails into the seat pan and secure them using 4 flange nuts (Figure 4).
Note: There are 2 installation locations in the seat pan. For tall operators, install the seat into the rear holes. For shorter operators, install the seat into the front holes.
Note: The eTriflex does not have holes in the seat pan; if you want to adjust the seat, change the position of the seat on the seat mount brackets as shown in Figure 5.
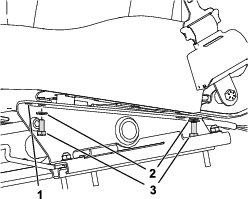
Important: Ensure that the seat has full clearance after adjusting the seat mounting.
-
Disconnect the right side of the seat bracket from the seat slide to create clearance for the console wire harness between the seat bracket and the seat slide (Figure 6).
Note: You may need to loosen the hardware on both sides of the seat bracket.
-
Route the console wire harness between the seat bracket and the seat slide (Figure 6).
-
Secure the wire harness to the console arm using cable ties or install the tree clips attached to the wire harness to the console arm for the eTriFlex.
-
Connect the open connector in the main wire harness (located to the right rear of the seat) to the short wire harness that came with the seat (Figure 7).
-
Install the armrest to the seat using the 2 flange bolts and flange nuts that you removed previously (Figure 8).

-
Connect the wire harness to the seat:
-
For the standard seat: Connect the connector on the short wire harness to the open port under the seat.
-
For the premium seat:
-
Cut the cable ties securing the seat wire harness to the back of the seat.
-
Adjust the seat as far back as possible and plug the seat harness into the short wire harness.
-
Cable tie the wire harness to the corner of the seat where the original ties were cut.
-
-
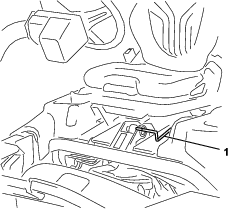
For Triflex machines: use cable ties to secure the wire harness to the choke/throttle cable.
-
Operation
Seat Controls
Seat-Adjusting Lever
The seat-adjusting lever is located on the front, left corner of the seat (Figure 9). Twisting the handle up allows you to adjust the seat forward and rearward.
Note: If you need additional adjustment on the seat, remove the 4 bolts securing the seat to the rails and move the seat to the second set of mounting holes provided (Figure 4).
Note: If you need additional adjustment to the armrest, loosen the hardware securing the armrest and move adjust its position (Figure 8).
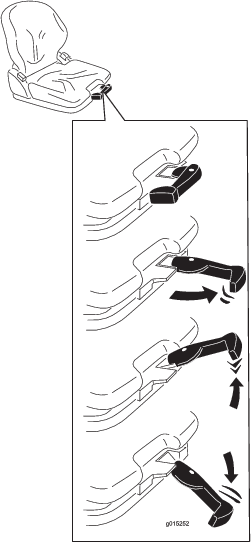
Weight-Adjustment Lever
You can adjust the seat for your weight to provide a smooth and comfortable ride.
Important: To adjust the seat, the driver must be seated.
Adjust the seat for your weight by pulling out the lever and then pumping it up to increase the suspension or down to decrease it (Figure 10).
When the arrow is in the middle clear area of the viewing window, you have adjusted the seat correctly for your weight.
When you reach the minimum/maximum weight adjustment, you can hear it reaching the upper or lower end stop.
Important: To prevent injury to you and/or damage to the machine, check the setting for your weight and adjust it before operating the machine.
Lumbar Support Knob
The lumbar support increases both the seating comfort and a customized lumbar support for your lower back.
Turn the adjustment knob upward to adjust the curvature in the upper part of the backrest cushion. Turn the knob downward to adjust the curvature in the lower part of the backrest cushion (Figure 11).
0 = No curvature
1 = Maximum curvature at the top
2 = Maximum curvature at the bottom
Backrest Locking Lever
You can adjust the back of the seat to provide a more comfortable ride.
Pull up the locking lever to release the backrest catch (Figure 11). When releasing the backrest catch, do not apply load to the backrest by pressing against it.
By exerting pressure on or off the front or rear of the seat you can move it to the desired position. Release the locking lever to lock the backrest.
Note: The backrest should not be able to move into another position after it has been locked.