Installation
Note: Determine the left and right sides of the machine from the normal operating position.
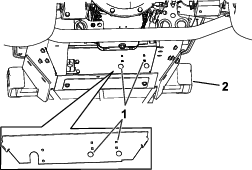
Ordering the Radiator Support
Note: Model year 2019 and newer machines have existing holes in the radiator support.
-
Check if your machine has existing holes in the radiator support (Figure 1).
-
If your machine does not have existing holes, order a radiator support, Part No. 139–0952–03, from your authorized Toro distributor.
Preparing the Machine
Perform the following procedure to prepare the machine for installing this kit.
-
Park the machine on a level surface, disengage the PTO, and engage the parking brake.
-
Turn the switch to the OFF position, remove the key, and wait for all movement to stop before leaving the operating position.
-
Repair all bent or damaged areas on the machine and replace any missing parts.
-
Clean any debris from the machine to ease installation.
Warning
Long-term exposure to fuel vapors can cause serious injury and illness.
-
Avoid prolonged breathing of vapors.
-
Keep face away from nozzle and gas tank or conditioner opening.
-
Keep fuel away from eyes and skin.
Warning
In certain conditions, fuel is extremely flammable and highly explosive. A fire or explosion from fuel can burn you and others and can damage property.
-
Wipe up any fuel that spills.
-
Never fill the fuel tank inside an enclosed space.
-
Never smoke when handling fuel, and stay away from an open flame or where fuel fumes may be ignited by a spark.
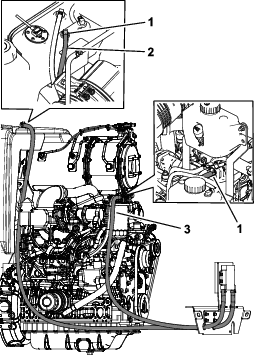
Removing the Existing Bracket and Fuel Hose
-
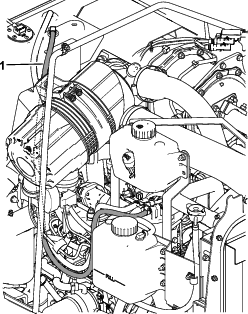
Remove the existing fuel hose shown in Figure 2.
Note: The following steps are only for machines that do not have existing holes in the radiator support. Refer to Figure 1 for locating the existing holes.
-
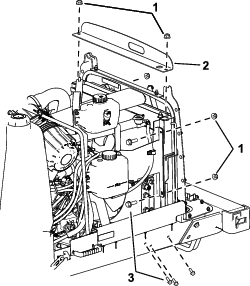
Remove the radiator bracket on top of the radiator (Figure 3).
-
Remove the 2 bolts on each side of the radiator (Figure 3).
-
Remove the 3 bolts at the bottom of the radiator on each side (Figure 3).
-
Raise the radiator up enough to slide out the existing radiator support (without existing holes). Refer to Figure 1 for finding existing holes.
-
Slide the radiator support out towards the rear of the machine.
-
Raise the radiator up, slide the new radiator support under the radiator, and secure it with the bolts removed in Figure 3.
Assembling the Hoses to the Fuel Cooler
Parts needed for this procedure:
| Fuel cooler | 1 |
| Hose clamp | 2 |
| Bolt (1/4 x 5/8 inch) | |
| Fuel cooler bracket | 1 |
| Hose (long) | 1 |
| Hose (short) | 1 |
| Foam (short) | 2 |
| Foam (long) | 2 |
| Push-in hose clamp | 2 |
-
Slide a push-in hose clamp onto the end of each hose (Figure 4).
-
Slide a hose clamp onto the end of each hose (Figure 4).
-
Connect the hose ends to the fuel cooler and secure them with the hose clamps.
-
Fasten the fuel cooler to the fuel cooler bracket with 4 bolts (1/4 x 5/8 inch) as shown in Figure 4.
-
Remove the backing from the foam pieces and adhere them to the fuel cooler bracket (Figure 4).

Installing the Fuel Cooler
Parts needed for this procedure:
| Worm clamp | 2 |
| Carriage bolt (1/4 x 3/4 inch) | 4 |
| Nut (1/4 inch) | 4 |
| Grommet | 2 |
-
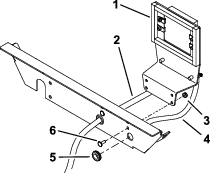
Install the grommets into the radiator support (Figure 5).
-
Route the hoses through the grommets (Figure 5).
-
Route the hoses along the side of the engine away from pinch-points and hot areas.
Note: Ensure the fuel hoses do not contact hot, moving or sharp parts on the machine.
-
Secure the short hose to the fuel-filter connection with a worm clamp and the long hose to the fuel-tank connection with a worm clamp (Figure 6).
-
Close the hood and check the seal around the radiator. Ensure that the seal contacts the frame around the radiator.
Important: Ensure that the hood opens and closes without contacting the fuel cooler.
-
Run the machine and check for any leaks. Ensure the clamps are tight.
-
After 50 hours of operation, tighten the clamps.