Setup

Mounting the Hydraulic Blade to the Frame Lift Kit

Parts needed for this procedure:

Front hydraulic blade assembly1

Note: The traction unit must be equipped with the Front Lift Frame Kit.

  1. Position the machine and the attachment on a level surface.

  2. Remove any existing attachment from the front of the machine.

  3. Start the engine and drive the traction unit into position behind the attachment adapter. Lower the traction unit adapter.

    Note: Ensure that the locking lever (Figure 1) is pivoted to the left (unlocked position) as viewed from the front of the machine.

  4. Lift the attachment adapter onto the traction unit adapter.

    Note: Be careful not to pinch yourself between adapters.

  5. Pivot the locking lever to the right to lock the adapters together (Figure 1).

    g003732

Adjusting the Link Assembly

  1. With the attachment mounted and secured on the traction unit, raise the attachment.

  2. Measure the gap between the top washer and the spacer in the link assembly on the attachment adapter as shown in Figure 2.

    The gap between the washer and the shoulder should be 1.5 to 2 mm (0.060 to 0.080 inch).

    g003733

Operation

Adjusting the Wear Plate

  • For a more-aggressive conditioning: Position the wear plate (Figure 3) with the teeth facing forward.

  • For a less-aggressive conditioning: Position the wear plate with the teeth facing backward.

  • For a finish grading: Install the blade with the flat edge down.

g003735

Adjusting the Blade Angle

The blade is shipped from the factory set at a 30° angle, but it may be increased to 45°.

  1. Start the engine and raise the blade slightly off the ground. Shut off the engine and remove the key.

  2. Remove the rear stop bolt, washer, and spacer on each side of the blade (Figure 4). Retain the components for installation at a later time.

    g003736

    Note: If the attachment adapter becomes stuck to the traction unit adapter, insert a prybar or screwdriver into the pry slot to disengage the parts (Figure 5).

    g003783

Inspection and Clean-up

When the grading operation is completed, clean the machine thoroughly. Flush off the sand after each use as sand is extremely abrasive.

If the machine is cleaned frequently (before the sand has a chance to "cake"), it can be cleaned with a stream of water from a hose without a spray nozzle. A high pressure stream could drive the sand into wear areas where it could act as a grinding compound.

Maintenance

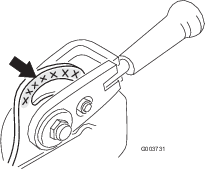
Greasing the Attachment

If the locking lever on the attachment adapter does not pivot freely and easily, apply a light coat of grease to the area shown in Figure 6.

g003731

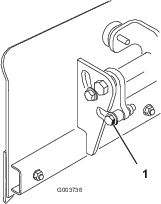
Adjusting the Actuating Rod Springs

The extension spring length is adjusted at the factory to 5 cm (2 inches) as shown in Figure 7. To increase the aggressiveness of the blade, tighten the springs. Loosen the springs to decrease the aggressiveness of the blade.

g003737