
Maintenance
Checking Lug Nuts
| Maintenance Service Interval | Maintenance Procedure |
|---|---|
| After the first 10 hours |
|
Torque the nuts to 68-102 N∙m (50-75 ft-lb).
Read and understand the following before using the trailer.
Before every use:
Inspect the coupler, ball, and hitch.
Always use safety chains.
Verify that all lights are functioning properly.
Verify that the tires are properly inflated as recommended on tires.
Verify that the lug nuts are tight and torqued properly.
Verify that that the machine is properly secured.
Know how to properly control your towing vehicle/trailer combination on the highway under all conditions. Remember that the loaded weight of the trailer increases your braking and stopping distances.
You are responsible for determining the towing capacity of your vehicle.
Clean off the machines prior to loading them onto the trailer. Keep the trailer clean of loose debris that could fall off during transport, causing a hazard.
Use proper loading and unloading procedures and sequences. Read all manuals and follow the instructions provided.
Inspect the trailer and machine often during transport.
 |
Safety decals and instructions are easily visible to the operator and are located near any area of potential danger. Replace any decal that is damaged or missing. |


Parts needed for this procedure:
| Trailer bed | 1 |
| Wheel | 2 |
| Lug nuts | 10 |
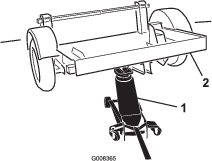
Using a hoist or mechanical jack, raise the trailer bed.
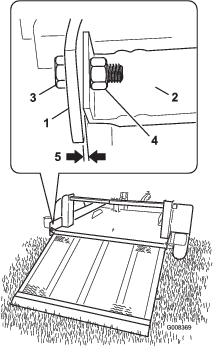
Install the wheels onto the hub with the valve stem facing out to allow access (Figure 1).
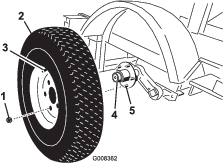
Secure each wheel to the hub using 5 lug nuts. Torque the nuts to 68-102 N∙m (50-75 ft-lb).
While the bed is still raised, remove the fasteners securing the packing stands to the trailer bed.
Lower the bed to the ground and verify the cold pressure of the wheels is at a maximum of 551 kPa (80 psi).
Parts needed for this procedure:
| Tongue | 1 |
| Bolt (5/8 x 3 inches) | 2 |
| Nut (5/8 inch) | 2 |
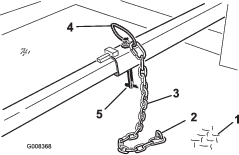
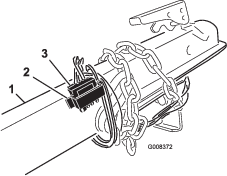
Lay the tongue out in front of the trailer and locate a flexible wire longer than the tongue.
Feed the wire through the length of the tongue so a portion of the wire is visible at both ends (Figure 2).
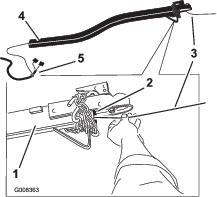
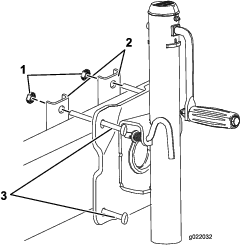
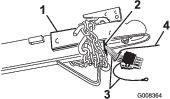
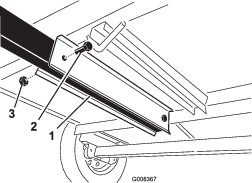
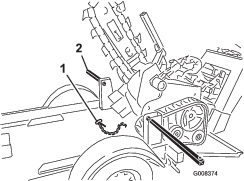
Remove the fastener securing the hitch wiring bundled to the trailer bed.
Secure the wire in the tongue to the wiring harness on the trailer and pull the wiring harness through the length of the tongue using the wire (Figure 3). Remove the wire from the harness.
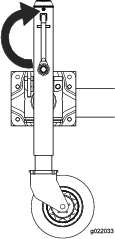
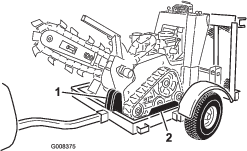
Using a jack or hoist, raise the front end of the trailer bed to allow the installation of the tongue (Figure 4).
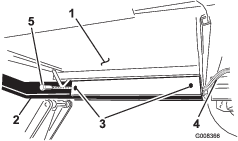
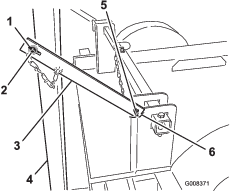
Move the tongue into position under the trailer bed and raise it to align the rear holes in the trailer bed with the rear holes in tongue.
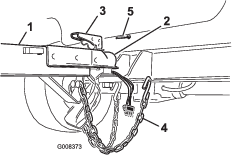
With the help of another person, install a bolt (5/8 x 3 inches) through the holes. Raise the front end of the tongue to align the front holes and use a bolt (5/8 x 3 inches) to hold the tongue in place (Figure 5).
At the front end of the tongue, pull the wire harness forward to remove all slack in the harness before continuing the installation.
Important: Ensure that the wire harness is not being pinched or impinged during the installation. Damaged wires can cause the tail lights to malfunction.
Secure the bolts with 2 nuts (5/8 inch) (Figure 6). Torque the nuts to 103-135 N∙m (76-100 ft-lb).
Lower the front end of the trailer.
Parts needed for this procedure:
| Mounting strap | 2 |
| Jack | 1 |
| Bolt | 4 |
| Locknut | 4 |
Parts needed for this procedure:
| Chain | 1 |
| Ramp | 1 |
| Bolt (1/2 x 1-1/2 inches) | 2 |
| Nut (1/2 inch) | 2 |
| Ramp strap | 2 |
| Cotter pin (1-1/4 inch) | 2 |
Install the retaining chain from the bed of the trailer to the retaining pin (Figure 8).
With the help of another person, place the ramp into position at the end of the trailer bed. Use a bolt (1/2 x 1-1/2 inches) and a nut (1/2 inch) at each hinge to attach the ramp to the trailer bed (Figure 9).
Tighten the bolt until there is approximately a 0.16 cm (1/16 inch) gap between the bed and ramp hinges. This allows the ramp to move freely while securely fastened to the trailer.
Important: Do not over tighten the ramp pivot bolts or binding will occur, causing damage to the trailer.
Install a ramp strap to each side of the trailer as shown in Figure 10. Install a cotter pin and bend back the ends to secure the straps to the trailer.
Raise the ramp and use the straps and lynch pins to secure it in the transport position (Figure 10).
Locate the white ground wire on the wiring harness and ground bolt on the front of the tongue. Secure the ground wire to the tongue at the ground bolt. Do not overtighten the bolt.
Plug the flat connector to a suitable vehicle for testing. Check to make sure the brake lights illuminate properly with the brake pedal applied and the taillights flash when the turning signals are use.
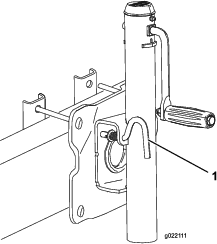
Disconnect the wire connector and bundle it to the trailer. Store the flat connector to the holster on the tongue (Figure 11).
This trailer uses couplers that require a 2 inch ball for the hitch.
Rotate the jack into the vertical position (Figure 14).
Raise the trailer to above the ball hitch.
Lift the handle on the tongue.
Lower the tongue ball socket over the ball hitch (Figure 15).
Close the handle, making sure it is securely locked.
Install a pin (not included with the trailer) to lock the handle.
Attach the chains to holes on the vehicle hitch. Connect the wiring harness to the flat connector on the hitch.
Raise the jack off of the ground and rotate the jack into the horizontal position.
Attempting to load or unload the machine from a trailer that is not securely hitched to a suitable vehicle could cause the trailer to become unstable, and tip causing injury to you or bystanders.
Make sure the trailer is securely hitched to a suitable vehicle parked on a level surface before attempting to load or unload the machine.
Remove the retaining straps and lower the ramp to the ground.
Remove the tie down bar pin and slide the bars apart (Figure 16).
Important: Allow the pin and chain to lay on the center of the bed to avoid running over it with the machine and damaging it.
Start the trencher according to the directions in the Operator's Manual and run the engine at low speed.
With the trencher arm raised in the transport position drive the machine up the ramp onto the trailer bed.
Take care to load the trencher with the tracks between guide rails on the trailer bed (Figure 17).
Move the trencher forward slowly until the front of the machine meets the forward stop on the trailer bed.
Turn the machine off and engage the parking brake.
Lower the trencher arm until it rests on the front stop.
Note: Make sure the front cross tube of the trencher is fully engaged to the front stop on the trailer.
Slide the tie down bars together through the rear tie down loops, aligning the holes to allow for the retaining pin. Install the pin.
Raise the ramp and use the straps and lynch pins to secure it in the transport position.
Attempting to load or unload the machine from a trailer that is not securely hitched to a suitable vehicle could cause the trailer to become unstable, and tip causing injury to you or bystanders.
Make sure the trailer is securely hitched to a suitable vehicle parked on a level surface before attempting to load or unload the machine.
Remove lynchpins securing the ramp straps. Remove the straps and slowly lower the ramp to the ground.
The ramp in the transport position represents a stored energy hazard and if not secured can fall; injuring you or bystanders.
Hold the ramp in place when removing straps and use care to lower the ramp carefully to the ground.
Remove the pin on the hold down bar and lay the chain and pin on the center of the trailer bed. Slide the hold down bars apart.
Start the machine according to the Operator's Manual and disengage the parking brake.
Raise the trencher arm into the transport position.
Slowly, while looking behind you and down, move the machine down and off the ramp.
Park the machine and trailer on a level surface.
Rotate the jack into the vertical position.
Disconnect the wiring harness from the electrical connector on the hitch. Place the connector into the holster on the tongue.
Remove the chains retaining the tongue to the hitch.
Remove the pin and lift the handle on top of the hitch.
With the tongue handle raised CHECK.
Raise the tongue above the hitch and lower the handle
Install a pin (not included) to lock the handle.
Chock the trailer wheels.
| Maintenance Service Interval | Maintenance Procedure |
|---|---|
| After the first 10 hours |
|
Torque the nuts to 68-102 N∙m (50-75 ft-lb).