Installation
Preparing the Machine
Preparing the Machine
-
Park the machine on a level surface.
-
Move the levers to the NEUTRAL position.
-
Lower all attachments (if equipped).
-
Engage the parking brake.
-
Shut off the engine and remove the key.
-
Disconnect the battery; refer to your machine Operator’s Manual.
Removing the Breather
-
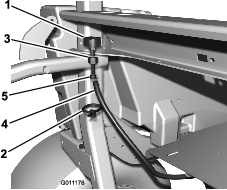
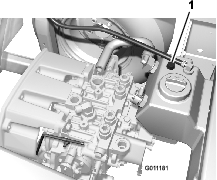
Locate the hydraulic tank breather mounted to the frame tube just ahead of the air cleaner mounting bracket (Figure 1). Remove the cable tie securing the breather to the frame tube.
-
Remove the hose clamp securing the straight fitting and the breather to the hose (Figure 1).
-
Remove the fitting and breather from the hose and retain the breather for installation later.
Installing the Overflow Tank with Kubota
Parts needed for this procedure:
| Hose | 1 |
| Hose clamp | 1 |
| Hose clamp (5/16 inch hose) | 1 |
| Screw (5/16 x 3-1/4 inch) | 2 |
| Washer | 2 |
| Nut (5/16 inch) | 2 |
-
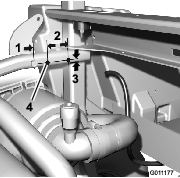
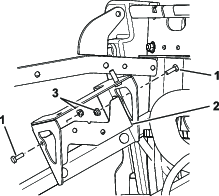
Use the dimensions shown in Figure 2, to locate, mark, and drill 2 holes with a 9 mm (11/32 inch) diameter in the frame tube.
Note: Use the center of the front air cleaner mounting-bracket bolt for reference.
-
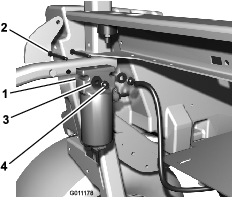
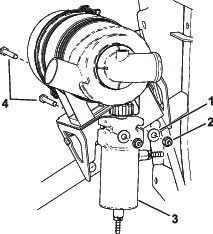
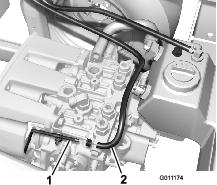
Mount the accumulator to the frame with 2 screws (5/16 x 3-1/4 inch), 2 washers, and 2 flange nuts (Figure 3).
Note: Mount the accumulator to the inside of the frame to keep the hardware away from the air cleaner.
-
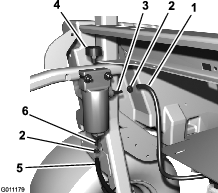
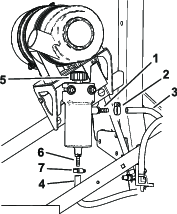
Connect the breather hose to the side fitting on the accumulator with a hose clamp (Figure 4).
-
Thread the breather into the top of the accumulator (Figure 4).
-
Connect the new hose to the bottom fitting on the accumulator with a hose clamp (Figure 4).
Installing the Overflow Tank with Yanmar
Parts needed for this procedure:
| Bolt (1/4 x 3/4 inch) | 2 |
| Nut (1/4 inch) | 2 |
| Bracket | 1 |
| Hose | 1 |
| Hose clamp | 1 |
| Hose clamp (5/16 inch hose) | 1 |
| Screw (5/16 x 2 inch) | 2 |
| Washer | 2 |
| Nut (5/16 inch) | 2 |
-
Install the bracket to the air-cleaner bracket with 2 bolts (1/4 x 3/4 inch) and 2 nuts (1/4 inch); refer to Figure 5.
-
Mount the accumulator to the bracket with 2 screws (5/16 x 2 inch), 2 washers, and 2 nuts (5/16 inch); refer to Figure 6.
-
Connect the breather hose to the side fitting on the accumulator with a hose clamp (5/16 inch hose); refer to Figure 7.
-
Thread the breather into the top of the accumulator (Figure 7).
-
Connect the new hose to the bottom fitting on the accumulator with a hose clamp (Figure 7).
Connecting the Hoses
Parts needed for this procedure:
| Grommet plug | 1 |
-
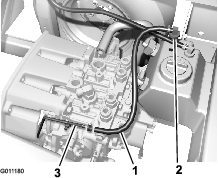
Unlatch and raise the seat. Locate the hose that goes from the elbow fitting on the hydraulic tank to the tube on the transmission (Figure 8).
-
Disconnect the hose from the tube on the transmission (Figure 8).
Note: Do not remove the tube from the transmission.
-
Disconnect the hose from the elbow fitting on the hydraulic tank (Figure 8) and discard the hose.
-
Install the grommet plug into the opening in the hydraulic tank (Figure 9).
-
Route the new hose to the transmission tube (Figure 10).
Note: Keep the hose away from any hot, sharp or moving parts.
-
Secure the hose to the transmission tube with a hose clamp (Figure 10).
-
Lower the seat.
-
Check the hydraulic fluid level in the reservoir. If the fluid level is low, add fluid until the level is between the marks on the dipstick.