Introduction
This blower is intended to be used by residential homeowners to move leaf-like debris as needed outdoors. It is designed primarily to use lithium-ion battery pack Model 81825, 81860, or 81875. Using this product for purposes other than its intended use could prove dangerous to you and bystanders.
Read this information carefully to learn how to operate and maintain your product properly and to avoid injury and product damage. You are responsible for operating the product properly and safely.
Visit www.Toro.com for more information, including safety tips, training materials, accessory information, help finding a dealer, or to register your product.
Model 51825T does not include a battery or a charger.
 |
For assistance, please see www.Toro.com/support for instructional videos or contact 1-888-384-9939 before returning this product. |
Safety
WARNING—When using electric gardening appliances, always follow basic safety precautions to reduce the risk of fire, electric shock, and personal injury, including the following:
IMPORTANT SAFETY
INSTRUCTIONS
I. Training
-
The operator of the appliance is responsible for any accidents or hazards occurring to others or their property.
-
Do not allow children to use or play with the appliance, battery pack, or battery charger; local regulations may restrict the age of the operator.
-
Do not allow people with reduced physical, sensory, or mental capabilities or without experience and knowledge to use the appliance, battery pack, or battery charger unless they receive instruction or supervision on using it safely and understand the hazards involved while using it.
-
Before using the appliance, battery pack, and battery charger, read all the instructions and cautionary markings on these products.
-
Become familiar with the controls and proper use of the appliance, battery pack, and battery charger.
II. Preparation
-
Keep bystanders and children away from the operating area.
-
Use only the battery pack specified by Toro. Using other accessories and attachments may increase the risk of injury and fire.
-
Plugging the battery charger into an outlet that is not 100 to 240 V can cause a fire or electric shock. Do not plug the battery charger into an outlet other than 100 to 240 V. For a different style of connection, use an attachment plug adapter of the proper configuration for the power outlet if needed.
-
Do not use a damaged or modified battery pack or battery charger, which may exhibit unpredictable behavior that results in fire, explosion, or risk of injury.
-
If the supply cord to the battery charger is damaged, contact an Authorized Service Dealer to replace it.
-
Do not use non-rechargeable batteries.
-
Charge the battery pack with only the battery charger specified by Toro. A charger suitable for 1 type of battery pack may create a risk of fire when used with another battery pack.
-
Charge the battery pack in a well-ventilated area only.
-
Do not expose a battery pack or battery charger to fire or to temperatures higher than 68°C (154°F).
-
Follow all charging instructions and do not charge the battery pack outside of the temperature range specified in the instructions. Otherwise, you may damage the battery pack and increase the risk of fire.
-
Do not operate the appliance without all guards and other safety protective devices in place and functioning properly on the appliance.
-
Dress properly—Wear appropriate clothing, including eye protection; long pants; substantial, slip-resistant footwear; and hearing protection. Tie back long hair and do not wear loose jewelry that can get caught in moving parts. Wear a dust mask in dusty operating conditions.
III. Operation
-
Avoid dangerous environments—Do not use the appliance in rain or in damp or wet locations.
-
Use the proper appliance for your application—Using the appliance for purposes other an its intended use could prove dangerous to you and bystanders.
-
Prevent unintentional starting—Ensure that the switch is in the OFF position before connecting to the battery pack and handling the appliance. Do not carry the appliance with your finger on the switch or energize the appliance with the switch in the ON position.
-
Operate the appliance only in daylight or good artificial light.
-
Remove the battery pack from the appliance before adjusting it or changing accessories.
-
Keep your hands and feet away from the opening and all moving parts.
-
Stop the appliance, remove the battery pack from the appliance, and wait for all movement to stop before adjusting, servicing, cleaning, or storing the appliance.
-
Remove the battery pack from the appliance whenever you leave it unattended.
-
Do not force the appliance—Allow the appliance to do the job better and safer at the rate for which it was designed.
-
Do not overreach—Keep proper footing and balance at all times, especially on slopes. Walk, never run with the appliance.
-
Stay alert—Watch what you are doing and use common sense when operating the appliance. Do not use the appliance while ill, tired, or under the influence of alcohol or drugs.
-
Ensure that the ventilation openings are kept clear of debris.
-
Do not insert any object into the opening or use the appliance with a blocked opening. Keep the opening free from dust, lint, hair, or anything else that could reduce the air flow.
-
Use extra care when using the appliance to clean stairways.
-
Under abusive conditions, the battery pack may eject liquid; avoid contact. If you accidently come into contact with the liquid, flush with water. If the liquid contacts your eyes, seek medical help. Liquid ejected from the battery pack may cause irritation or burns.
-
CAUTION—A mistreated battery pack may present a risk of fire or chemical burn. Do not disassemble the battery pack. Do not heat the battery pack above 68°C (154°F) or incinerate it. Replace the battery pack with a genuine Toro battery pack only; using another type of battery pack may cause a fire or explosion. Keep battery packs out of the reach of children and in the original packaging until you are ready to use them.
IV. Maintenance and Storage
-
Maintain the appliance with care—Keep it clean and in good repair for best performance and to reduce the risk of injury. Follow the instructions for lubricating and changing accessories. Keep handles dry, clean, and free from oil and grease.
-
When the battery pack is not in use, keep it away from metal objects such as paper clips, coins, keys, nails, and screws that can make a connection from 1 terminal to another. Shorting the battery terminals may cause burns or a fire.
-
Keep your hands and feet away from moving parts.
-
Stop the appliance, remove the battery pack from the appliance, and wait for all movement to stop before adjusting, servicing, cleaning, or storing the appliance.
-
Check the appliance for damaged parts—If there are damaged guards or other parts, determine whether it will operate properly. Check for misaligned and binding moving parts, broken parts, mounting, and any other condition that may affect its operation. Unless indicated in the instructions, have an Authorized Service Dealer repair or replace a damaged guard or part.
-
Keep all fasteners on the appliance tight.
-
Do not attempt to service or repair the appliance, battery pack, or battery charger except as indicated in the instructions. Have an Authorized Service Dealer perform service using identical replacement parts to ensure that the product is safely maintained.
-
Store an idle appliance indoors in a place that is dry, secure, and out of the reach of children.
-
Do not dispose of the battery in a fire. The cell may explode. Check with local codes for possible special disposal instructions.
SAVE THESE
INSTRUCTIONS
Safety and Instructional Decals
 |
Safety decals and instructions are easily visible to the operator and are located near any area of potential danger. Replace any decal that is damaged or missing. |

Setup
Note: The battery pack is not fully charged when you purchase it. Before using the tool for the first time, refer to Charging the Battery Pack.
Assembling the Blower
Parts needed for this procedure:
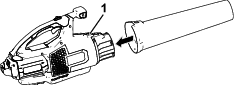
| Blower tube | 1 |
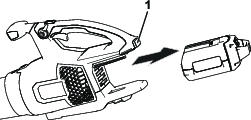
Slide the blower tube onto the blower housing. You may need to press down on the tube latch for the blower tube to lock into place (Figure 1).
Product Overview
| Charge/ store the battery pack at | 5°C (41°F) to 40°C (104°F)* |
| Use the battery pack at | -30°C (-22°F) to 49°C (120°F) |
| Use the blower at | 0°C (32°F) to 49°C (120°F) |
| Store the blower at | 0°C (32°F) to 49°C (120°F)* |
*Charging time will increase if you do not charge the battery within this range.
Store the tool, battery pack, and battery charger in an enclosed clean, dry area.
Operation
Warning
The blower can throw debris, possibly causing serious personal injury to you or bystanders.
-
Do not blow hard objects, such as nails or bolts.
-
Do not operate the blower near bystanders or pets.
-
Be careful of blowing direction (i.e., blow away from bystanders, windows, automobiles, etc.). Only use as much speed as required.
-
Use extra care when cleaning debris from stairs or other tight areas.
-
Dress properly—Wear appropriate clothing, including eye protection; long pants; substantial, slip-resistant footwear; and hearing protection. Tie back long hair and do not wear loose jewelry that can get caught in moving parts. Wear a dust mask in dusty operating conditions.
Starting the Blower
-
Make sure that the vents on the blower are clear of any dust and debris.
-
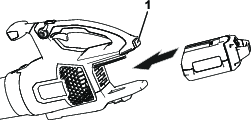
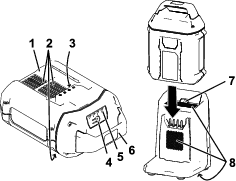
Align the cavity on the battery pack with the tongue in the handle housing (Figure 2).
-
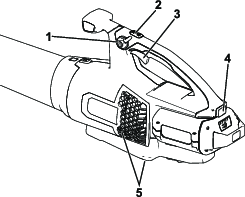
Grasp the handle and push the battery pack into the handle until the latch locks into place (Figure 1).
-
To start the blower, squeeze the variable-speed trigger (Figure 3).
Note: Engage the speed lock to keep the machine on without pressing the variable-speed trigger (Figure 3).
Adjusting the Air Speed of the Blower
To achieve maximum performance (air speed), fully depress the variable-speed trigger, then press and hold the turbo boost button for the desired amount of time (Figure 3).
To adjust the air speed as you blow, use the variable-speed trigger (Figure 3).
To maintain the current air speed, engage the speed lock (Figure 3).
Shutting Off the Blower
To shut off the blower, disengage the speed lock (if in use) and release the variable-speed trigger (Figure 3).
Important: After stopping the blower, do not leave the speed lock engaged with the battery pack in the blower.
Whenever you are not using the blower or are transporting the blower to or from the work area, remove the battery pack.
Removing the Blower Tube
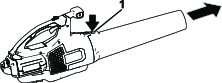
Press down on the tab latch to separate the blower tube from the blower (Figure 4).
Removing the Battery from the Blower
Press the battery latch to release the battery pack and slide the battery pack out of the blower (Figure 5).
Charging the Battery Pack
Important: The battery pack is not fully charged when you purchase it. Before using the tool for the first time, place the battery pack in the charger and charge it until the LED display indicates the battery pack is fully charged. Read all safety precautions.
Important: Charge the battery pack only in temperatures that are within the appropriate range; refer to Specifications.
Note: At any time, press the battery-charge-indicator button on the battery pack to display the current charge (LED indicators).
-
Make sure that the vents on the battery and battery charger are clear of any dust and debris.
-
Line up the cavity in the battery pack (Figure 6) with the tongue on the charger.
-
Slide the battery pack into the charger until it is fully seated (Figure 6).
-
To remove the battery pack, slide the battery backward out of the charger.
-
Refer to the following table to interpret the LED indicator light on the battery charger.
Indicator light Indicates Off No battery pack inserted Green blinking Battery pack is charging Green Battery pack is charged Red Battery pack and/or battery charger is over or under the appropriate temperature range Red blinking Battery pack charging fault*
*Refer to for more information.
Storage
Important: Store the tool, battery pack, and charger only in temperatures that are within the appropriate range; refer to Specifications.
Important: If you are storing the tool for a year or longer, remove the battery pack from the tool and charge the battery pack until 2 or 3 LED indicators turn green on the battery. Do not store a fully charged or fully depleted battery. When you are ready to use the tool again, charge the battery pack until the left indicator light turns green on the charger or all 4 LED indicators turn green on the battery.
-
Disconnect the product from the power supply (i.e., remove the plug from the power supply or the battery pack) and check for damage after use.
-
Clean all foreign material from the product.
-
When not in use, store the tool, battery pack, and battery charger out of the reach of children.
-
Keep the tool, battery pack, and battery charger away from corrosive agents, such as garden chemicals and de-icing salts.
-
To reduce the risk of serious personal injury, do not store the battery pack outside or in vehicles.
-
Store the tool, battery pack, and battery charger in an enclosed clean, dry area.
Troubleshooting
Perform only the steps described in these instructions. All further inspection, maintenance, and repair work must be performed by an authorized service center or a similarly qualified specialist if you cannot solve the problem yourself.
| Problem | Possible Cause | Corrective Action |
|---|---|---|
| The tool does not start. |
|
|
| The tool does not reach full power. |
|
|
| The battery pack loses charge quickly. |
|
|
| The battery charger is not working. |
|
|
| The LED indicator light on the battery charger is red. |
|
|
| The LED indicator light on the battery charger is blinking red. |
|
|
| The tool does not run or does not run continuously. |
|
|
| It is difficult to remove the battery pack from the tool. |
|
|
| The speed lock does not hold when engaged. |
|
|
| The tool is producing a beeping sound. |
|
|