Installation
Note: Determine the left and right sides of the machine from the normal operating position.
Preparing the Machine
Perform the following procedure to prepare the machine for attaching the blower and finishing kit.
-
Disengage the PTO, move the motion-control levers to the NEUTRAL-LOCK position, and set the parking brake.
-
Shut off the engine, remove the key, and wait for all moving parts to stop before leaving the operating position.
-
Repair all bent or damaged areas of mower deck and replace any missing parts.
-
Clean the machine of any debris on the deck or rear part of the machine to ease installation.
Installing the Pulley Assembly and Belt
Parts needed for this procedure:
| Pulley assembly | 1 |
| Pulley-plate mount | 1 |
| Flange nut (3/8 inch) | 3 |
-
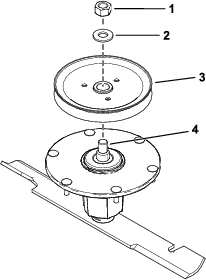
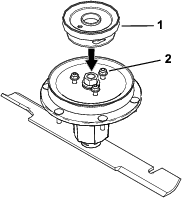
Remove the top nut, washer, and sheave from the spindle (Figure 1).
Note: Note the orientation of the sheave when you remove it from the spindle to ensure that you install it properly later in the process.
-
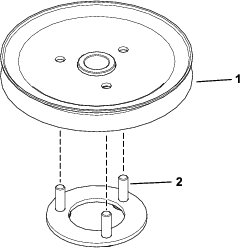
Insert the pulley-plate mount studs into the holes in the sheave (Figure 2).
-
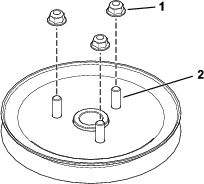
Loosely install the 3 nuts to the studs (Figure 3).
Leave a clearance of 5 mm (3/16 inch) between the nut and sheave.
-
Install the sheave assembly to the spindle using the washer and top nut (Figure 4).
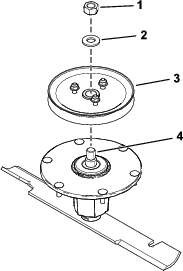
-
Torque the top nut to 176 to 217 N∙m (130 to 160 ft-lb).
Note: Ensure that the sheave spins freely.
-
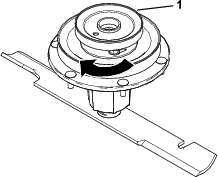
Align the new pulley assembly so that the openings fit over the nuts (Figure 5).
-
Turn the pulley to lock it into position (Figure 6).
Note: If the pulley does not turn, loosen the nuts more to raise the nuts and allow the pulley to lock into position.
-
After the new pulley assembly is in position, tighten the nuts to secure new pulley assembly.
Torque the 3 nuts to 28 to 34 N∙m (21 to 25 ft-lb).
-
Install the deck belt.