Installation
Preparing the Machine
Preparing the Machine
-
Park the machine on a level surface.
-
Lower all attachments (if equipped).
-
Engage the parking brake.
-
Shut off the engine and remove the key.
Installing the Trash Bag to a Cab Door
Parts needed for this procedure:
| Large bracket mount | 1 |
| Hex-head screw (3/8 x 3/4 inch) | 2 |
| Locknut (3/8 inch) | 2 |
| R-clamp | 2 |
| Trash bag | 1 |
| Trash bag rod | 1 |
-
Install the bag rod into the trash bag.
-
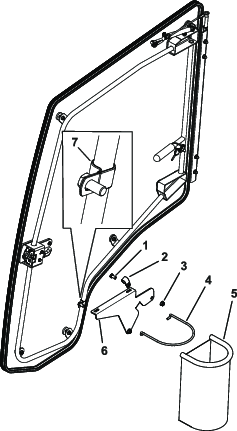
Install the R-clamps to the door (Figure 1).
-
Loosely secure the large bracket to the door with 2 bolts (3/8 x 3/4 inch) and 2 locknuts (3/8 inch) as shown in Figure 1.
-
Position the bracket on the door so it does not interfere with machine (Figure 1).
-
Tighten the bolts that secure the large bracket (Figure 1).
-
Install the trash bag and rod into the large bracket (Figure 1).
Installing the Trash Bag to a Rollbar
Parts needed for this procedure:
| Smal bracket mount | 1 |
| Locknut (3/8 inch) | 2 |
| Trash bag | 1 |
| Trash bag rod | 1 |
| U-bolt | 2 |
-
Install the bag rod into the trash bag.
-
Loosely secure the small bracket to the rollbar with a U-bolt and 2 locknuts (3/8 inch) as shown in Figure 2.
-
Position the bracket on the rollbar so it does not interfere with machine (Figure 2).

-
Tighten the U-bolt that secures the small bracket (Figure 2).
-
Install the trash bag and rod into the small bracket (Figure 2).
Installing the Drink Holder to the Arm Rest
Parts needed for this procedure:
| Armrest bracket | 1 |
| Drink holder | 1 |
| Flat washer | 2 |
| Hex-head screw (#10 x 5/8 inch) | 2 |
| Locknut (#10) | 2 |
-
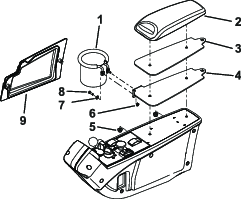
Remove the armrest panel to gain access to the armrest hardware (Figure 3).
-
Remove the nuts holding the armrest pad. Discard the existing armrest bracket (Figure 3).
-
Install the new armrest bracket and armrest pad to the armrest with the previously removed nuts (Figure 3).
-
Install the drink holder to the armrest bracket with 2 bolts (#10 x 5/8 inch), 2 washers, and 2 locknuts (#10) as shown in Figure 3.
-
Install the armrest panel (Figure 3).