Note: Determine the left and right sides of the machine from the normal operating position.
Note: If your machine has multiple electrical accessories installed, you need a Y adapter (Toro Part No. 121-5988, sold separately) to install this kit.
Installation
Installing the Kit to a Grandstand Mower
Preparing the Machine
-
Park the machine on a level surface.
-
Engage the parking brake.
-
Shut off the engine and remove the key.
-
Remove the negative (-) battery cable from the battery.
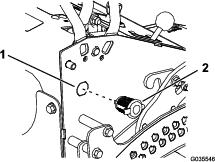
Installing the 12 V Receptacle
Connecting the Port Wire Harness
-
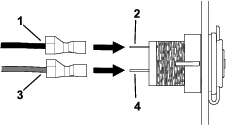
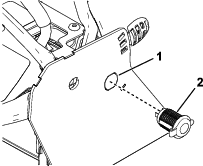
Install the post connectors from the port wire harness to the posts on the 12 V receptacle (Figure 2).
-
Connect the wire harness as follows.
-
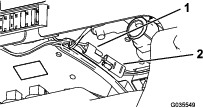
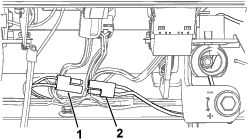
Machines without any electric accessories—connect the port wire harness to the machine wire harness (Figure 3).
-
Machines with either a light kit or other electric accessory—connect the port wire harness to the light kit or other accessory wire harness.
-
Machines with both a light kit and other electric accessory—complete as follows:
Note: You need a Y adapter (Toro Part No. 121-5988, sold separately) to connect the port wire harness with both accessories installed on the machine.
-
Disconnect the other accessory from the light kit harness.
-
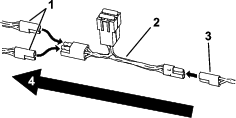
Connect the 1-connection end of the Y adapter to the light kit wire harness (Figure 4).
Important: Do not connect the 2-connection end of the Y adapter to any connectors with outgoing power.
-
Connect the port wire harness and the other accessory wire harness to the 2-connector end of the Y adapter (Figure 4).
-
-
Installing the Kit to a ProLine Mower
Preparing the Machine
-
Park the machine on a level surface.
-
Engage the parking brake.
-
Shut off the engine and remove the key.
-
Remove the negative (-) battery cable from the battery.
Installing the 12 V Receptacle
Connecting the Port Wire Harness
-
Install the post connectors from the wire harness to the posts on the 12 V receptacle.
-
Connect the wire harness as follows.
-
Machines without any electric accessories—connect the port wire harness to the machine wire harness (Figure 7).
-
Machines with another electric accessory—connect the port wire harness to the accessory wire harness.
-
Machines with 2 other electric accessories—complete as follows:
Note: You need a Y adapter (Toro Part No. 121-5988, sold separately) to connect the port wire harness with both accessories installed on the machine.
-
Disconnect the second accessory from the accessory connected to the machine wire harness.
-
Connect the 1-connection end of the Y adapter to the connected accessory wire harness (Figure 8).
Important: Do not connect the 2-connection end of the Y adapter to any connectors with outgoing power.
-
Connect the port wire harness and the other accessory wire harness to the 2-connector end of the Y adapter (Figure 8).
-
-
Completing the Installation
-
Use the cable ties to secure the wire harness away from sharp or moving parts.
-
Raise the cushion.
-
Connect the negative (-) battery cable to the battery.