Note: Determine the left and right sides of the machine from the normal operating position.
Installation
Preparing the Machine
-
Rotate the cutting unit into the maintenance position; refer to your machine Operator’s Manual.
-
Thoroughly clean the cutting unit. Remove all debris to ensure that the baffles fit properly against the cutting unit.
Removing the Existing Wing-Blade Assemblies
-
Remove the existing wing-blade assemblies; refer to the mower-deck maintenance section in your machine Operator’s Manual.
Set aside the bolts, spring lock washers, and curved washers for the mulching-blade installation procedure.
Important: The right-blade assembly bolt has a left-handed thread. Turn the blade bolt clockwise to loosen it.
-
Save the existing wing-blade assemblies for use when you use the hopper for collection.
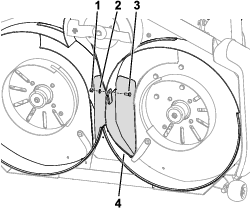
Installing the Discharge-Chute Plug
Parts needed for this procedure:
| Discharge-chute plug | 1 |
| Bolt | 1 |
| Washer | 1 |
| Nut | 1 |
-
Use a bolt, washer, and nut to install the discharge-chute plug over the disharge-chute opening (Figure 1).
If there is not a hole in the baffle, use the hole in the plug to drill a 9.5 mm (0.375 inch) hole in the baffle. Remove any burs from the hole.
-
Torque the bolt to 28 N∙m (21 ft-lb).
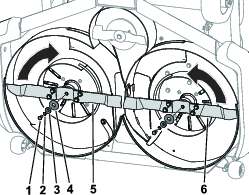
Installing the Mulching Blades
Parts needed for this procedure:
| Blade assembly (right side) | 1 |
| Blade assembly (left side) | 1 |
| Spacer | 2 |
-
Hold a blade-assembly end using a cloth or a thickly-padded glove.
-
Use the previously-removed parts from the wing-blade-assembly removal procedure (bolts, spring lock washers, and curved washers) and spacers to install the blade assemblies to their respective sides (Figure 2).
-
Torque the blade bolts to 53 N∙m (39 ft-lb).
Important: The right-blade assembly bolt has a left-handed thread. Turn the blade bolt clockwise to loosen it.