Installation
Removing the Mower Deck
-
Park the machine on a level surface, disengage the blade-control switch, and engage the parking brake.
-
Shut off the engine, remove the key, and wait for all moving parts to stop before leaving the operating position.
-
Remove the mower deck from the machine. Refer to the Removing the Mower section in the Operator's Manual or the appropriate section of the Service Manual.
Warning
The belt tension spring is under tension when installed and can cause personal injury.
Be careful when removing the mower belt and deck.
-
Slide the mower deck out from underneath the machine.
-
Clean the back of the mower deck.
Installing the Striping Kit
Parts needed for this procedure:
| Mounting bracket | 2 |
| Washer-head screw (5/16 x 3/4 inch, self-threading) | 2 |
| Striping bracket | 1 |
| Washer-head screw (5/16 x 1/2 inch, self-threading) | 2 |
| Flat washer (5/16 inch) | 2 |
| Wiper | 1 |
| Hex-head screw (1/4 x 3/4 inch) | 5 |
| Washer | 5 |
| Speed nut | 5 |
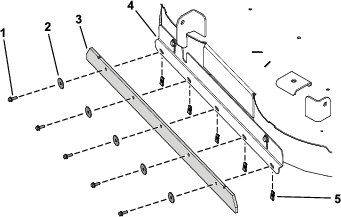
Install the Mounting Brackets
-
Install the right mounting bracket for the striping kit as follows:
-
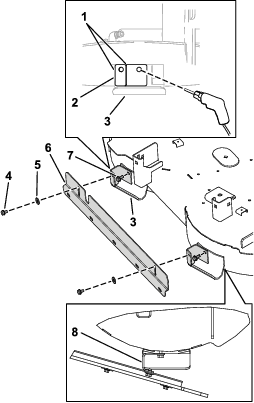
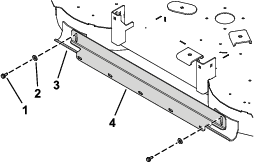
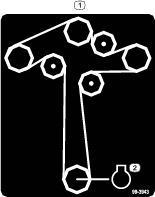
Locate the right skid on the rear of the mower deck (Figure 1).
-
Position the longer leg of the mounting bracket for the striping kit against the right skid.
Align the left edge of the mounting bracket with the left edge of the skid and the top edge of the mounting bracket with the top edge of the right skid (Figure 1).
-
Mark the outline of the mounting-bracket hole on the skid (Figure 1).
-
Remove the bracket. Center-punch the center of the outline marked on the right skid.
-
Drill a hole (9/32 inch) in the right skid at the center-punched location (Figure 1).
-
Position the longer leg of the mounting bracket against the right skid.
Align the mounting bracket hole with the hole drilled in the skid.
-
Secure the bracket using a washer-head screw (5/16 x 3/4 inch, self-threading) as shown in Figure 1.
-
-
Install the left mounting bracket for the striping kit as follows:
-
Locate the left skid on the rear of the mower deck (Figure 1).
-
Position the longer leg of the mounting bracket for the striping kit against the left skid. Align the left edge of the mounting bracket with the left edge of skid and the top edge of the mounting bracket with the top edge of the left skid (Figure 1).
Note: Ensure that the hole on the short leg of the mounting brackets align with the slots in the striping bracket. If necessary, adjust the left mounting bracket position left or right on the skid to achieve alignment with the striping bracket slots.
-
Mark the outline of the mounting-bracket hole on the skid (Figure 1).
-
Remove the bracket. Center-punch the center of the outline marked on the right skid.
-
Drill a hole (9/32 inch) in the right skid at the center-punched location (Figure 1).
-
Position the longer leg of the mounting bracket against the left skid. Align the mounting bracket hole with the hole drilled in the skid.
-
Secure the bracket using a washer-head screw (5/16 x 3/4 inch, self-threading) as shown in Figure 1.
-
Install the Striping Bracket
-
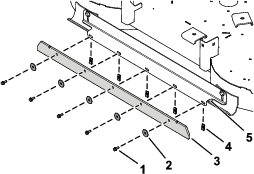
Align the striping bracket so that the mounting flange is up and facing toward the mower deck (the wiper flange is down and away from the deck) as shown in Figure 1.
-
Align the top of the slot in the mounting flange of the striping bracket with the hole in the short leg of each mounting bracket installed on the skids (Figure 1).
-
Secure the striping bracket to the mounting brackets using 2 washer-head screws (5/16 x 1/2 inch, self-threading) and 2 flat washers (5/16 inch) as shown in Figure 1.
Installing the Striping Kit
Parts needed for this procedure:
| Striping bracket | 1 |
| Washer-head screw (5/16 x 3/4 inch, self-threading) | 2 |
| Flat washer (5/16 inch) | 2 |
| Wiper | 1 |
| Hex head screw (1/4 x 3/4 inch) | 5 |
| Washer | 5 |
| Speed nut | 5 |
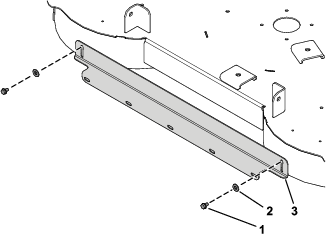
Installing the Striping Bracket
-
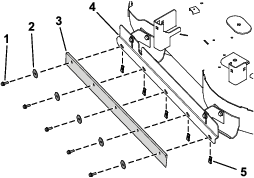
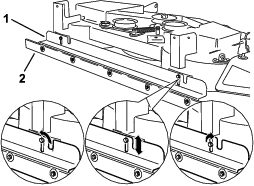
Locate the left and right skids at the rear of the the mower deck.
-
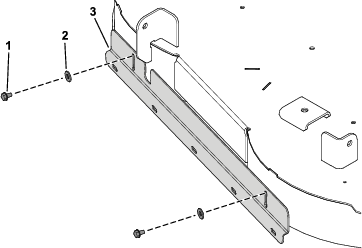
Align the striping bracket so that the mounting flange is up and facing toward the mower deck.
-
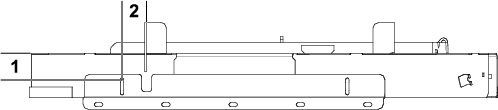
Center the wiper flange of the striping bracket between the skids and align the top edge of the striping bracket with the top edges of the skids.
-
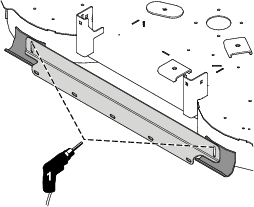
Using the striping bracket as a drilling template, mark 2 locations at the top of the slot of the striping bracket (Figure 4).
-
Drill 2 holes (9/32 inch) in the skids (Figure 4).
-
Secure the striping bracket to the skids using 2 washer-head screws (5/16 x 3/4 inch, self-threading) and 2 flat washers (5/16 inch) as shown in Figure 5.
Installing the Striping Kit
Parts needed for this procedure:
| Striping bracket | 1 |
| Washer-head screw (5/16 x 1/2 inch, self-threading) | 2 |
| Flat washer (5/16 inch) | 2 |
| Wiper | 1 |
| Hex-head screw (1/4 x 3/4 inch) | 5 |
| Washer | 5 |
| Speed nut | 5 |
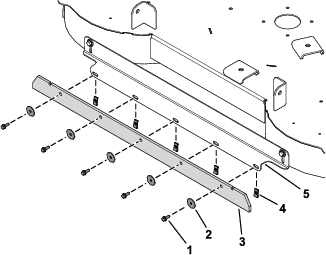
Installing the Striping Bracket
Installing the Striping Kit
Parts needed for this procedure:
| Striping bracket | 1 |
| Washer-head screw (5/16 x 1/2 inch, self-threading) | 2 |
| Flat washer (5/16 inch) | 2 |
| Wiper | 1 |
| Hex-head screw (1/4 x 3/4 inch) | 5 |
| Washer | 5 |
| Speed nut | 5 |
Installing the Striping Bracket

Installing the Mower
Note: Squealing when the belt is rotating, blades slipping when cutting grass, frayed belt edges, burn marks, and cracks are signs of a worn mower belt. Replace the mower belt if any of these conditions are evident.
Operation
Adjusting the Striping Height
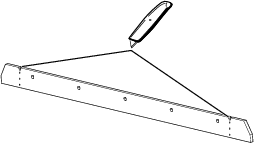
To change the striping effect of the mower deck, raise or lower the wiper height by adjusting the striping bracket position. For best results, set the bottom edge of the wiper to 6 to 13 mm (1/4 to 1/2 inch) below the bottom of the deck (Figure 15).
Important: Applying excessive downward pressure with the striping bracket may damage turf and the striping kit.
Important: To avoid damage to landscaping and the striping bracket, avoid close trimming with the striping kit installed. Replace the wiper yearly, or more often as wear requires.
Important: Avoid obstacles that can damage the kit. Temporarily lift the deck to the transport position when performing turns or moving in reverse.
Important: Raise the mower deck with the striping kit installed to the transport position when not in use to avoid damaging the wiper.
-
Park the machine on a level surface, disengage the blade-control switch, and engage the parking brake.
-
Shut off the engine, remove the key, and wait for all moving parts to stop before leaving the operating position.
-
Loosen the 2 washer-head screws (self-threading) that secure the striping bracket (Figure 15).
-
Adjust the striping bracket position as follows:
-
Ensure the striping bracket is adjusted level to the ground.
-
Tighten the 2 washer-head screws (self-threading) that secure the striping bracket (Figure 15).
Operating Tips
Effective striping is influenced by grass condition and grass type
-
Limp grass where wheel tracks are very visible is usually good for striping.
-
Stiff grass where wheel tracks are less visible will usually produce poor striping.
-
Cool season grass types found in northern regions are usually good for striping.
-
Warm season grass types found in southern regions will usually produce less pronounced striping.
-
Transition zone grasses found in the narrow belt region can produce good striping in some areas and some portions of the growing season, while producing poor striping in other areas or portions of the season.
-
Some grass types produce better striping contrast when mowing short. Other grass types or moisture content of the grass can provide better contrast when mowing at a long/tall height of cut. Experiment with what works best in your situation.
Striping visibility is affected by the sun position
This is how the light is reflected on the grass.
-
Mowing patterns which generally run east–west will have a greater contrast than north–south patterns.
-
The striping pattern contrast is less visible around noon, and is more visible in mornings and afternoons.
Striping visibility is affected by your position
The grass which is bent towards you will appear darker, and grass which is bent away from you will appear lighter.
-
Mowing patterns which generally run along a road will have greater contrast when viewed approaching or leaving the property. The contrast of striping will be less visible when looking across the mowing direction.
-
If the property has a focal point, or a viewing location, it can be beneficial to mow in a pattern that is generally to and from the observation point.
Lawn condition affects striping visibility
-
Large flat areas usually provide better striping contrast than on slopes or areas with a lot of trimming and edging.
-
Mowing in morning dew can produce good striping contrast.
-
Double cut mowing, and mowing a second pass at a 1/2 inch lower height of cut can produce good striping contrast.
Mowing mode can affect striping contrast
-
Side dispersal of clippings can hide striping, reducing the contrast effect.
-
Bagging can display heavy wheel tracks, reducing the effect of striping.
-
Mulching will often display excellent contrast, enhancing the effect of striping.
The landscape can promote or hinder striping
-
The mowing area size has an effect on the final appearance. Large areas can look better when mowed with a large mower. Small areas may not look right when cut with a large mower.
-
Large areas with occasional trees or other obstructions will often look best when the mowing pattern appears to go through the obstruction. For example, it can look best for a pattern to match and continue on the far side of a small pond. A different cross cut pattern on the far side of a pond may not be visible.
-
Some areas look best with long straight lines of striping mowing pattern, aligned with a property edge. Some areas look best with a diamond pattern, where neither straight line is aligned with the property edge. Properties with rolling hillsides or ponds can look best with a flowing curves striping pattern. A distinctive feature like a small pond can be highlighted and enhanced by a radial pattern or by a ring pattern.
Some lawns need to be
-
On a new property during weeks 1 and 2, you may need to follow the exact same pattern and direction in the same wheel tracks. This will begin training the grass to bend in the desired direction.
-
On week 3 use a cross–grain striping pattern.
-
On weeks 4 and 5 follow with repeating the original pattern. After the primary striping pattern grain is established, you may alternate the pattern each week to establish a checkerboard or a plaid style of mowing pattern.
-
Do not mow in the exact same pattern every week. This will cause compaction in wheel tracks, and may produce ruts or depressions along the wheel tracks.
Turning while using the striping kit
-
Raise the deck when turning. Striping is generally not enhanced by end turns.
-
Raising the deck will reduce confusing the pattern at the ends of the pattern.
Driving the machine to different cutting areas
-
Raise the deck and drive along a previous cut path to transport from one area of the property to another section.
-
A nice striping pattern can be ruined by driving across the pattern.
Follow all general mowing common practices
-
It is usually best to first mow the perimeter to establish a boundary.
-
When side discharging, the clippings should be directed away from walks, drives, flower beds, buildings and vehicles. If the discharge throws clippings a long distance, mow additional passes to avoid unwanted cleanup of clippings.
-
Avoid excessive trimming. Driving back and forth, frequent forward and reverse maneuvers around an obstacle will compress the grass and disturb the professional appearance of a nice job.
-
Follow all safe mowing practices as describe in the Operator’s Manual. Do not let the striping pattern cause you to mow into a hazardous situation.