Safety
Important: Before using this product, read the safety section in your traction unit operator’s manual, and follow all precautions listed there.
Stability Ratings
To determine the degree of slope you can traverse with the cement bowl installed on a traction unit, find the stability rating for the hill position you want to travel in the appropriate table on the following page, then find the degree of slope for the same rating and hill position in the Stability Data section of the traction unit operator’s manual.
Important: If your traction unit has a rear operator’s platform, the counterweight must be used on the platform while using the cement bowl, or the traction unit will become unstable.
Warning
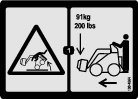
Exceeding the maximum recommended slope can cause the traction unit to tip, crushing you or bystanders.
Do not drive the traction unit on a slope steeper than the maximum recommended slope, as determined in the following tables and the traction unit operator’s manual.
| Orientation | Stability Rating |
| Front Uphill | B |
 |
|
| Rear Uphill | D |
 |
|
| Side Uphill | C |
 |
| Orientation | Stability Rating |
| Front Uphill | C |
|
|
| Rear Uphill | C |
|
|
| Side Uphill | B |
|
Safety and Instructional Decals
 | Safety decals and instructions are easily visible to the operator and are located near any area of potential danger. Replace any decal that is damaged or lost. |
Installation
Installing the Cement Bowl onto the Auger Drive Head
Parts needed for this procedure:
| Cement bowl | 1 |
| Bolt | 2 |
| Nut | 2 |
-
Raise the loader arms so the drive head clears the ground and stop the engine.
-
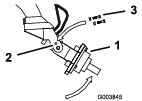
Manually rotate the auger drive head up, until you can install two bolts into the holes on both sides of the cradle arms, securing the drive head. Secure each bolt with a nut (Figure 1).
-
Start the engine.
-
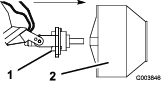
Maneuver the drive shaft into the collar on the back of the bowl (Figure 2).
-
Stop the engine.
-
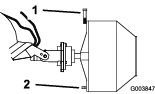
Secure the bowl to the drive head with the bolt and nut supplied with the auger drive head (Figure 3).
Reading/Storing the Documentation
Parts needed for this procedure:
| Operator’s Manual | 1 |
| Parts Catalog | 1 |
-
Read the documentation.
-
Store the documentation in a safe place.
Operation
Specifications
Note: Specifications and design are subject to change without notice.
| Width | 25.15 inches (64 cm) |
| Length | 18.25 inches (46 cm) |
| Weight | 75 lb (34 kg) |
| Maximum dry concrete load | 200 lb (90.7 kg) |
Mixing and Pouring Concrete
Warning
When full of concrete, the bowl is very heavy and could unbalance the traction unit. The traction unit could tip, seriously injuring you or bystanders.
-
Never use the cement bowl on a 200 or 300 series compact utility loader without first installing the counterweight, available from your Toro dealer.
-
Always keep the bowl close to the ground.
-
Lower the loader arms as far as possible while tilting the bowl upward as far as possible.
-
Add up to 200 lb (90.7 Kg) of dry concrete mixture.
-
Move the throttle lever to the fast position (rabbit).
-
If your traction unit has a speed selector and flow divider, move the speed selector lever to fast (Rabbit), and the flow divider control to the 10 to 11 o’clock position (20 to 30 rpm).
-
Push the auxiliary hydraulics lever away from the operator grip to mix the concrete and add the appropriate amount of water.
-
When the cement is sufficiently mixed, move the auxiliary hydraulics lever to neutral and drive slowly to the work site.
-
Tilt the bowl forward and pull the auxiliary hydraulics lever to the operator grip and hold it to dump the concrete.
-
When finished using the bowl, wash it out before the concrete sets.
Removing the Bowl from the Auger Drive Head
-
Set the bowl down in its storage location.
-
Stop the engine.
-
Remove the bolt and nut securing the drive head to the bowl.
-
Start the engine and back the traction unit away from the bowl.
Storage
-
Before long term storage, wash the bowl with mild detergent and water to remove dirt and grime.
-
Store the bowl in a clean, dry garage or storage area. Cover it to protect it and keep it clean.