Introduction

Read this information carefully to learn how to operate and maintain your product properly and to avoid injury and product damage. You are responsible for operating the product properly and safely.

Visit www.Toro.com for product safety and operation training materials, accessory information, help finding a dealer, or to register your product.

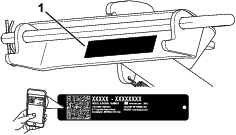
Whenever you need service, genuine Toro parts, or additional information, contact an Authorized Service Dealer or Toro Customer Service and have the model and serial numbers of your product ready. Figure 1 identifies the location of the model and serial numbers on the product. Write the numbers in the space provided.

Important: With your mobile device, you can scan the QR code on the serial number decal (if equipped) to access warranty, parts, and other product information.

g294869

Write the product model and serial numbers in the space below:

This manual uses 2 words to highlight information. Important calls attention to special mechanical information and Note emphasizes general information worthy of special attention.

Warning

CALIFORNIA

Proposition 65 Warning

Use of this product may cause exposure to chemicals known to the State of California to cause cancer, birth defects, or other reproductive harm.
Safety

  • Ensure that the sulky is properly attached to the machine and is in good working order prior to use.

  • Do not try to stabilize the machine by putting your foot on the ground. If you lose control of the machine, step off the sulky platform and away from the machine.

  • Do not place your feet under the sulky.

  • While using the sulky, do not move the machine unless you are standing with both feet on the platform and your hands are holding on to the reference bars.

  • Do not operate the machine in reverse while standing on the platform. Step off the platform and allow the sulky to rotate 180 degrees around while moving the machine in reverse.

  • Look behind and down before backing up to ensure that the path is clear.

  • Allow only the machine operator on the platform.

  • Do not allow untrained operators to use the sulky.

  • Dismount and latch the sulky in the transport position when loading and unloading the machine and operating on hillsides.

  • Slow down before turning. Sharp turns on any terrain may cause loss of control.

  • Do not use the sulky on rough and uneven terrain.

  • Ensure that you operate the sulky in areas where there are no obstacles nearby. Failure to maintain adequate distance from trees, walls, and other barriers may result in injury as the sulky backs up or turns during operation if the operator is not attentive to the surroundings. Operate the sulky only in areas where there is sufficient clearance for you to safely maneuver the sulky.

  • Before performing any service, repairs, maintenance, or adjustments, do the following:

    • Park the machine on a level surface.

    • Disengage the power takeoff.

    • Engage the parking brake.

    • Shut off the engine and remove the key.

  • Keep nuts and bolts tight. Keep equipment clean and in good condition.

  • Use only genuine replacement parts.

  • Do not modify the sulky or use it on non-approved machines.

Safety and Instructional Decals

Graphic

Safety decals and instructions are easily visible to the operator and are located near any area of potential danger. Replace any decal that is damaged or missing.

decal116-8225
decal126-1400
decal133-8061
decal140-1917
decal140-1918

Setup

Important: A Weight Kit is required for 91 cm (36 inch) machines and is optional for other sizes. Contact your Authorized Service Dealer to obtain the kit, and install it before installing the sulky.

Preparing the Machine

  1. Park the machine on a level surface.

  2. Disengage the PTO and engage the parking brake.

  3. Shut off the engine and remove the key.

Installing the Sulky

Parts needed for this procedure:

Mount plate1
Bolt4
Nut4
Pivot pin1
Hairpin cotter1
Transport pin1
Sulky1
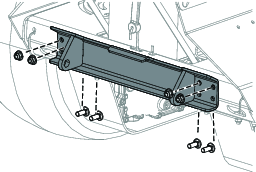
  1. Install the back plate to the lower rear frame of the machine using 4 bolts and 4 nuts (Figure 2).

    Note: Use the lower holes in the bracket for 36-inch machines. Use the upper holes for all other machines.

    g315914
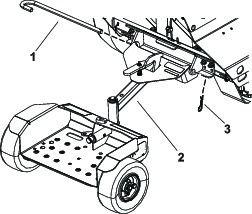
  2. Attach the sulky to the bracket using the pivot pin and hairpin cotter (Figure 3).

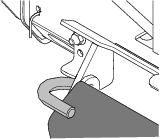
    Note: Ensure the J end of the pin rests on top of the plate (Figure 4).

    g315915
    g295053
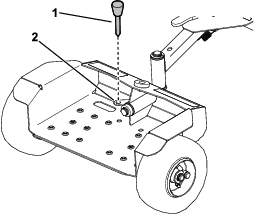
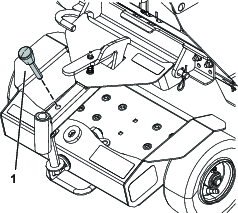
  3. Store the transport pin in the pin plate shown in Figure 5.

    Important: Do not store the transport pin in the drawbar tube while operating the machine.

    g294868

Operation

Warning

You could fall off the platform and be seriously injured during operation.

Do not move the machine forward unless you are standing with both feet on the platform and your hands are holding onto the reference bars. Step off the platform when moving the machine in reverse.

Using the Sulky

Step onto the sulky platform before starting the machine. Use the reference bars on the machine to stabilize yourself while riding on the platform.

Fully stop the machine and step off the platform before moving the machine in reverse. The sulky will rotate forward, under the drawbar, when you move the machine in reverse and rotate back to the operating position when you move the machine forward.

Using the Transport Position

  1. Park the machine on a level surface, disengage the PTO, engage the parking brake, and move the motion-control levers outward to the NEUTRAL-LOCK position.

  2. Shut off the engine and remove the key.

  3. Remove the transport pin.

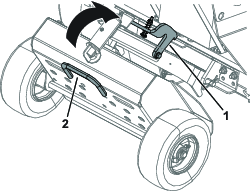
  4. Rotate the platform forward and secure it using the transport pin (Figure 6).

    Note: You can also move the machine in reverse to rotate the platform.

    g315917
  5. Grab the handle and raise the sulky until it latches on the bracket (Figure 6).

    g315916
  6. To lower the sulky, push the sulky forward, pull back on the latch, and use the handle to lower the sulky. Remove the transport pin and store it in the pin plate (Figure 5).

Maintenance

Greasing the Sulky

Maintenance Service IntervalMaintenance Procedure
Before each use or daily
  • Inspect the grease fittings.
  • Every 40 hours
  • Grease the platform(grease immediately after each washing).
  • Grease type: General-purpose grease

    1. Park the machine on a level surface, disengage the PTO, and engage the parking brake.

    2. Shut off the engine and remove the key.

    3. Clean the grease fittings with a rag.

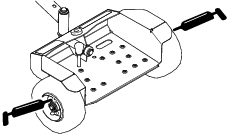
      Note: Make sure to scrape any paint off the front of the fitting(s).

    4. Connect a grease gun to the fitting.

    5. Pump grease into the fittings until grease begins to ooze out of the bearings.

    6. Wipe up any excess grease.

    g295121