Safety

General Operation

  • Do not modify the platform or use it on non–approved machines.

  • Ensure that the platform is properly attached to the machine and is in good working order prior to use.

  • Allow only the machine operator on the platform.

  • Do not allow use of the platform by untrained operators.

  • Use appropriate personal protective apparatus for eyes, feet, hands, and head.

  • Look behind and down before backing up to be sure of a clear path.

  • Use extra care when operating in reverse.

  • Dismount and latch the platform in the transport position when loading and unloading the machine.

  • Do not place your feet under the platform.

  • Slow down before turning. Sharp turns on any terrain may cause loss of control.

  • Do not step off of the platform with the load raised.

  • Keep your hands, feet, hair, and loose clothing away from any moving parts.

  • Do not try to stabilize the traction unit by putting your foot on the ground.

  • Do not operate platform on rough and uneven terrain.

  • Ensure that you operate the platform in areas where there are no obstacles in close proximity to the operator. Failure to maintain adequate distance from trees, walls, and other barriers may result in injury as the platform backs up or turns during operation if the operator is not attentive to the surroundings. Only operate the unit in areas where there is sufficient clearance for the operator to safely maneuver the platform.

  • Ensure that the area is clear of other people before operating the traction unit with the platform. Stop the traction unit if anyone enters the area.

  • Do not exceed the rated operating capacity, as the traction unit with the platform may become unstable which may result in loss of control.

Service

  • Stop the engine before performing any service, repairs, maintenance, or adjustments

  • Keep nuts and bolts tight. Keep equipment clean and in good condition.

  • Never tamper with safety devices. Check safety systems for proper operation before each use.

  • Stop and inspect the equipment if you strike an object. Make any necessary repairs before restarting.

  • Use only genuine replacement parts to ensure that original standards are maintained.

Safety and Instructional Decals

Graphic

Safety decals and instructions are easily visible to the operator and are located near any area of potential danger. Replace any decal that is damaged or lost.

decal94-3353
decal58-6520
decal112-2744

Installation

Preparing the Traction Unit

  1. Stop the engine, lower the loader arms, set the parking brake, and remove the key.

  2. Wash all dirt and debris from the traction unit.

  3. If you are installing this kit on a TX 400 series traction unit, remove the counterweights and their fasteners from the rear of the traction unit and store them in a safe location (Figure 1).

    g004399

Installing the Platform

Parts needed for this procedure:

Platform assembly1
Bolt (1/2 x 1-1/2 inches)4
Flange-head nut (1/2 inch)4
  1. Check and tighten the bottom 2 bolts securing the lower rear panel to the frame (Figure 2).

    g004398
  2. One at a time, remove and discard the 4 bolts and nuts securing sides of the lower rear panel to the frame, replacing each with a new bolt (1/2 x 1-1/2 inches) installed from the front to hold the space as pressure is released on the rear panel (Figure 3).

    Important: Do not remove the rear panel (Figure 2).

    g004400

    Note: Figure 3 shows a TX 500 series traction unit. If you have a TX 400 series traction unit it will look slightly different, but it is configured similarly.

  3. Grab the platform handle and pull up on it to extend the platform (Figure 4).

    g004401
  4. By hand, loosen, but do not remove, the 4 bolts and nuts securing the platform assembly to the mounting brackets (Figure 4).

  5. Install the mounting brackets (Figure 5) onto the 4 bolts (1/2 x 1-1/2 inches) you inserted earlier, and secure them with 4 flange-head nuts (1/2 inch).

    g004402
  6. Torque the flange-nuts to 91 to 113 N∙m (67 to 83 ft-lb).

  7. Align the platform so that it is centered on the machine (Figure 4), then torque the 4 bolts and nuts securing the platform assembly to the mounting brackets to 91 to 113 N∙m (67 to 83 ft-lb).

Installing the Counterweight (TX 500 Series Traction Units Only)

Parts needed for this procedure:

Counterweight1
Bolt (1/2 x 1-1/4 inches)4
Washer4

If you are installing this kit on a TX 500 series traction unit, install the counterweight to the front of the traction unit using 4 bolts (1/2 x 1-1/4 inches) and washers (Figure 6). Apply a locking compound to the threads of the bolts before installing them. Torque the bolts to 73 to 89 N∙m (54 to 66 ft-lb).

g004782

Installing the Decal

  1. Clean the area behind the traction control (Figure 7) so that there is not dirt or grease on it.

    g004511
  2. Remove the backing from the decal and secure it in place (Figure 7).

    Note: To keep from getting bubbles under the decal, press it down in the center first and rub it outward toward the edges.

Installing the Handle

Parts needed for this procedure:

Handle1
Flange-head bolts (5/16 x 3/4 inch)2
  1. Remove the rear access cover; refer to you traction unit Operator’s Manual for instructions.

  2. Locate and drill 2 holes—9.5 mm (3/8 inch diameter) on the control panel below the loader arm lever, as shown in Figure 8.

    g004403
  3. Secure the handle to the control panel using 2 flange-head bolts (5/16 x 3/4 inch) installed from the inside (Figure 9).

    g004404
  4. Install the rear access cover.

Operation

Warning

If you step off of the platform with a heavy load raised, the machine could tip forward quickly, injuring your and/or pinning bystanders.

Do not step off of the platform with the load raised.

Warning

Unless you are carrying heavy loads or attachments, the platform with an operator will make the rear of the machine the heavy end.

Always keep the heavy end of the machine uphill when operating on slopes.

Warning

You could fall off of the platform and be seriously injured during operation.

Do not move the controls unless you are standing with both feet on the platform and your hands are holding the handles.

Folding/Unfolding the Platform

To fold the platform, lift up on the back of it and swing it towards the traction unit (Figure 10). When the latch contacts the mounting plate, the platform will slide down into the tube and will lock in place.

g004405

To unfold the platform, pull up on it until the latch releases and then swing it out and down (Figure 11).

g004406

Using the Platform

To use the platform, step onto it before starting the machine. Fully stop the machine and apply the parking brake before getting off of the platform. Use the reference bar and handle to stabilize yourself while riding on the platform.

Maintenance

Greasing the Platform

Grease all pivot joints every 8 operating hours and immediately after every washing.

Grease Type: General-purpose grease.

  1. Lower the loader arms and stop the engine. Remove the key.

  2. Clean the grease fittings with a rag.

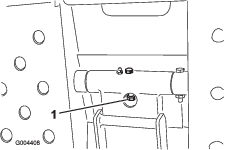
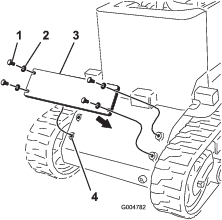
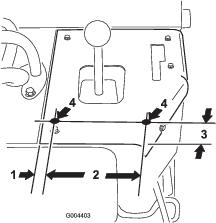
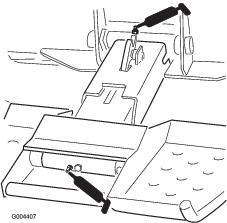
  3. Connect a grease gun to each fitting (Figure 12).

    g004407
  4. Pump grease into the fittings until grease begins to ooze out (approximately 3 pumps).

  5. Wipe up any excess grease.

Checking the Shear Bolt

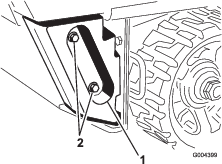
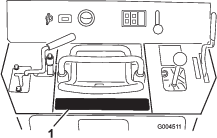
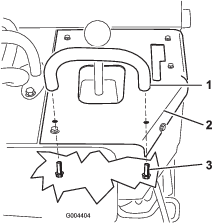
Check the shear bolt (Figure 13) for wear, cracks, or damage every 8 operating hours. Replace it if it is damaged.

Important: Use only a genuine Toro replacement shear bolt and nut. Other bolts will not function correctly and may lead to an unsafe condition.

g004408