Installation
-
Model No. 31957 installs to cutting unit Model No. 31970
-
Model No. 31958 installs to cutting unit Model No. 31972
-
Model No. 31959 installs to cutting unit Model No. 31971
-
Model No. 31960 installs to cutting unit Model No. 31973
Preparing the Machine
If your cutting unit is equipped on the machine, perform the following steps:
-
Park the machine on a level surface.
-
Engage the parking brake.
-
Lower the cutting unit.
-
Shut off the engine and remove the key.
-
Remove the cutting unit from the machine; refer to your cutting unit Operator’s Manual.
Installing the Kit
Parts needed for this procedure:
| Gearbox pulley | 1 |
| Blade | 3 |
| Side belt-cover bracket | 2 |
| Middle belt-cover bracket | 1 |
| Bolt (5/16 inch) | 3 |
| Washer | 3 |
| Push nut | 3 |
| U-nut | 3 |
| Carriage screw | 4 |
| Nut (3/8 inch) | 4 |
| Blade pulley (Model No. 31957 and 31958 only) | 3 |
| Belt (Model No. 31957 and 31958 only) | 1 |
| Thread-locking compound | 1 |
Preparing for Installation
-
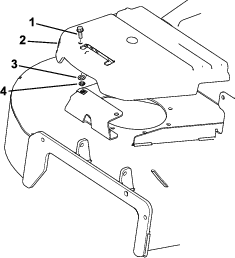
Remove the belt covers and driveshaft cover (Figure 1).
-
Remove the belt; refer to your cutting unit Operator’s Manual.
Installing the Gearbox Pulley
-
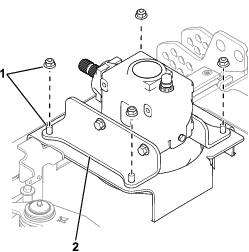
Remove the 4 sets of hardware that secures the gearbox bracket to the cutting unit (Figure 2).
-
On machines that already have the cutting unit installed: With the driveshaft connected, pull the gearbox assembly out several inches and rotate it up to gain access to the pulley.
-
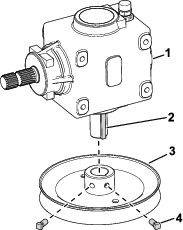
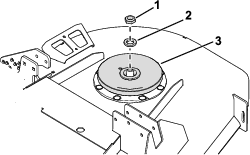
Remove the 2 square-head screws from the existing gearbox pulley (Figure 3).
-
Remove the existing pulley from the cutting unit.
-
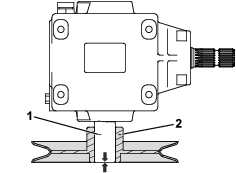
Apply anti-seize compound to the gearbox shaft (Figure 4) and keyway.
-
Loosely install the new pulley to the gearbox shaft.
-
Ensure that the shaft is flush with the pulley-hub end (Figure 4) and that the square key (Figure 3) is not protruding from the pulley hub.
-
Apply thread-locking compound to the square-head screws.
-
Use the square-head screws to secure the new pulley to the gearbox shaft (Figure 3).
-
Torque the screws to 14 to 18 N∙m (130 to 160 in-lb).
Installing the Blade Pulley
Installing the Belt-Cover Brackets
-
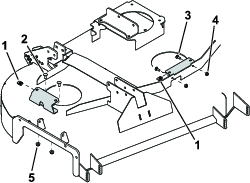
Remove the existing belt-cover brackets (Figure 6) from the cutting unit.

-
Use 4 carriage bolts and 4 nuts (3/8 inch) to secure the side belt-cover brackets to the cutting unit (Figure 7).
-
Use 2 nuts (5/16 inch) and the previously-removed carriage bolts to secure the middle belt-cover bracket to the cutting unit (Figure 7).
-
Position the U-nuts to the belt-cover brackets as shown in Figure 7.
Installing the Belt
Route the new belt around the pulleys; refer to your cutting unit Operator’s Manual.
Note: Model No. 31957 and 31958 have a new belt. Install this belt and discard the old belt.
Installing the Blades
-
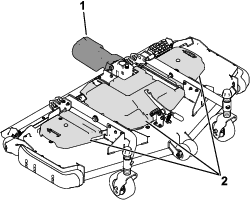
Move the cutting unit to the SERVICE position; refer to your traction unit Operator’s Manual.
-
Install the new blades; refer to your cutting unit Operator’s Manual.
Installing the Belt Covers
Use 3 push nuts, 3 washers, and 3 bolts (5/16 inch) to secure the belt covers to the belt-cover brackets (Figure 8).