Introduction

This grapple rake is intended to be used on a Toro compact utility loader. It is designed primarily for grabbing, dragging, lifting, and removing materials without picking up topsoil on residential or commercial properties. It is not designed for use on non-Toro traction units.

Read this information carefully to learn how to operate and maintain your product properly and to avoid injury and product damage. You are responsible for operating the product properly and safely.

You may contact Toro directly at www.Toro.com for product and accessory information, help finding a dealer, or to register your product.

Whenever you need service, genuine Toro parts, or additional information, contact an Authorized Service Dealer or Toro Customer Service and have the model and serial numbers of your product ready. The model and serial numbers are located on a plate on the attachment frame, in front of the mount plate. Write the numbers in the space provided.

This manual identifies potential hazards and has safety messages identified by the safety-alert symbol (Figure 1), which signals a hazard that may cause serious injury or death if you do not follow the recommended precautions.

g000502

This manual also uses 2 words to highlight information. Important calls attention to special mechanical information and Note emphasizes general information worthy of special attention.

This product complies with all relevant European directives. For details, please see the Declaration of Incorporation (DOI) at the back of this publication.

Warning

CALIFORNIA

Proposition 65 Warning

Close section

Safety

Improper use or maintenance by the operator or owner can result in injury. To reduce the potential for injury, comply with these safety instructions and those in the traction unit Operator's Manual. Always pay attention to the safety-alert symbol, which means Caution, Warning, or Danger—personal safety instruction. Failure to comply with the instruction may result in personal injury or death.

To ensure optimum performance and continued safety certification of the machine, use only genuine Toro replacement parts and accessories. Replacement parts and accessories made by other manufacturers could be dangerous, and such use could void the product warranty.

Warning

The attachment can crush and break legs, arms, and other body parts.

  • Never go near the attachment while it is in operation.

  • Keep all bystanders and pets a safe distance from the attachment.

  • Always close the jaws of the attachment when not in use.

Warning

There may be buried power, gas, and/or telephone lines in the work area. Shock or explosion may occur if you dig into them.

Have the property or work area marked for buried lines and do not dig in marked areas.

Warning

There may be overhead power lines in the work area. Shock may occur if you touch a power line with a tree or other object that you are transporting.

Survey and mark the area where there are overhead power lines, and do not transport trees or tall objects under the power lines.

Warning

When the engine is off, attachments in the raised position can gradually lower. Someone nearby may be pinned or injured by the attachment as it lowers.

Always lower the attachment lift each time you shut off the traction unit.

Always close the grapple’s jaws each time you shut off the traction unit.

Warning

If you step off the platform (wheeled traction units only) with the load raised, the machine could tip forward. Someone nearby may be pinned or injured.

Lower the load before stepping off the platform.

Warning

If you lift a long object off center, it could cause the machine to tip sideways. Someone nearby may be pinned or injured.

Always grab and lift long items near the center.

Warning

Lifting uneven, heavy objects can cause the machine to become unstable and tip forward. Someone nearby may be pinned or injured.

When lifting an object, keep it as low to the ground as possible.

Warning

When going up or down hill, the machine could overturn if the heavy end is toward the downhill side. Someone may be pinned or seriously injured by the machine if it overturns.

Operate up and down slopes with the heavy end of the machine uphill. Carrying a load with the attachment makes the front end heavy.

Warning

If you do not fully seat the attachment locking pins in the attachment mount plate holes, the attachment could fall off the traction unit, severely injuring the operator or bystanders.

  • Ensure that you fully seat the attachment locking pins through the holes in the attachment mount plate before lifting the attachment.

  • Ensure that the attachment mount plate is free of any dirt or debris that may hinder the connection of the traction unit to the attachment.

  • Refer to your traction unit Operator's Manual for detailed information on safely connecting an attachment to your traction unit.

Caution

Hydraulic couplers, hydraulic lines/valves, and hydraulic fluid may be hot and can burn you if you touch them.

  • Wear gloves when operating the hydraulic couplers.

  • Allow the traction unit to cool before touching hydraulic components.

  • Do not touch hydraulic fluid spills.

Stability Ratings

To determine the degree of slope you can traverse with the attachment installed on a traction unit, find the stability rating for the hill position you want to travel in the appropriate table below, then find the degree of slope for the same rating and hill position in the Stability Data section of the traction unit Operator's Manual.

Warning

Exceeding the maximum recommended slope can cause the traction unit to tip, crushing you or bystanders.

Do not drive the traction unit on a slope steeper than the maximum recommended slope, as determined in the following tables and the traction unit Operator's Manual.

Important: If your traction unit has wheels, use the counterweight on the platform while using the attachment, or the traction unit will become unstable.

OrientationStability Rating with a Load
Front UphillC
Graphic
Rear UphillD
Graphic
Side UphillC
Graphic
OrientationStability Rating without a Load
Front UphillD
Graphic
Rear UphillC
Graphic
Side UphillC
Graphic
Close section

Safety and Instructional Decals

Graphic

Safety decals and instructions are easily visible to the operator and are located near any area of potential danger. Replace any decal that is damaged or lost.

decal114-1280
decal114-1281
Close section
Close section

Product Overview

g030833

Note: Specifications and design are subject to change without notice.

Width87.6 cm (35.5 inches)
Length46 cm (18 inches)
Height76 cm (30 inches)
Weight120 kg (265 lb)

Attachments/Accessories

A selection of Toro approved attachments and accessories is available for use with the machine to enhance and expand its capabilities. Contact your Authorized Service Dealer or Distributor or go to www.Toro.com for a list of all approved attachments and accessories.

Close section
Close section

Operation

Refer to your traction unit Operator’s Manual for more information on installing and removing attachments on your traction unit.

Important: Always use the traction unit to lift and move the attachment.

Lifting Objects

Use the attachment to grab and lift heavy objects such as logs and rocks.

g030834

Note: Never lift more than the rated lift capacity of the attachment as listed on the decals. When transporting a load, keep it as close to the ground as possible.

Important: If you are lifting more delicate or hollow items, such as crates, close the jaws with care so as not to crush the item being moved.

Close section

Digging/Raking with the Upper Jaw

  1. To dig or rake using the upper jaw, open the jaws all the way, and tilt the attachment forward until the upper jaw teeth touch (or penetrate) the ground.

  2. Drive the machine rearwards. To rake up loose sticks and other debris, which you can then grab with the jaws, place the teeth on the ground. To dig furrows in the earth and break up the sod, penetrate the ground with the teeth.

    Note: You can also perform this operation with the jaws closed, because the upper teeth protrude through the lower jaw (Figure 4).

    g030835
  3. You can also use this method to rip out bushes. Place the upper jaw teeth into the ground on the far side of the bush and then close the jaws around the bush and roots, ripping the bush out of the ground.

Close section

Digging with the Lower Jaw

  1. To dig or rake using the lower jaw, open the jaws and lower the lower jaw teeth into the ground (Figure 5).

  2. Drive the machine forward.

    Note: This digs furrows in the earth, breaking up the sod, and also pushes any debris ahead of the attachment.

    g030836
Close section
Close section

Maintenance

Recommended Maintenance Schedule(s)

Maintenance Service IntervalMaintenance Procedure
Before each use or daily
  • Grease the pivot joints(and immediately after every washing).
  • Before storage
  • Paint chipped surfaces.
  • Caution

    If you leave the key in the traction unit ignition switch while the grapple rake is attached, someone could accidently start the engine and seriously injure you or other bystanders.

    Remove the key from the ignition switch before you do any maintenance.

    Greasing the Pivot Points

    Grease Type: General-purpose grease.

    1. Lower the loader arms, close the grapple jaws, turn the key to the OFF position, and remove the key from the ignition switch.

    2. Clean the grease fittings with a rag.

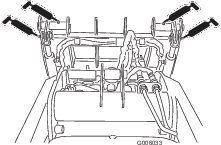
    3. Connect a grease gun to each fitting (Figure 6).

      g006033
    4. Pump grease into the fittings until grease begins to ooze out of the bearings (approximately 3 pumps).

    5. Wipe up any excess grease.

    Close section
    Close section

    Storage

    1. Before long term storage, wash the attachment with mild detergent and water to remove dirt and grime.

    2. Check and tighten all bolts, nuts, and screws. Repair or replace any damaged or worn parts.

    3. Paint all scratched or bare metal surfaces. Paint is available from your Authorized Service Dealer.

    4. Store the attachment in a clean, dry garage or storage area. Cover it to protect it and keep it clean.

    Close section