Installation
Preparing to Install the Rear Skirt Kit
Preparing the Machine
-
Park the machine on a level surface.
-
Lower the cutting units.
-
Engage the parking brake.
-
Shut off the engine and remove the key.
-
Wait for all moving parts to stop.
-
Allow the engine and exhaust system to cool completely.
Caution
If the engine has been running, the exhaust system will be hot and can burn you.
-
Keep away from the hot muffler.
-
Allow the engine and exhaust system to cool completely.
-
Raising the Operator’s Platform
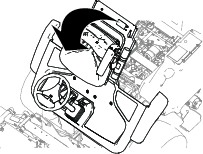
Removing the Storage Compartment
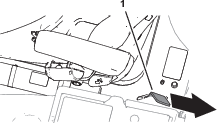
Opening the Hood
Unlatch and open the hood.
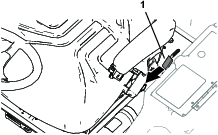
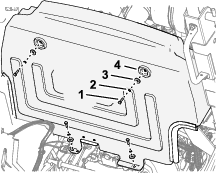
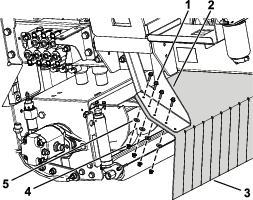
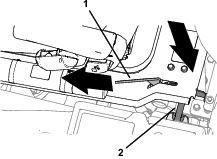
Removing the Bulkhead
Remove 4 bolts, 4 lock washers, and 4 washers that secure the bulkhead (Figure 4) to the electrical panel, and remove the bulkhead.
Note: Retain the bulkhead, bolts, lock washers, and washers.
Installing the Flap Mounts
Parts needed for this procedure:
| Left flap mount | 1 |
| Right flap mount | 1 |
| Locknut (16 mm) | 4 |
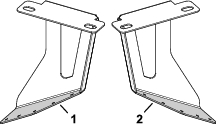
Identifying the Flap Mounts
Identify the left and right flap mounts.
Installing the Flap Mounts
-
Remove the 2 hex-head bolts (16 x 50 mm), 4 washers, and 2 locknuts (16 mm) from the left ROPS bracket (Figure 6).
Discard the 2 locknuts (16 mm); retain the 2 hex-head bolts (16 x 50 mm) and 4 washers.
-
Loosely secure the left flap mount to the left ROPS bracket using the previously removed 2 hex-head bolts (16 x 50 mm), 4 washers, and 2 new locknuts (16 mm) as shown in Figure 7.
-
Repeat steps 1 and 3 for the right flap mount.
Installing the Wide Deflector
Parts needed for this procedure:
| Wide deflector | 1 |
| Deflector strap | 1 |
| Flange-head bolt (6 x 25 mm) | 10 |
| Locknut (6 mm) | 10 |
| Washer | 8 |
-
Secure the wide deflector to the left and right flap mounts using 8 flange-head bolts (6 x 25 mm), 8 washers, and 8 locknuts (6 mm) as shown in Figure 8.
-
Secure the deflector strap to the wide deflector using 2 flange-head bolts (6 x 25 mm) and 2 locknuts (6 mm) as shown in Figure 9.
-
Torque the 4 locknuts (16 mm) that secure the flap mounts to the ROPS frame to 200 N∙m (148 ft-lb).
Completing the Rear Skirt Kit Installation
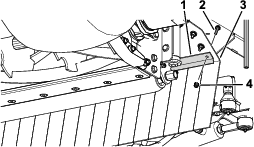
Installing the Bulkhead
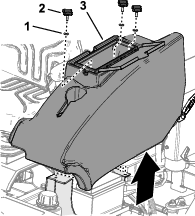
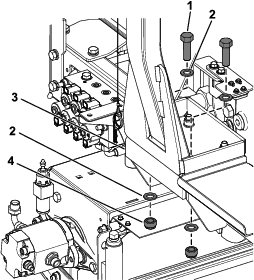
Assemble the bulkhead to the electrical panel (Figure 10) using the previously removed 4 bolts, 4 lock washers, and 4 washers.
Closing the Hood
Close and latch the hood.
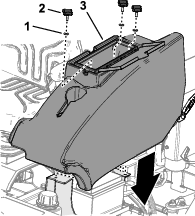
Installing the Storage Compartment
-
Align the holes on the bottom of the storage compartment with the holes in the chassis brackets.
-
Assemble the storage compartment to the machine with the 3 knobs and 3 washers (Figure 11).
-
Close the storage-compartment door.
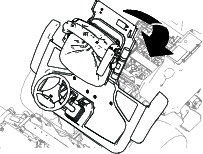
Lowering the Operator’s Platform
Warning
Operating the machine with the platform unlatched may cause you to lose control of the machine, resulting in serious injury to you and bystanders.
Never operate the machine without first checking that the operator platform latching mechanism is fully engaged and in good working order.
-
Lower the platform carefully (Figure 12).
Note: The gas cylinder helps support the platform.
-
As the platform nears the fully lowered position, move the platform-latch handle (Figure 13) toward the front of the machine.
Note: This ensures that the latch hooks clear the locking bar.
-
Fully lower the platform and move the platform-latch handle toward the rear of the machine until the latch hooks fully engage the locking bar (Figure 14).