Installation
Preparing the Machine
-
Park the machine on a level surface.
-
Disengage the blade-control switch.
-
Move the motion-control levers outward to the NEUTRAL-LOCK position.
-
Engage the parking brake.
-
Shut off the engine and remove the key.
Installing the Light Kit
Parts needed for this procedure:
| LED light | 2 |
| Hex-head screw (5/16 x 1 inch)—included with the LED light | 2 |
| Locknut (5/16 inch)—included with the LED light | 2 |
| Tube clamp | 2 |
| Wire harness | 1 |
| Rocker switch | 1 |
| Cable tie | 14 |
-
Slide or tip the seat forward.
-
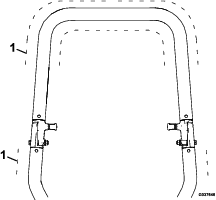
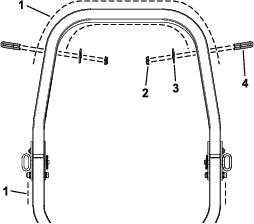
Secure the 2 tube clamps to the roll bar in the desired location (Figure 1).
-
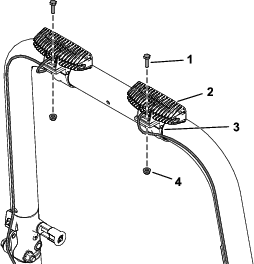
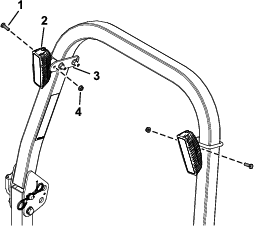
Secure the 2 LED lights to the 2 tube clamps using the 2 hex-head screw (5/16 x 1 inch) and 2 locknuts (5/16 inch) as shown in Figure 2.
Note: Do not install the LED lights where they cover ROPS decals.
-
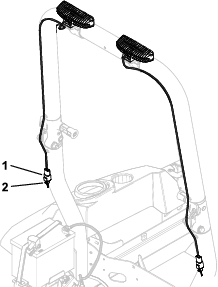
Connect the 2 LED light wire-harness connectors to the main light harness (Figure 3).
-
Remove and retain the 2 screws that secure the control panel to the right fender.
Gently lift the panel and turn it over.
-
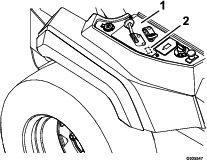
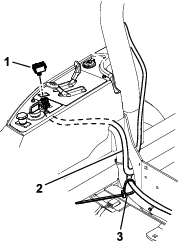
Using the control panel as a guide, carefully cut out the switch opening in the throttle/choke decal (Figure 4).
-
Separate the light switch from the wire harness.
-
Route the light harness under the ROPS mounting frame and pass the wires through the rectangular cutout on the control panel (Figure 5).
-
Place the light switch on the top side of the control panel and connect it to the light wire harness (Figure 5).
Ensure that the connectors are fully inserted onto the terminals. Carefully snap the switch into the cutout.
-
Secure the control panel to right fender using the previously removed screws.
-
Loosely secure the light harness to the main harness using cable ties (Figure 5).
-
Remove and retain the plug from the accessory connector on the machine harness. Connect the accessory connector to the light harness and secure the 2 harnesses using cable ties.
-
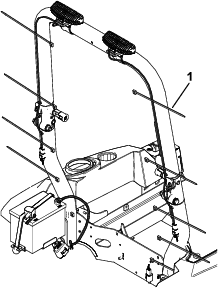
Coil the excess wire as necessary and use the remaining cable ties to secure the light harness to the machine (Figure 6).
Note: Ensure that the you can lower, raise, and lock the roll bar into place without pinching or damaging the wire harness.
Note: Ensure that cable ties do not cover ROPS decals.
Installing the Light Kit
Parts needed for this procedure:
| LED light | 2 |
| Hex-head screw (5/16 x 1 inch)—included with the LED light | 2 |
| Locknut (5/16 inch)—included with the LED light | 2 |
| Wire harness | 1 |
| Rocker switch | 1 |
| Cable tie | 14 |
| Light-mount plate | 2 |
| U-bolt | 2 |
| Locknut (3/8 inch) | 4 |
-
Slide or tip the seat forward.
-
Secure the 2 light-mount plates to the roll bar using 2 U-bolts and 2 locknuts (3/8 inch) in the desired location (Figure 7).
-
Secure the 2 LED lights to the 2 light-mount plates using the 2 hex-head screw (5/16 x 1 inch) and 2 locknuts (5/16 inch) as shown in Figure 8.
Note: Do not install the LED lights where they cover ROPS decals.
-
Connect the 2 LED light wire-harness connectors to the main light harness (Figure 3).
-
Remove and retain the 2 screws that secure the control panel to the right fender.
Gently lift the panel and turn it over.
-
Using the control panel as a guide, carefully cut out the switch opening in the throttle/choke decal (Figure 4).
-
Separate the light switch from the wire harness.
-
Route the light harness under the ROPS mounting frame and pass the wires through the rectangular cutout on the control panel (Figure 5).
-
Place the light switch on the top side of the control panel and connect it to the light wire harness (Figure 5).
Ensure that the connectors are fully inserted onto the terminals. Carefully snap the switch into the cutout.
-
Secure the control panel to right fender using the previously removed screws.
-
Loosely secure the light harness to the main harness using cable ties (Figure 5).
-
Remove and retain the plug from the accessory connector on the machine harness. Connect the accessory connector to the light harness and secure the 2 harnesses using cable ties.
-
Coil the excess wire as necessary and use the remaining cable ties to secure the light harness to the machine (Figure 6).
Note: Ensure that the you can lower, raise, and lock the roll bar into place without pinching or damaging the wire harness.
Note: Ensure that cable ties do not cover ROPS decals.