Installation
Preparing the Machine
-
Park the machine on a level surface.
-
Move the motion-control levers to the NEUTRAL-LOCK position.
-
Engage the parking brake.
-
Shut off the engine and remove the key.

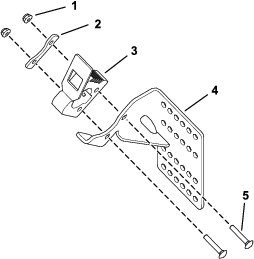
Assembling the Upper Trimmer Mount Assembly
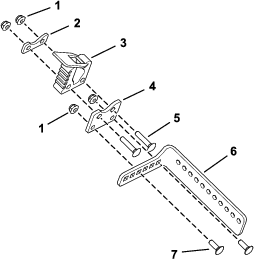
Parts needed for this procedure:
| Upper trimmer mount bracket | 1 |
| Large fist clamp | 1 |
| Large backer plate | 1 |
| Carriage bolt (1/4 x 1-1/2 inches) | 2 |
| Flange nut (1/4 inch) | 2 |
Assemble the upper trimmer mount assembly (Figure 2).
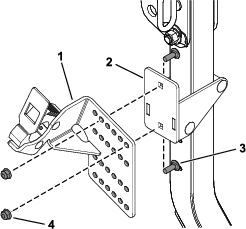
Securing the Upper Trimmer Mount Assembly to the Support Bracket
Parts needed for this procedure:
| Carriage bolt (5/16 x 7/8 inch) | 2 |
| Flange nut (5/16 inch) | 2 |
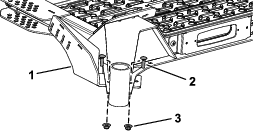
Secure the upper trimmer mount assembly to the support bracket using 2 carriage bolts (5/16 x 7/8 inch) and 2 flange nuts (5/16 inch) as shown in Figure 3.
Note: Multiple mounting hole locations are provided to adjust the mounting position of the trimmer for clearance.
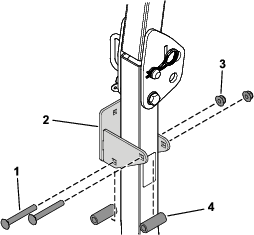
Installing the Support Bracket
Parts needed for this procedure:
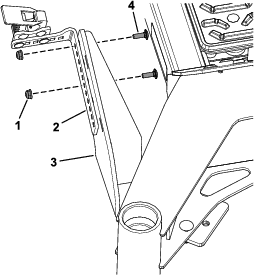
| Support bracket | 1 |
| Tube spacer | 2 |
| Carriage bolt (3/8 x 3 inches) | 2 |
| Flange nut (3/8 inch) | 2 |
-
Lower the roll bar.
-
Install the support bracket to the right post of the roll bar using 2 tube spacers, 2 carriage bolts (3/8 x 3 inches), and 2 flange nuts (3/8 inch) as shown in Figure 4.
-
Slowly raise the roll bar and ensure that there is no interference between the roll bar and support bracket.
Adjust the height of the support bracket if there is contact.
Installing the Lower Trimmer Mount Assembly
Parts needed for this procedure:
| Lower trimmer mount assembly | 1 |
| Flange nut (3/8 inch) | 2 |
| Carriage bolt (3/8 x 1-1/4 inches)—for machines with the Bagger Kit installed | 2 |
| Hex-head bolt (3/8 x 1 inch)—for machines without the Bagger Kit installed | 2 |
If the Bagger Kit is installed with the front caster weights on your machine, use the 2 carriage bolts (3/8 x 1-1/4 inches) when installing the lower trimmer mount assembly.
If the Bagger Kit is not installed on your machine, use the 2 hex-head bolts (3/8 x 1 inch) when installing the lower trimmer mount assembly.
Secure the lower trimmer mount assembly using the holes shown in Figure 5 for 48-inch and 52-inch mower decks or 60-inch mower decks.
Install the lower trimmer mount assembly near the tie-down hook mounting location on the front, right side of the frame using 2 carriage bolts (3/8 x 1-1/4 inches) or 2 hex-head bolts (3/8 x 1 inch) and 2 flange nuts (3/8 inch) as shown in Figure 6.
Assembling the Trimmer Mount Bracket
Parts needed for this procedure:
| Trimmer mount bracket | 1 |
| Fist-mount plate | 1 |
| Small fist clamp | 1 |
| Small backer plate | 1 |
| Flange nut (1/4 inch) | 4 |
| Carriage bolt (1/4 x 3/4 inch) | 2 |
| Carriage bolt (1/4 x 1-1/4 inches) | 2 |
Assemble the trimmer mount bracket (Figure 7).
Securing the Trimmer Mount Bracket to the Lower Trimmer Mount Assembly
Parts needed for this procedure:
| Carriage bolt (1/4 x 3/4 inch) | 2 |
| Flange nut (1/4 inch) | 2 |
-
Fully lower the mower deck.
-
Secure the trimmer mount bracket assembly to the lower trimmer mount assembly using 2 carriage bolts (1/4 x 3/4 inch) and 2 flange nuts (1/4 inch) as shown in Figure 8.
Note: Multiple mounting hole locations are provided to adjust the mounting position of the trimmer for clearance.
Securing a Trimmer to the Mount Assemblies
Insert the handle end of the trimmer into the large fist clamp and the trimming end into the small fist clamp.
Check the fit of the trimmer for interference, and adjust the mounting hole locations as required for clearance to the machine. Ensure that all the fasteners are tightened after any adjustments.